
Copyright © 2013 Richard Dallaway. All rights reserved.
Printed in the United States of America.
Published by O'Reilly Media, Inc., 1005 Gravenstein Highway North, Sebastopol, CA 95472.
O'Reilly books may be purchased for educational, business, or sales promotional use. Online editions are also available for most titles (http://safaribooksonline.com). For more information, contact our corporate/institutional sales department: 800-998-9938 or corporate@oreilly.com.
See http://oreilly.com/catalog/errata.csp?isbn=9781449362683 for release details.
The O'Reilly logo is a registered trademark of O'Reilly Media, Inc. Lift Cookbook, the cover image, and related trade dress are trademarks of O'Reilly Media, Inc.
While the publisher and the authors have used good faith efforts to ensure that the information and instructions contained in this work are accurate, the publisher and the authors disclaim all responsibility for errors or omissions, including without limitation responsibility for damages resulting from the use of or reliance on this work. Use of the information and instructions contained in this work is at your own risk. If any code samples or other technology this work contains or describes is subject to open source licenses or the intellectual property rights of others, it is your responsibility to ensure that your use thereof complies with such licenses and/or rights.
978-1-449-36268-3
[LSI]
This is a collection of solutions to questions you might have while developing web applications with the Lift Web Framework.
The aim is to give a single, short answer to a specific question. When there are multiple approaches, or styles, we’ll give you one solution, but will point you at alternatives in the discussion.
Installing and Running Lift will get you up and running with Lift, but in other respects, this cookbook is aimed at practitioners and the questions they have asked. If this is the first time you’ve heard of Lift, you’ll want to look at:
Torsten Uhlmann’s Instant Lift Web Applications How-to (PACKT Publishing)
Timothy Perrett’s Lift in Action (Manning Publications)
I’ve mined the Lift mailing list for these recipes, but I’m not the only one. Recipes have been contributed by:
Jono Ferguson, who’s a Scala consultant based in Sydney, Australia. He can be found lurking on the Lift mailing list and occasionally helps out with Lift modules. Find him at https://twitter.com/jonoabroad and http://underscoreconsulting.com.
Franz Bettag, who’s been an enthusiastic Scala hacker for several years now. He joined the Lift team in January 2012 and actively tweets and blogs about his newest Scala adventures. Find him at https://twitter.com/fbettag.
Marek Żebrowski.
Peter Robinett, who’s a web and mobile developer and a Lift committer. He can be found on the Web and on Twitter.
Kevin Lau, who’s a founder of a few web apps with a focus in AWS cloud, iOS, and Lift.
Tony Kay.
Chenguang He.
You should join them: How to Add a New Recipe to This Cookbook tells you how.
The text of this cookbook is at https://github.com/d6y/lift-cookbook.
You’ll find projects for each chapter on GitHub.
Follow @LiftCookbook on Twitter.
Except where otherwise indicated, the examples use Lift 2.6 with SBT 0.13 and Scala 2.11.
The following typographical conventions are used in this book:
Indicates new terms, URLs, email addresses, filenames, and file extensions.
Constant widthUsed for program listings, as well as within paragraphs to refer to program elements such as variable or function names, databases, data types, environment variables, statements, and keywords.
Constant width boldShows commands or other text that should be typed literally by the user.
Constant width italicShows text that should be replaced with user-supplied values or by values determined by context.
This icon signifies a tip, suggestion, or general note.
This icon indicates a warning or caution.
This book is here to help you get your job done. In general, if this book includes code examples, you may use the code in this book in your programs and documentation. You do not need to contact us for permission unless you’re reproducing a significant portion of the code. For example, writing a program that uses several chunks of code from this book does not require permission. Selling or distributing a CD-ROM of examples from O’Reilly books does require permission. Answering a question by citing this book and quoting example code does not require permission. Incorporating a significant amount of example code from this book into your product’s documentation does require permission.
We appreciate, but do not require, attribution. An attribution usually includes the title, author, publisher, and ISBN. For example: “Lift Cookbook by Richard Dallaway (O’Reilly). Copyright 2013 Richard Dallaway, 978-1-449-36268-3.”
If you feel your use of code examples falls outside fair use or the permission given above, feel free to contact us at permissions@oreilly.com.
Safari Books Online is an on-demand digital library that delivers expert content in both book and video form from the world’s leading authors in technology and business.
Technology professionals, software developers, web designers, and business and creative professionals use Safari Books Online as their primary resource for research, problem solving, learning, and certification training.
Safari Books Online offers a range of plans and pricing for enterprise, government, education, and individuals.
Members have access to thousands of books, training videos, and prepublication manuscripts in one fully searchable database from publishers like O’Reilly Media, Prentice Hall Professional, Addison-Wesley Professional, Microsoft Press, Sams, Que, Peachpit Press, Focal Press, Cisco Press, John Wiley & Sons, Syngress, Morgan Kaufmann, IBM Redbooks, Packt, Adobe Press, FT Press, Apress, Manning, New Riders, McGraw-Hill, Jones & Bartlett, Course Technology, and hundreds more. For more information about Safari Books Online, please visit us online.
Please address comments and questions concerning this book to the publisher:
We have a web page for this book, where we list errata, examples, and any additional information. You can access this page at http://oreil.ly/lift-cookbook.
To comment or ask technical questions about this book, send email to bookquestions@oreilly.com.
For more information about our books, courses, conferences, and news, see our website at http://www.oreilly.com.
Find us on Facebook: http://facebook.com/oreilly
Follow us on Twitter: http://twitter.com/oreillymedia
Watch us on YouTube: http://www.youtube.com/oreillymedia
These recipes exist because of the many contributions on the Lift mailing list, where Liftafarians, as they are known, generously give their time to ask questions, put together example projects, give answers, share alternatives, and chip in with comments. Thank you.
I am indebted to the contributors who have taken the trouble to write new recipes, and to those who have provided corrections and suggestions.
You’ll see I’ve repeatedly referenced the work of Antonio Salazar Cardozo, Diego Medina, Tim Nelson, David Pollak, and Dave Whittaker. These are fantastic communicators: thank you guys.
It’s been a pleasure working with the O’Reilly team, and they have immensely improved the text. Thank you, especially Meghan Blanchette, Kara Ebrahim, and Kiel Van Horn.
Many thanks to Jono for all the encouragement and help.
To Jane, Mum, Dad: thank you. It’s amazing what you can do with a supportive family.
This chapter covers questions regarding starting development with Lift: running a first Lift application and setting up a coding environment. You’ll find answers regarding production deployment in Production Deployment.
The only prerequisite for installing and running Lift is to have Java 1.7 or later installed. Instructions for installing Java can be found at http://java.com/.
You can find out if you have Java from the shell or command prompt by asking for the version you have installed:
$ java -version
java version "1.7.0_13"
Java(TM) SE Runtime Environment (build 1.7.0_13-b20)
Java HotSpot(TM) 64-Bit Server VM (build 23.7-b01, mixed mode)
Once you have Java, the following instructions will download, build, and start a basic Lift application.
Visit http://liftweb.net/download and download the most recent Lift 2.6 ZIP file.
Unzip the file.
Start Terminal or your favourite shell tool.
Navigate into the unzipped folder and into the scala_211 subfolder and then into the lift_basic folder.
Run ./sbt.
Required libraries will be downloaded automatically.
At the SBT prompt (>), type container:start.
Open your browser and go to http://127.0.0.1:8080/.
When you’re done, type exit at the SBT prompt to stop your application from running.
Visit http://liftweb.net/download and locate the link to the most recent ZIP version of Lift 2.6 and save this to disk.
Extract the contents of the ZIP file.
Navigate in Explorer to the extracted folder, and once inside, navigate into scala_211 and then lift_basic.
Double-click sbt.bat to run the build tool; a Terminal window should open.
Some versions of windows will display a warning that the SBT "publisher could not be verified". Click "Run" if this happens.
Required libraries will be downloaded automatically.
At the SBT prompt (>), type container:start.
You may find Windows Firewall blocking Java from running. If so, opt to "allow access."
Start your browser and go to http://127.0.0.1:8080/.
When you’re done, type exit at the SBT prompt to stop your application from running.
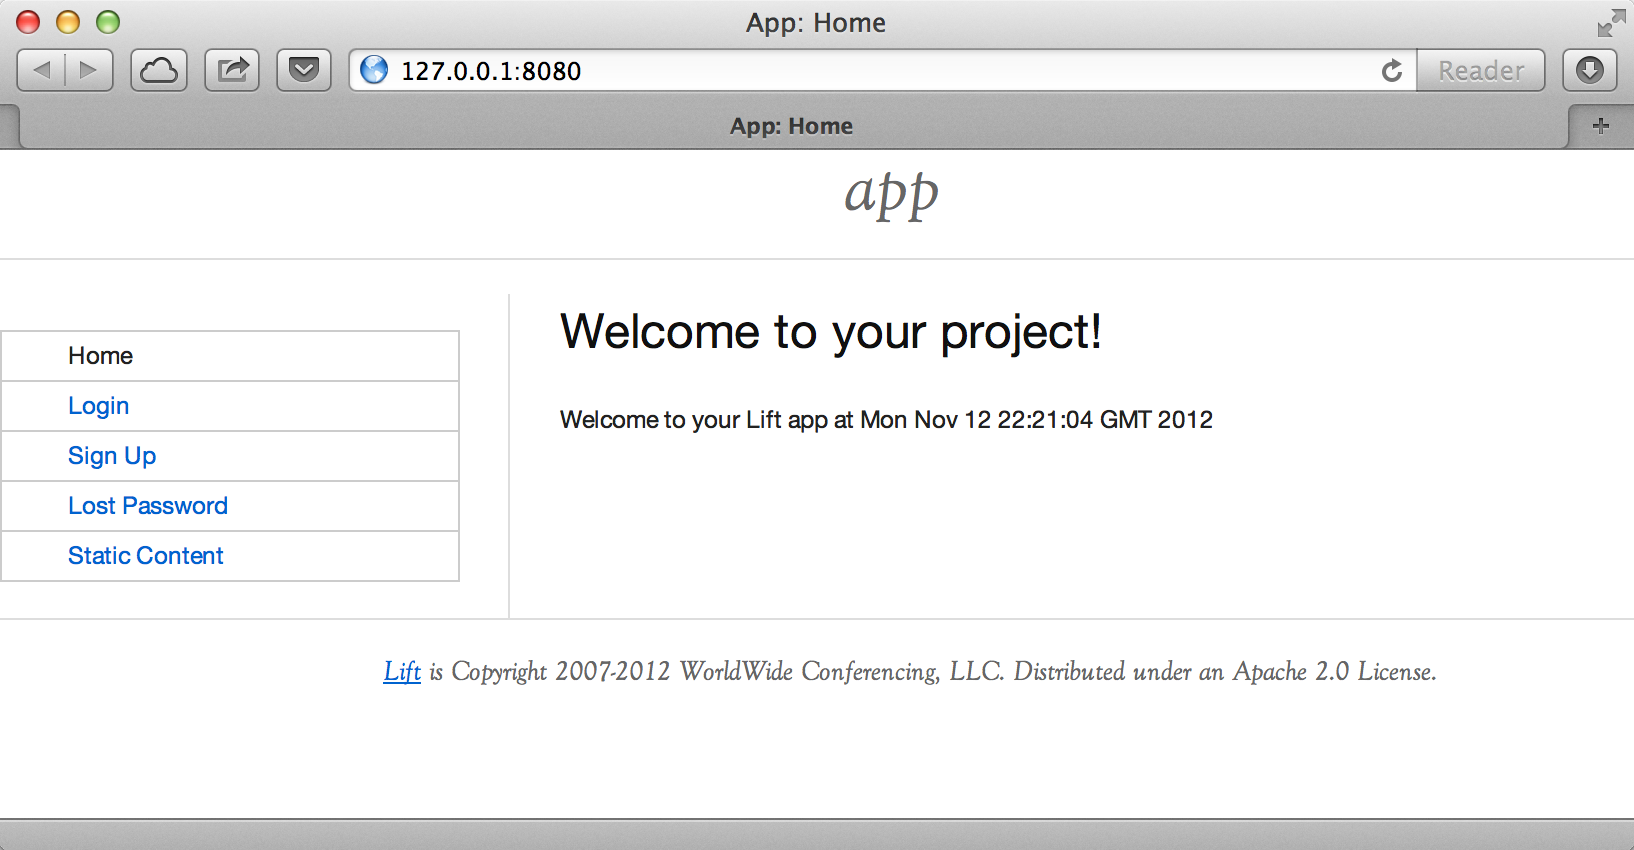
The result of these commands should be a basic Lift application running on your computer, as shown in Figure 1-1.
Lift isn’t installed in the usual sense of "installing software." Instead, you use standard build tools, such as SBT or Maven, to assemble your application with the Lift framework. In this recipe, we downloaded a ZIP file containing four fairly minimal Lift applications, and then started one of them via the build tool.
Typing sbt starts a Simple Build Tool used by Scala projects (it’s not specific to Lift). SBT will check the project definition and download any libraries required, which will include the Lift framework.
This download happens once, and the downloaded files are stored on disk in .ivy2 under your home folder.
Your application build is configured by build.sbt. Looking inside, you’ll see:
Basic information about your application, including a name and version
Resolvers, which inform SBT where to fetch dependencies from
Settings for plugins and the Scala compiler
A list of dependencies required to run your application, which will include the Lift framework
The SBT command container:start starts the web server on the default port of 8080 and
passes requests to your Lift application. The word container refers to the
software you deploy your application into. There are a variety of containers (Jetty and
Tomcat are probably the best known) all of which conform to a standard for deployment.
The upshot is you can build your application and deploy to whichever one you prefer.
The container:start command uses Jetty.
The source code of the application resides in src/main/webapp and src/main/scala. If you take a look at index.html in the webapp folder, you’ll see mention of data-lift="helloWorld.howdy". That’s a reference to the class defined in scala/code/snippet/HelloWorld.scala. This is a snippet invocation and an example of Lift’s view first approach to web applications. That is, there’s no routing set up for the index page to collect the data and forward it to the view. Instead, the view defines areas of the content that are replaced with functions, such as those functions defined in HelloWorld.scala.
Lift knows to look in the code package for snippets, because that package is declared as a location for snippets in scala/bootstrap/liftweb/Boot.scala. The Boot class is run when starting your application, and it’s where you can configure the behaviour of Lift.
The Simple Build Tool documentation is at http://www.scala-sbt.org.
Tutorials for Lift can be found in Simply Lift, Instant Lift Web Applications How-to (PACKT Publishing), and in Lift in Action (Manning Publications Co.).
You want to create a Lift web project from scratch without using the ZIP files provided on the official Lift website.
You will need to configure SBT and the Lift project yourself. Luckily, only five small files are needed.
First, create an SBT plugin file at project/plugins.sbt (all filenames are given relative to the project root directory):
addSbtPlugin("com.earldouglas"%"xsbt-web-plugin"%"0.7.0")
This file tells SBT that you will be using the xsbt-web-plugin. This plugin will allow you to start and stop your application.
Next, create an SBT build file, build.sbt:
organization:="org.yourorganization"name:="liftfromscratch"version:="0.1-SNAPSHOT"scalaVersion:="2.11.1"seq(webSettings:_*)libraryDependencies++={valliftVersion="2.6-RC1"Seq("net.liftweb"%%"lift-webkit"%liftVersion%"compile","org.eclipse.jetty"%"jetty-webapp"%"8.1.7.v20120910"%"container,test","org.eclipse.jetty.orbit"%"javax.servlet"%"3.0.0.v201112011016"%"container,compile"artifactsArtifact("javax.servlet","jar","jar"))}
Feel free to change the various versions, though be aware that certain versions of Lift are only built for certain versions of Scala.
Now that you have the basics of an SBT project, you can launch the sbt console. It should load all the necessary dependencies, including the proper Scala version, and bring you to a prompt.
Next, create the following file at src/main/webapp/WEB-INF/web.xml:
<!DOCTYPE web-app SYSTEM "http://java.sun.com/dtd/web-app_2_3.dtd"><web-app><filter><filter-name>LiftFilter</filter-name><display-name>Lift Filter</display-name><description>The Filter that intercepts Lift calls</description><filter-class>net.liftweb.http.LiftFilter</filter-class></filter><filter-mapping><filter-name>LiftFilter</filter-name><url-pattern>/*</url-pattern></filter-mapping></web-app>
The web.xml file tells web containers, such as Jetty as configured by xsbt-web-plugin, to pass all requests on to Lift.
Next, create a sample index.html file at src/main/webapp/index.html for our Lift app to load. For example:
<!DOCTYPE html><html><head><title>Lift From Scratch</title></head><body><h1>Welcome, you now have a working Lift installation</h1></body></html>
Finally, set up the basic Lift boot settings by creating a Boot.scala file at src/main/scala/bootstrap/Boot.scala. The following contents will be sufficient:
packagebootstrap.liftwebimportnet.liftweb.http.{Html5Properties,LiftRules,Req}importnet.liftweb.sitemap.{Menu,SiteMap}/*** A class that's instantiated early and run. It allows the application* to modify lift's environment*/classBoot{defboot{// where to search snippetLiftRules.addToPackages("org.yourorganization.liftfromscratch")// Build SiteMapdefsitemap():SiteMap=SiteMap(Menu.i("Home")/"index")// Use HTML5 for renderingLiftRules.htmlProperties.default.set((r:Req)=>newHtml5Properties(r.userAgent))}}
Congratulations, you now have a working Lift project!
You can verify that you have a working Lift project by launching the Jetty web container from the SBT console with the container:start command. First, the Boot.scala file should be compiled and then you should be notified that Jetty has launched and is listening at http://localhost:8080. You should be able to go to the address in your web browser and see the rendered index.html file you created earlier.
As shown previously, creating a Lift project from scratch is a relatively simple process. However, it can be a tricky one for newcomers, especially if you are not used to the Java Virtual Machine (JVM) ecosystem and its conventions for web containers. If you run into problems, make sure the files are in the correct locations and that their contents were not mistakenly modified. If all else fails, refer to the sample project next or ask for help on the Lift mailing list.
Lift projects using SBT or similar build tools follow a standard project layout, where Scala source code is in src/main/scala and web resources are in src/main/webapp. Your Scala files must be placed either directly at src/main/scala or in nested directories matching the organization and name you defined in build.sbt, in our case giving us src/main/scala/org/yourorganization/liftfromscratch/. Test files match the directory structure but are placed in src/test/ instead of src/main/. Likewise, the web.xml file must be placed in src/main/webapp/WEB-INF/ for it to be properly detected.
Given these conventions, you should have a directory structure looking quite, if not exactly, like this:
- project root directory
  | build.sbt
  - project/
    | plugins.sbt
  - src/
    - main/
      - scala/
        - bootstrap/
          | Boot.scala
        - org/
          - yourorganization/
            - liftfromscratch/
              | <your Scala code goes here>
      - webapp/
        | index.html
        | <any other web resources - images, HTML, JavaScript, etc - go here>
        - WEB-INF/
          | web.xml
    - test/
      - scala/
        - org/
          - yourorganization/
            - liftfromscratch/
              | <your tests go here>
There is a sample project created using this method.
You want to develop your Lift application using your favourite text editor, hitting reload in your browser to see changes.
Run SBT while you are editing, and ask it to detect and compile changes to Scala files. To do that, start sbt and enter the following to the SBT prompt:
~; container:start; container:reload /
When you save a source file in your editor, SBT will detect this change, compile the file, and reload the web container.
An SBT command prefixed with ~ makes that command run when files
change. The first semicolon introduces a sequence of commands, where if
the first command succeeds, the second will run. The second semicolon
means the reload command will run if the start command ran OK. The start
command will recompile any Scala source files that have changed.
When you run SBT in this way, you’ll notice the following output:
1. Waiting for source changes... (press enter to interrupt)
And indeed, if you do press Enter in the SBT window, you’ll exit this triggered execution mode and SBT will no longer be looking for file changes. However, while SBT is watching for changes, the output will indicate when this happens with something that looks a little like this:
[info] Compiling 1 Scala source to target/scala-2.11/classes...
[success] Total time: 1 s, completed 26-Aug-2014 17:17:47
[pool-301-thread-4] DEBUG net.liftweb.http.LiftServlet - Destroyed Lift handler.
[info] stopped o.e.j.w.WebAppContext{/,[src/main/webapp/]}
[info] NO JSP Support for /, did not find org.apache.jasper.servlet.JspServlet
[info] started o.e.j.w.WebAppContext{/,[src/main/webapp/]}
[success] Total time: 0 s, completed 26-Aug-2014 17:17:48
2. Waiting for source changes... (press enter to interrupt)
Edits to HTML files don’t trigger the SBT compile and reload commands. This is because SBT’s default behaviour is to look for Scala and Java source file changes, and also changes to files in src/main/resources/. This works out just fine, because Jetty will use your modified HTML file when you reload the browser page.
Restarting the web container each time you edit a Scala file isn’t ideal. You can reduce the need for restarts by integrating JRebel into your development environment, as described in Incorporating JRebel.
However, if you are making a serious number of edits, you may prefer to issue a container:stop command until you’re ready to run you application again with container:start. This will prevent SBT compiling and restarting your application over and over. The SBT console has a command history, and using the up and down keyboard arrows allows you to navigate to previous commands and run them by pressing the Return key. That takes some of the tedium out of these long commands.
If you are using Java before Java 8, one error you may run into is:
java.lang.OutOfMemoryError: PermGen space
The permanent generation is a Java Virtual Machine concept. It’s the area of memory used for storing classes (amongst other things). It’s a fixed size, and once it is full, this PermGen error appears. As you might imagine, continually restarting a container causes many classes to be loaded and unloaded, but the process is not perfect, effectively leaking memory. The best you can do is stop and then restart SBT. If you’re seeing this error often, check the setting for -XX:MaxPermSize inside the sbt (or sbt.bat) script, and if you can, double it.
Triggered execution has a number of settings you can adjust, as described in the SBT documentation.
See the SBT Command Line Reference for an overview of available commands.
Commands and configuration options for the SBT web plugin are described on the GitHub wiki.
You want to avoid application restarts when you change a Scala source file by using JRebel.
There are three steps required: install JRebel once; each year, request the free Scala license; and configure SBT to use JRebel.
First, visit https://my.jrebel.com/plans and request the free Scala license.
Second, download the "Generic ZIP Archive" version of JRebel, unzip it to where you like. For this recipe, I’ve chosen to use /opt/zt/jrebel/.
When you have received your account confirmation email from JRebel, you can copy your "authentication token" from the "Active" area of ZeroTurnaround’s site. To apply the token to your local install, run the JRebel configuration script:
$ /opt/zt/jrebel/bin/jrebel-config.sh
For Windows, navigate to and launch bin\jrebel-config.cmd.
In the "Activation" setting, select "I want to use myJRebel" and then in the "License" section, paste in your activation token. Click the "Activate" button, and once you see the license status change to "You have a valid myJRebel token," click "Finish."
Finally, configure SBT by modifying the sbt script to enable JRebel. This means setting the -javaagent and -noverify flags for Java, and enabling the JRebel Lift plugin.
For Mac and Linux, the script that’s included with the Lift downloads would become:
java -Drebel.lift_plugin=true -noverify -javaagent:/opt/zt/jrebel/jrebel.jar \
 -Xmx1024M -Xss2M -XX:MaxPermSize=512m -XX:+CMSClassUnloadingEnabled -jar \
 `dirname $0`/sbt-launch-0.12.jar "$@"
For Windows, modify sbt.bat to be:
set SCRIPT_DIR=%~dp0
java -Drebel.lift_plugin=true -noverify -javaagent:c:/opt/zt/jrebel/jrebel.jar \
 -XX:+CMSClassUnloadingEnabled -XX:MaxPermSize=256m -Xmx1024M -Xss2M \
 -jar "%SCRIPT_DIR%\sbt-launch-0.12.jar" %*
There’s nothing else to do to use JRebel. When you start SBT, you’ll see a large banner stating something like this:
#############################################################

  JRebel 5.1.1 (201211271929)
  (c) Copyright ZeroTurnaround OU, Estonia, Tartu.

  Over the last 30 days JRebel prevented
  at least 335 redeploys/restarts saving you about 13.6 hours.
....
With JRebel installed, you can now container:start your application, modify and compile a Scala file, and reload a page in your application. You’ll see a notice that the class has been reloaded:
[2012-12-16 23:15:44] JRebel: Reloading class 'code.snippet.HelloWorld'.
That change is live, without having to restart the container.
JRebel is very likely to speed up your development. It updates code in a running Java Virtual Machine, without having to stop and restart it. The effect is that, on the whole, you can compile a class, then hit reload in your browser to see the change in your Lift application.
Even with JRebel you will need to restart your applications from time to time, but JRebel usually reduces the number of restarts. For example, Boot.scala is run when your application starts, so if you modify something in your Boot.scala, you’ll need to stop and start your application. JRebel can’t help with that.
But there are also other situations that JRebel cannot help with, such as when a superclass changes. Generally, JRebel will emit a warning about this in the console window. If that happens, stop and start your application.
The -Drebel.lift_plugin=true setting adds Lift-specific functionality to JRebel. Specifically, it allows JRebel to reload changes to LiftScreen, Wizard, and RestHelper. This means you can change fields or screens, and change REST serve code.
This recipe uses a free Scala license for a service called myJRebel. This communicates with JRebel servers via the activation code. If you have purchased a license from ZeroTurnaround, the situation is slightly different. In this case, you will have a license key that you store in a file called jrebel.lic. You can place the file in a .jrebel folder in your home directory, or alongside jrebel.jar (e.g., in the /opt/zt/jrebel/ folder, if that’s where you installed JRebel), or you can specify some other location. For the latter option, modify the sbt script and specify the location of the file by adding another Java setting:
-Drebel.license=/path/to/jrebel.lic
Details about how JRebel works can be found in the ZeroTurnaround FAQ.
The Lift support was announced in a blog post in 2012, where you’ll find more about the capabilities of the plugin.
You want to develop your Lift application using the Eclipse IDE, hitting reload in your browser to see changes.
Use the "Scala IDE for Eclipse" plugin to Eclipse, and the sbteclipse plugin for SBT. This will give Eclipse the ability to understand Scala, and SBT the ability to create project files that Eclipse can load.
The instructions for the Eclipse plugin are given at http://scala-ide.org. There are a number of options to be aware of when picking an update site to use: there are different sites for Scala 2.9 and 2.10, and for different versions of Eclipse. Start with the stable version of the plugin rather than a nightly or milestone version. This will give you an Eclipse perspective that knows about Scala.
Once the Eclipse plugin is installed and restarted, you need to create the project files to allow Eclipse to load your Lift project. Install sbteclipse by adding the following to projects/plugins.sbt in your Lift project:
addSbtPlugin("com.typesafe.sbteclipse"%"sbteclipse-plugin"%"2.5.0")
You can then create Eclipse project files (.project and .classpath) by entering the following into the SBT prompt:
eclipse
Open the project in Eclipse by navigating to "File → Import…" and selecting "General → Existing Projects into Workspace." Browse to and choose your Lift project. You are now set up to develop your application in Eclipse.
To see live changes as you edit and save your work, run SBT in a separate terminal window. That is, start sbt from a terminal window outside of Eclipse and enter the following:
~; container:start; container:reload /
The behaviour of this command is described in Developing Using a Text Editor, but if you’re using JRebel (see Incorporating JRebel), then you just need to run container:start by itself.
You can then edit in Eclipse, save to compile, and in your web browser, hit reload to see the changes.
One of the great benefits of an IDE is the ability to navigate source, by Cmd+click (Mac) or F3 (PC).
You can ask the SBT eclipse command to download the Lift
source and Scaladoc, allowing you to click through to the Lift source from
methods and classes, which is a useful way to discover more about Lift.
To achieve this in a project, run eclipse with-source=true in SBT, but if you want
this to be the default behaviour, add the following to your build.sbt file:
EclipseKeys.withSource:=true
If you find yourself using the plugin frequently, you may wish to declare it in your global SBT configuration files so it applies to all projects. To do that, create a ~/.sbt/0.13/plugins/build.sbt file containing:
resolvers+=Classpaths.typesafeResolveraddSbtPlugin("com.typesafe.sbteclipse"%"sbteclipse-plugin"%"2.5.0")
Note the blank line between the resolvers and the addSbtPlugin. In .sbt files, a blank line is required between statements.
Finally, set any global configurations (such as withSource) in ~/.sbt/0.13/global.sbt.
There are other useful settings for sbteclipse. You’ll also find the latest version number for the plugin on that site.
The SBT ~/.sbt/ structure is described in the guide to using plugins and in the wiki page for global configuration.
You want to use the IntelliJ IDEA development environment when writing your Lift application.
You need the Scala plugin for IntelliJ, and an SBT plugin to generate the IDEA project files.
The IntelliJ plugin you’ll need to install only once, and these instructions are for IntelliJ IDEA 13. The details may vary between releases of the IDE, but the basic idea is to find the JetBrains Scala plugin, and download and install it.
From the "Welcome to IntelliJ IDEA" or "Quick Staert" screen, select "Configure" and then "Plugins." Select "Browse repositories…" In the search box, top right, type "Scala." You’ll find on the left a number of matches: select "Scala." On the right, you’ll see confirmation that this is the "Plugin for Scala language support" and the vendor is JetBrains, Inc. Click the "Install Plugin" button, confirm you want to install, then "Close" the repository browser, and finally OK out of the plugins window. You’ll be prompted to restart IntelliJ IDEA.
With the IDE configured, you now need to include the SBT plugin inside your Lift project by adding the following to the file projects/plugins.sbt:
addSbtPlugin("com.github.mpeltonen"%"sbt-idea"%"1.6.0")
Start SBT, and at the SBT prompt, create the IDEA project files by typing:
gen-idea
This will generate the .idea and .iml files that IntelliJ uses. Inside IntelliJ you can open the project from the "File" menu, picking "Open…" and then navigating to your project and selecting the directory.
To see live changes as you edit and save your work, run SBT in a separate Terminal window. That is, start sbt from a Terminal window outside of IntelliJ and enter the following:
~; container:start; container:reload /
This behaviour of this command is described in Developing Using a Text Editor, but if you’re using JRebel (see Incorporating JRebel), then you just need to run container:start by itself.
Each time you compile or make the project, the container will pick up the changes, and you can see them by reloading your browser window.
By default, the gen-idea command will fetch source for dependent libraries. That means out of the box you can click through to Lift source code to explore it and learn more about the framework.
If you want to try the latest snapshot version of the plugin, you’ll need to include the snapshot repository in your plugin.sbt file:
resolvers+="Sonatype snapshots"at"http://oss.sonatype.org/content/repositories/snapshots/"
Setting up the SBT IDEA plugin globally, for all SBT projects, is the same pattern as described for Eclipse in Developing Using Eclipse.
The sbt-idea plugin doesn’t have a configuration guide yet. One way to discover the features is to browse the release notes in the notes folder of that project.
JetBrains has a blog for the Scala plugin with feature news and tips.
You’re developing using the default lift_proto.db H2 database, and you would like to use a tool to look at the tables.
Use the web interface included as part of H2. Here are the steps:
Locate the H2 JAR file. For me, this was: ~/.ivy2/cache/com.h2database/h2/jars/h2-1.2.147.jar.
Start the server from a Terminal window using the JAR file: java -cp /path/to/h2-version.jar org.h2.tools.Server.
This should launch your web browser, asking you to log in.
Select "Generic H2 Server" in "Saved Settings."
Enter jdbc:h2:/path/to/youapp/lift_proto.db;AUTO_SERVER=TRUE for "JDBC URL," adjusting the path for the location of your database, and adjusting the name of the database (lift_proto.db) if different in your Boot.scala.
Press "Connect" to view and edit your database.
The default Lift projects that include a database, such as lift_basic, use the H2 relational database, as it can be included as an SBT dependency and requires no external installation or configuration. It’s a fine product, although production deployments typically use standalone databases, such as PostgreSQL or MySQL.
Even if you’re deploying to a non–H2 database, it may be useful to keep H2 around because it has an in-memory mode, which is great for unit tests. This means you can create a database in memory, and throw it away when your unit test ends.
If you don’t like the web interface, the connection settings described in this recipe should give you the information you need to configure other SQL tools.
The H2 site lists the features and configuration options for database engine.
If you’re using the console frequently, consider making it accessible from your Lift application in development node. This is described by Diego Medina in a blog post.
The example Lift project for Relational Database Persistence with Record and Squeryl has the H2 console enabled.
You need to make two changes to your build.sbt file. First, reference the snapshot repository:
resolvers+="snapshots"at"http://oss.sonatype.org/content/repositories/snapshots"
Second, change the liftVersion in your build to be the latest version. For this example, let’s use the 3.0 snapshot version of Lift:
valliftVersion="3.0-SNAPSHOT"
Restarting SBT (or issuing a reload command) will trigger a download
of the latest build.
Production releases of Lift (e.g., 2.5, 2.6), as well as milestone releases (e.g., 2.6-M3) and release candidates (e.g., 2.6-RC1) are published into a releases repository. When SBT downloads them, they are downloaded once.
Snapshot releases are different: they are the result of an automated
build, and change often. You can force SBT to resolve the latest
versions by running the command clean and then update.
To learn the detail of snapshot versions, dig into the Maven Complete Reference.
A new Scala version has just been released and you want to immediately use it in your Lift project.
Providing that the Scala version is binary compatible with the latest version used by Lift, you can change your build file to use the latest version of Scala.
For example, let’s assume your build.sbt file is set up to use Lift 2.6 with Scala 2.11.1:
scalaVersion:="2.11.1"libraryDependencies++={valliftVersion="2.6"Seq("net.liftweb"%%"lift-webkit"%liftVersion%"compile->default")}
To use Scala 2.11.2, just change the value in scalaVersion.
Dependencies have a particular naming convention. For example, the lift-webkit library for Lift 2.6 is called lift-webkit_2.11-2.6.jar. Normally, in build.sbt we simply refer to "net.liftweb" %% "lift-webkit", and SBT turns that into the name of a file that can be downloaded.
If for any reason you need to control the dependency downloaded, you can drop the %% and use % instead:
scalaVersion:="2.11.2"libraryDependencies++={valliftVersion="2.6"Seq("net.liftweb"%"lift-webkit_2.11"%liftVersion%"compile->default")}
What we’ve done here is explicitly specified we want the 2.11 Scala version for Lift. This is the difference between using %% and % in a
dependency: with %% you do not specify the Scala version, as SBT will append
the scalaVersion number automatically; with % this automatic change is not made,
so we have to manually specify more details for the name of the library.
Please note this only works for minor releases of Scala: major releases break compatibility. For example, Scala 2.10.1 is compatible with Scala 2.10.2 but not 2.11.
Binary compatibility in Scala is discussed on the Scala user mailing list.
The SBT Library Dependencies page describes how SBT manages version numbers.
Using the Latest Lift Build describes how to use a snapshot version of Lift.
Generating HTML is often a major component of web applications. This chapter is concerned with Lift’s View First approach and use of CSS Selectors. Later chapters focus more specifically on form processing, REST web services, JavaScript, Ajax, and Comet.
Code for this chapter is at https://github.com/LiftCookbook/cookbook_html.
You can use the Scala REPL to run your CSS selectors.
Here’s an example where we test out a CSS selector that adds an href attribute to a link.
Start from within SBT and use the console command to get into the REPL:
> console
[info] Starting scala interpreter...
[info]
Welcome to Scala version 2.9.1.final
Type in expressions to have them evaluated.
Type :help for more information.
scala>importnet.liftweb.util.Helpers._importnet.liftweb.util.Helpers._scala>valf="a [href]"#>"http://example.org"f:net.liftweb.util.CssSel=(Full(a[href]),Full(ElemSelector(a,Full(AttrSubNode(href)))))scala>valin=<a>clickme</a>in:scala.xml.Elem=<a>clickme</a>scala>f(in)res0:scala.xml.NodeSeq=NodeSeq(<ahref="http://example.org">clickme</a>)
The Helpers._ import brings in the CSS selector functionality, which we then exercise by creating a selector, f, calling it with a very simple template, in, and observing the result, res0.
CSS selector transforms are one of the distinguishing features of Lift. They succinctly describe a node in your template (lefthand side) and give a replacement (operation, the righthand side). They do take a little while to get used to, so being able to test them at the Scala REPL is useful.
It may help to know that prior to CSS selectors, Lift snippets were typically defined in terms
of a function that took a NodeSeq and returned a NodeSeq, often via a method called bind. Lift would take your template, which would be the input NodeSeq, apply the function, and return a new NodeSeq. You won’t see that usage so often anymore, but the principle is the same.
The CSS selector functionality in Lift gives you a CssSel function,
which is NodeSeq => NodeSeq. We exploit this in the previous example by constructing an input
NodeSeq (called in), then creating a CSS function (called f). Because we know that CssSel
is defined as a NodeSeq => NodeSeq, the natural way to execute the selector is to supply
the in as a parameter, and this gives us the answer, res0.
If you use an IDE that supports a worksheet, which both Eclipse and IntelliJ IDEA do, then you can also run transformations in a worksheet.
The syntax for selectors is best described in Simply Lift.
See Developing Using Eclipse and Developing Using IntelliJ IDEA for how to work with Eclipse and IntelliJ IDEA.
You want your CSS selector binding to apply to the results of earlier binding expressions.
Use andThen rather than & to compose your selector expressions.
For example, suppose we want to replace <div id="foo"/> with
<div id="bar">bar content</div> but for some reason we need to
generate the bar div as a separate step in the selector expression:
sbt> console
[info] Starting scala interpreter...
[info]
Welcome to Scala version 2.9.1.final (Java 1.7.0_05).
Type in expressions to have them evaluated.
Type :help for more information.
scala>importnet.liftweb.util.Helpers._importnet.liftweb.util.Helpers._scala>defrender="#foo"#><divid="bar"/>andThen"#bar *"#>"bar content"render:scala.xml.NodeSeq=>scala.xml.NodeSeqscala>render(<divid="foo"/>)res0:scala.xml.NodeSeq=NodeSeq(<divid="bar">barcontent</div>)
When using &, think of the CSS selectors as always applying to the
original template, no matter what other expressions you are combining.
This is because & is aggregating the selectors together before applying them. In contrast, andThen is
a method of all Scala functions that composes two functions together, with the first being
called before the second.
Compare the previous example if we change the andThen to
&:
scala>defrender="#foo"#><divid="bar"/>&"#bar *"#>"bar content"render:net.liftweb.util.CssSelscala>render(<divid="foo"/>)res1:scala.xml.NodeSeq=NodeSeq(<divid="bar"></div>)
The second expression will not match, as it is applied to the original
input of <div id="foo"/>—the selector of #bar won’t match on id=foo,
and so adds nothing to the results of render.
The Lift wiki page for CSS selectors also describes this use of andThen.
You want to set the content of an HTML meta tag from a snippet.
Use the @ CSS binding name selector. For example, given:
<metaname="keywords"content="words, here, please"/>
The following snippet code will update the value of the content attribute:
"@keywords [content]"#>"words, we, really, want"
The @ selector selects all elements with the given name. It’s useful in this case to change the <meta name="keyword"> tag, but you may also see it used elsewhere. For example, in an HTML form, you can select input fields such as <input name="address"> with "@address".
The [content] part is an example of a replacement rule that can follow a selector. That’s to say, it’s not specific to the @ selector and can be used with other selectors. In this example, it replaces the value of the attribute called "content." If the meta tag had no "content" attribute, it would be added.
There are two other replacement rules useful for manipulating attributes:
[content!] to remove an attribute with a matching value.
[content+] to append to the value.
Examples of these would be:
scala>importnet.liftweb.util.Helpers._importnet.liftweb.util.Helpers._scala>valin=<metaname="keywords"content="words, here, please"/>in:scala.xml.Elem=<metaname="keywords"content="words, here, please"></meta>scala>valremove="@keywords [content!]"#>"words, here, please"remove:net.liftweb.util.CssSel=CssBind(Full(@keywords[content!]),Full(NameSelector(keywords,Full(AttrRemoveSubNode(content)))))scala>remove(in)res0:scala.xml.NodeSeq=NodeSeq(<metaname="keywords"></meta>)
and:
scala>valadd="@keywords [content+]"#>", thank you"add:net.liftweb.util.CssSel=CssBind(Full(@keywords[content+]),Full(NameSelector(keywords,Full(AttrAppendSubNode(content)))))scala>add(in)res1:scala.xml.NodeSeq=NodeSeq(<metacontent="words, here, please, thank you"name="keywords"></meta>)
Although not directly relevant to meta tags, you should be aware that there is one convenient special case for appending to an attribute. If the attribute is class, a space is added together with your class value. As a demonstration of that, here’s an example of appending a class called btn-primary to a div:
scala>defrender="div [class+]"#>"btn-primary"render:net.liftweb.util.CssSelscala>render(<divclass="btn"/>)res0:scala.xml.NodeSeq=NodeSeq(<divclass="btn btn-primary"></div>)
The syntax for selectors is best described in Simply Lift.
See Testing and Debugging CSS Selectors for how to run selectors from the REPL.
You want to set the <title> of the page from a Lift snippet.
Select the content of the title element and replace it with the
text you want:
"title *"#>"I am different"
Assuming you have a <title> tag in your template, this will
result in:
<title>I am different</title>
This example uses an element selector, which picks out tags in the HTML template and replaces the content. Notice that we are using "title *" to select the content of the title tag. If we had left off the *, the entire title tag would have been replaced with text.
As an alternative, it is also possible to set the page title from the contents of SiteMap,
meaning the title used will be the title you’ve assigned to the page in
the site map. To do that, make use of Menu.title in your template directly:
<titledata-lift="Menu.title"></title>
The Menu.title code appends to any existing text in the title.
This means the following will have the phrase "Site Title - " in the
title, followed by the page title:
<titledata-lift="Menu.title">Site Title -</title>
If you need more control, you can of course bind on <title> using a
regular snippet. This example uses a custom snippet to put the site
title after the page title:
<titledata-lift="MyTitle"></title>
objectMyTitle{defrender=<title><lift:Menu.title/>-SiteTitle</title>}
Notice that our snippet is returning another snippet, <lift:Menu.title/>. This is a perfectly normal thing to do in Lift, and snippet invocations returned from snippets will be processed by Lift as normal.
Snippet Not Found When Using HTML5 describes the different ways to reference a snippet, such as data-lift and <lift: ... />.
At the Assembla website, there’s more about SiteMap and the Menu snippets.
You want to make use of Internet Explorer HTML conditional comments in your templates.
Put the markup in a snippet and include the snippet in your page or template.
For example, suppose we want to include the HTML5 Shiv (a.k.a. HTML5 Shim) JavaScript so we can use HTML5 elements with legacy IE browsers. To do that, our snippet would be:
packagecode.snippetimportscala.xml.UnparsedobjectHtml5Shiv{defrender=Unparsed("""<!--[if lt IE 9]><script src="http://html5shim.googlecode.com/svn/trunk/html5.js"></script><![endif]-->""")}
We would then reference the snippet in the <head> of a page, perhaps even in
all pages via templates-hidden/default.html:
<scriptdata-lift="Html5Shiv"></script>
The HTML5 parser used by Lift does not carry comments from the source through to the rendered page. If you just tried to paste the html5shim markup into your template you’d find it missing from the rendered page.
We deal with this by generating unparsed markup from a snippet. If you’re looking at
Unparsed and are worried, your instincts are correct. Normally, Lift would cause the
markup to be escaped, but in this case, we really do want
unparsed XML content (the comment tag) included in the output.
If you find you’re using IE conditional comments frequently, you may want to create a more general version of the snippet. For example:
packagecode.snippetimportxml.{NodeSeq,Unparsed}importnet.liftweb.http.SobjectIEOnly{privatedefcondition:String=S.attr("cond")openOr"IE"defrender(ns:NodeSeq):NodeSeq=Unparsed("<!--[if "+condition+"]>")++ns++Unparsed("<![endif]-->")}
It would be used like this:
<divdata-lift="IEOnly">A div just for IE</div>
and produces output like this:
<!--[if IE]><div>A div just for IE</div><![endif]-->
Notice that the condition test defaults to IE, but first tries to look for an attribute called cond. This allows you to write:
<divdata-lift="IEOnly?cond=lt+IE+9">You're using IE 8 or earlier</div>
The + symbol is the URL encoding for a space, resulting in:
<!--[if lt IE 9]><div>You're using IE 8 or earlier</div><![endif]-->
The IEOnly example is derived from a posting on the mailing list from Antonio Salazar Cardozo.
The html5shim project can be downloaded from its Google Code site.
You want a snippet to return the original markup associated with the snippet invocation.
Use the PassThru transform.
Suppose you have a snippet that performs a transform when some condition is met, but if the condition is not met, you want the snippet to return the original markup.
Starting with the original markup:
<h2>Pass Thru Example</h2><p>There's a 50:50 chance of seeing "Try again" or "Congratulations!":</p><divdata-lift="PassThruSnippet">Try again - this is the template content.</div>
We could leave it alone or change it with this snippet:
packagecode.snippetimportnet.liftweb.util.Helpers._importnet.liftweb.util.PassThruimportscala.util.Randomimportxml.TextclassPassThruSnippet{privatedeffiftyFifty=Random.nextBooleandefrender=if(fiftyFifty)"*"#>Text("Congratulations! The content was changed")elsePassThru}
PassThru is an identity function of type NodeSeq => NodeSeq. It returns the input it
is given:
objectPassThruextendsFunction1[NodeSeq,NodeSeq]{defapply(in:NodeSeq):NodeSeq=in}
A related example is ClearNodes, defined as:
objectClearNodesextendsFunction1[NodeSeq,NodeSeq]{defapply(in:NodeSeq):NodeSeq=NodeSeq.Empty}
The pattern of converting one NodeSeq to another is simple, but also powerful enough to get you out of most situations, as you can always arbitrarily rewrite the NodeSeq.
You’re using Lift with the HTML5 parser and one of your snippets is rendering with a "Class Not
Found" error. It even happens for <lift:HelloWorld.howdy />.
Switch to the designer-friendly snippet invocation mechanism. For example:
<divdata-lift="HellowWorld.howdy"></div>
In this Cookbook, we use the HTML5 parser, which is set in Boot.scala:
// Use HTML5 for renderingLiftRules.htmlProperties.default.set((r:Req)=>newHtml5Properties(r.userAgent))
The HTML5 parser and the traditional Lift XHTML parser have different
behaviours. In particular, the HTML5 parser converts elements and attribute names to lowercase when looking up snippets. This means Lift would take <lift:HelloWorld.howdy /> and look for a class called helloworld rather than HelloWorld, which would be the cause of the "Class Not Found" error.
Switching to the designer-friendly mechanism is the solution here, and you gain validating HTML as a bonus.
There are four popular ways of referencing a snippet:
data-lift="MySnippet"This is the style we use in this book, and is valid HTML5 markup.
class="lift:MySnippet"Also valid HTML5, but you must include the "lift" prefix for Lift to recognise this as a snippet.
lift attribute, as in: lift="MySnippet"This won’t strictly validate against HTML5, but you may see it used.
<lift:MySnippet />You’ll see the usage of this tag in templates declining because of the way it interacts with the HTML5 parser. However, it works just fine outside of a template, for example when embedding a snippet invocation in your server-side code (Setting the Page Title includes an example of this for Menu.title).
The key differences between the XHTML and HTML5 parsers are outlined on the mailing list.
You’ve modified CSS or JavaScript in your application, but web browsers have cached your resources and are using the older versions. You’d like to avoid this browser caching.
Add the with-resource-id attribute to script or link tags:
<scriptdata-lift="with-resource-id"src="/myscript.js"type="text/javascript"></script>
The addition of this attribute will cause Lift to append a resource ID to
your src (or href), and as this resource ID changes each time Lift
starts, it defeats browser caching.
The resultant HTML might be:
<scriptsrc="/myscript.js?F619732897824GUCAAN=_"type="text/javascript"></script>
The random value that is appended to the resource is computed when your Lift application boots. This means it should be stable between releases of your application.
If you need some other behaviour from with-resource-id, you can assign
a new function of type String => String to
LiftRules.attachResourceId. The default implementation, shown previously,
takes the resource name, /myscript.js in the example, and returns the
resource name with an ID appended.
You can also wrap a number of tags inside a
<lift:with-resource-id>...<lift:with-resource-id> block. However,
avoid doing this in the <head> of your page, as the HTML5 parser will
move the tags to be outside of the head section.
Note that some proxies may choose not to cache resources with query parameters at all. If that impacts you, it’s possible to code a custom resource ID method to move the random resource ID out of the query parameter and into the path.
Here’s one approach to doing this. Rather than generate JavaScript and CSS links that look like /assets/style.css?F61973, we will generate /cache/F61973/assets/style.css. We will then will need to tell our container or web server to take requests that look like this new format, and remove the /cache/F61973/ part.
The code to change the way links are created:
packagecode.libimportnet.liftweb.util._importnet.liftweb.http._objectCustomResourceId{definit():Unit={// The random number we're using to avoid cachingvalresourceId=Helpers.nextFuncName// Prefix with-resource-id links with "/cache/{resouceId}"LiftRules.attachResourceId=(path:String)=>{"/cache/"+resourceId+path}}}
This would be initialised in Boot.scala:
CustomResourceId.init()
or you could just paste all the code into Boot.scala, if you prefer.
With the code in place, we can, for example, modify templates-hidden/default.html and add a resource ID class to jQuery:
<scriptid="jquery"data-lift="with-resource-id"src="/classpath/jquery.js"type="text/javascript"></script>
At runtime, this would be rendered in HTML as:
<scripttype="text/javascript"id="jquery"src="/cache/F352555437877UHCNRW/classpath/jquery.js"></script>
Finally we need a way to rewrite URLs like this back to the original path. That is, remove the /cache/… part. There are a few ways to achieve this. If you’re using nginx or Apache in front of your Lift application, you can configure those web servers to perform the rewrite before it reaches Lift.
http://bit.ly/14BfNYJ shows the default implementation of attachResourceId.
Google’s "Optimize caching" notes are a good source of information about browser behaviour.
There is support for URL rewriting, described on the Lift wiki. Rewriting is used rarely, and only for special cases. It’s not suitable for this recpie, as outlined in a posting to Stackoverflow. Many problems that look like rewriting problems are better solved with a Menu Param.
Grunt and similar tools can modify paths. Diego Medina’s post on Using Grunt and Bower with Lift is a good starting point.
You use a template for layout, but on one specific page you need to add
something to the <head> section.
Use the head snippet so Lift knows to merge the
contents with the <head> of your page. For example, suppose you have
the following contents in templates-hidden/default.html:
<htmllang="en"xmlns:lift="http://liftweb.net/"><head><metacharset="utf-8"></meta><titledata-lift="Menu.title">App:</title><scriptid="jquery"src="/classpath/jquery.js"type="text/javascript"></script><scriptid="json"src="/classpath/json.js"type="text/javascript"></script></head><body><divid="content">The main content will get bound here</div></body></html>
Also suppose you have index.html on which you want to include red-titles.css to change the style of just this page.
Do so by including the CSS in the part of the page that will get processed, and mark it with the head snippet:
<!DOCTYPE html><html><head><title>Special CSS</title></head><bodydata-lift-content-id="main"><divid="main"data-lift="surround?with=default;at=content"><linkdata-lift="head"rel="stylesheet"href="red-titles.css"type="text/css"/><h2>Hello</h2></div></body></html>
Note that this index.html page is validated HTML5, and will produce a
result with the custom CSS inside the <head> tag, something like this:
<!DOCTYPE html><htmllang="en"><head><metacharset="utf-8"><title>App: Special CSS</title><scripttype="text/javascript"src="/classpath/jquery.js"id="jquery"></script><scripttype="text/javascript"src="/classpath/json.js"id="json"></script><linkrel="stylesheet"href="red-titles.css"type="text/css"></head><body><divid="main"><h2>Hello</h2></div><scripttype="text/javascript"src="/ajax_request/liftAjax.js"></script><scripttype="text/javascript">// <![CDATA[varlift_page="F557573613430HI02U4";// ]]></script></body></html>
If you find your tags not appearing in the <head> section, check that
the HTML in your template and page is valid HTML5.
You can also use <lift:head>...</lift:head> to wrap a number of
expressions, and will see <head_merge>...</head_merge> used in the code
example as an alternative to <lift:head>.
Another variant you may see is class="lift:head", as an alternative to data-lift="head".
The head snippet is a built-in snippet, but otherwise no different from any snippet you might write. What the snippet does is emit a <head> block, containing the elements you want in the head. These can be <title>, <link>, <meta>, <style>, <script>, or <base> tags. How does this <head> block produced by the head snippet end up inside the main <head> section of the page? When Lift processes your template, it automatically merges all <head> tags into the main <head> section of the page.
You might suspect you can therefore put a plain old <head> section anywhere on your template. You can, but that would not necessarily be valid HTML5 markup.
There’s also tail, which works in a similar way, except anything marked with this snippet is moved to be just before the close of the body tag.
Move JavaScript to End of Page describes how to move JavaScript to the end of the page with the tail snippet.
The W3C HTML validator is a useful tool for tracking down HTML markup issues that may cause problems with content being moved into the head of your page.
In Boot.scala, add the following:
importnet.liftweb.util._importnet.liftweb.http._LiftRules.uriNotFound.prepend(NamedPF("404handler"){case(req,failure)=>NotFoundAsTemplate(ParsePath(List("404"),"html",true,false))})
The file src/main/webapp/404.html will now be served for requests to unknown resources.
The uriNotFound Lift rule needs to return a NotFound in reply to a
Req and Box[Failure]. This allows you to customise the
response based on the request and the type of failure.
There are three types of NotFound:
NotFoundAsTemplateUseful to invoke the Lift template processing
facilities from a ParsePath
NotFoundAsResponseAllows you to return a specific LiftResponse
NotFoundAsNodeWraps a NodeSeq for Lift to translate into a 404
response
In the example, we’re matching any not found situation, regardless of the request and the failure, and evaluating
this as a resource identified by ParsePath. The path we’ve used is /404.html.
In case you’re wondering, the last two true and false arguments to ParsePath
indicate the path we’ve given is absolute and doesn’t end in a
slash. ParsePath is a representation for a URI path, and exposing
if the path is absolute or ends in a slash are useful flags for matching on, but
in this case, they’re not relevant.
Be aware that 404 pages, when rendered this way, won’t have a location in the site map. That’s because we’ve not included the 404.html file in the site map, and we don’t have to, because we’re rendering via NotFoundAsTemplate rather than sending a redirect to /404.html. However, this means that if you display an error page using a template that contains Menu.builder or similar (as templates-hidden/default.html does), you’ll see "No Navigation Defined." In that case, you’ll probably want to use a different template on your 404 page.
As an alternative, you could include the 404 page in your site map but make it hidden when the site map is displayed via the Menu.builder:
Menu.i("404")/"404">>Hidden
Catch Any Exception shows how to catch any exception thrown from your code.
You want to show a customised page for certain HTTP status codes.
Use LiftRules.responseTransformers to match against the response and
supply an alternative.
As an example, suppose we want to provide a custom page for 403 ("Forbidden") statuses created in our Lift application. Further, suppose that this page might contain snippets so will need to pass through the Lift rendering flow.
To do this in Boot.scala, we define the LiftResponse we want to generate
and use the response when a 403 status is about to be produced by Lift:
defmy403:Box[LiftResponse]=for{session<-S.sessionreq<-S.requesttemplate=Templates("403"::Nil)response<-session.processTemplate(template,req,req.path,403)}yieldresponseLiftRules.responseTransformers.append{caserespifresp.toResponse.code==403=>my403openOrrespcaseresp=>resp}
The file src/main/webapp/403.html will now be served for requests that generate 403 status codes. Other non–403 responses are left untouched.
LiftRules.responseTransformers allows you to supply
LiftResponse => LiftResponse functions to change a response right at the end
of the HTTP processing cycle. This is a very general mechanism: in this
example, we are matching on a status code, but we could match on anything
exposed by LiftResponse.
In the recipe, we respond with a template, but you may find
situations where other kinds of responses make sense, such as an InMemoryResponse.
You could even simplify the example to just this:
LiftRules.responseTransformers.append{caserespifresp.toResponse.code==403=>RedirectResponse("/403.html")caseresp=>resp}
In Lift 3, responseTransformers will be modified to be a partial function, meaning you’ll be able to leave off the final case resp => resp part of this example.
That redirect will work just fine, with the only downside that the HTTP status code sent back to the web browser won’t be a 403 code.
A more general approach, if you’re customising a number of pages, would be to define the status codes you want to customise, create a page for each, and then match only on those pages:
LiftRules.responseTransformers.append{caseCustomised(resp)=>respcaseresp=>resp}objectCustomised{// The pages we have customised: 403.html and 500.htmlvaldefinedPages=403::500::Nildefunapply(resp:LiftResponse):Option[LiftResponse]=definedPages.find(_==resp.toResponse.code).flatMap(toResponse)
deftoResponse(status:Int):Box[LiftResponse]=for{session<-S.sessionreq<-S.requesttemplate=Templates(status.toString::Nil)response<-session.processTemplate(template,req,req.path,status)}yieldresponse}
The convention in Customised is that we have an HTML file in src/main/webapp that matches
the status code we want to show, but of course you can change that by using a different
pattern in the argument to Templates.
One way to test the previous examples is to add the following to Boot.scala to make all requests to /secret return a 403:
valProtected=If(()=>false,()=>ForbiddenResponse("No!"))valentries=List(Menu.i("Home")/"index",Menu.i("secret")/"secret">>Protected,// rest of your site map here...)
If you request /secret, a 403 response will be triggered, which will match the response transformer showing you the contents of the 403.html template.
Custom 404 Page explains the built-in support for custom 404 messages.
Catch Any Exception shows how to catch any exception thrown from your code.
You want to include a clickable link in your S.error, S.notice, or
S.warning messages.
Include a NodeSeq containing a link in your notice:
S.error("checkPrivacyPolicy",<span>Seeour<ahref="/policy">privacypolicy</a></span>)
You might pair this with the following in your template:
<spandata-lift="Msg?id=checkPrivacyPolicy"></span>
You may be more familiar with the S.error(String) signature of Lift notices than the versions
that take a NodeSeq as an argument, but the String versions just convert the String argument
to a scala.xml.Text kind of NodeSeq.
Lift notices are described on the wiki.
You want a button or a link that, when clicked, will trigger a download in the browser rather than visiting a page.
Create a link using SHtml.link, provide a function to return a LiftResponse, and wrap the response in a ResponseShortcutException.
As an example, we will create a snippet that shows the user a poem and provides a link to download the poem as a text file. The template for this snippet will present each line of the poem separated by a <br>:
<h1>A poem</h1><divdata-lift="DownloadLink"><blockquote><spanclass="poem"><spanclass="line">line goes here</span><br/></span></blockquote><ahref="">download link here</a></div>
The snippet itself will render the poem and replace the download link with one that will send a response that the browser will interpret as a file to download:
packagecode.snippetimportnet.liftweb.util.Helpers._importnet.liftweb.http._importxml.TextclassDownloadLink{
valpoem="Roses are red,"::"Violets are blue,"::"Lift rocks!"::"And so do you."::Nildefrender=".poem"#>poem.map(line=>".line"#>line)&"a"#>downloadLinkdefdownloadLink=SHtml.link("/notused",()=>thrownewResponseShortcutException(poemTextFile),Text("Download"))defpoemTextFile:LiftResponse=InMemoryResponse(poem.mkString("\n").getBytes("UTF-8"),"Content-Type"->"text/plain; charset=utf8"::"Content-Disposition"->"attachment; filename=\"poem.txt\""::Nil,cookies=Nil,200)}
Recall that SHtml.link generates a link and executes a function you supply before following the link.
The trick here is that wrapping the LiftResponse in a ResponseShortcutException will indicate
to Lift that the response is complete, so the page being linked to (in this case, notused) won’t be processed. The browser is happy: it has a response to the link the user clicked on, and will render it how it wants to, which in this case will probably be by saving the file to disk.
SHtml.link works by generating a URL that Lift associates with the function you give it. On a page called downloadlink, the URL will look something like:
downloadlink?F845451240716XSXE3G=_#notused
When that link is followed, Lift looks up the function and executes it, before processing the linked-to resource. However, in this case, we are shortcutting the Lift pipeline by throwing this particular exception. This is caught by Lift, and the response wrapped by the exception is taken as the final response from the request.
This shortcutting is used by S.redirectTo via ResponseShortcutException.redirect. This companion object also defines shortcutResponse, which you can use like this:
importnet.liftweb.http.ResponseShortcutException._defdownloadLink=SHtml.link("/notused",()=>{S.notice("The file was downloaded")throwshortcutResponse(poemTextFile)},Text("Download"))
We’ve included an S.notice to highlight that throw shortcutResponse will process Lift notices when the page next loads, whereas throw new ResponseShortcutException does not. In this case, the notice will not appear when the user downloads the file, but it will be included the next time notices are shown, such as when the user navigates to another page. For many situations, the difference is immaterial.
This recipe has used Lift’s stateful features. You can see how useful it is to be able to close over state (the poem), and offer the data for download from memory. If you’ve created a report from a database, you can offer it as a download without having to regenerate the items from the database.
However, in other situations you might want to avoid holding this data as a function on a link. In that case, you’ll want to create a REST service that returns a LiftResponse.
REST looks at REST-based services in Lift.
Streaming Content discusses InMemoryResponse and similar responses to return content to the browser.
For reports, the Apache POI project includes libraries for generating Excel files; and OpenCSV is a library for generating CSV files.
Supply a mock request to Lift’s MockWeb.testReq, and run your test in the context of the Req supplied by testReq.
The first step is to add Lift’s Test Kit as a dependency to your project in build.sbt:
libraryDependencies+="net.liftweb"%%"lift-testkit"%"2.5"%"test"
To demonstrate how to use testReq, we will test a function that detects a Google crawler. Google identifies
crawlers via various User-Agent header values, so the function we want to test would look like this:
packagecode.libimportnet.liftweb.http.ReqobjectRobotDetector{valbotNames="Googlebot"::"Mediapartners-Google"::"AdsBot-Google"::Nildefknown_?(ua:String)=botNames.exists(uacontains_)defgooglebot_?(r:Req):Boolean=r.header("User-Agent").exists(known_?)}
We have the list of magic botNames that Google sends as a user agent, and we define a check, known_?, that takes the user agent string and looks to see if any robot satisfies the condition of being contained in that user agent string.
The googlebot_? method is given a Lift Req object, and from this, we look up the header. This evaluates to a Box[String], as it’s possible there is no header. We find the answer by seeing if there exists in the Box a value that satisfies the known_? condition.
To test this, we create a user agent string, prepare a MockHttpServletRequest with the header, and use Lift’s MockWeb to turn the low-level request into a Lift Req for us to test with:
packagecode.libimportorg.specs2.mutable._importnet.liftweb.mocks.MockHttpServletRequestimportnet.liftweb.mockweb.MockWebclassSingleRobotDetectorSpecextendsSpecification{"Google Bot Detector"should{"spot a web crawler"in{valuserAgent="Mozilla/5.0 (compatible; Googlebot/2.1)"// Mock a request with the right header:valhttp=newMockHttpServletRequest()http.headers=Map("User-Agent"->List(userAgent))// Test with a Lift Req:MockWeb.testReq(http){r=>RobotDetector.googlebot_?(r)mustbeTrue}}}}
Running this from SBT with the test command would produce:
[info] SingleRobotDetectorSpec
[info]
[info] Google Bot Detector should
[info] + spot a web crawler
[info]
[info] Total for specification SingleRobotDetectorSpec
[info] Finished in 18 ms
[info] 1 example, 0 failure, 0 error
Although MockWeb.testReq is handling the creation of a Req for us, the environment for that Req is supplied by the MockHttpServletRequest. To configure a request, create an instance of the mock and mutate the state of it as required before using it with testReq.
Aside from HTTP headers, you can set cookies, content type, query parameters, the HTTP method, authentication type, and the body. There are variations on the body assignment, which conveniently set the content type depending on the value you assign:
JValue will use a content type of application/json.
NodeSeq will use text/xml (or you can supply an alternative).
String uses text/plain (unless you supply an alternative).
Array[Byte] does not set the content type.
In the example test shown earlier, it would be tedious to have to set up the same code repeatedly for different user agents. Specs2's Data Table provides a compact way to run different example values through the same test:
packagecode.libimportorg.specs2._importmatcher._importnet.liftweb.mocks.MockHttpServletRequestimportnet.liftweb.mockweb.MockWebclassRobotDetectorSpecextendsSpecificationwithDataTables{defis="Can detect Google robots"^{"Bot?"||"User Agent"|true!!"Mozilla/5.0 (Googlebot/2.1)"|true!!"Googlebot-Video/1.0"|true!!"Mediapartners-Google"|true!!"AdsBot-Google"|false!!"Mozilla/5.0 (KHTML, like Gecko)"|>{(expectedResult,userAgent)=>{valhttp=newMockHttpServletRequest()http.headers=Map("User-Agent"->List(userAgent))MockWeb.testReq(http){r=>RobotDetector.googlebot_?(r)must_==expectedResult}}}}}
The core of this test is essentially unchanged: we create a mock, set the user agent, and check the result of googlebot_?. The difference is that Specs2 is providing a neat way to list
out the various scenarios and pipe them through a function.
The output from running this under SBT would be:
[info] Can detect Google robots
[info] + Bot?  | User Agent
[info]   true  | Mozilla/5.0 (Googlebot/2.1)
[info]   true  | Googlebot-Video/1.0
[info]   true  | Mediapartners-Google
[info]   true  | AdsBot-Google
[info]   false | Mozilla/5.0 (KHTML, like Gecko)
[info]
[info] Total for specification RobotDetectorSpec
[info] Finished in 1 ms
[info] 1 example, 0 failure, 0 error
Although the expected value appears first in our table, there’s no requirement to put it first.
The Lift wiki discusses this topic and also other approaches such as testing with Selenium.
Install the Lift Textile module in your build.sbt file by adding the following to the list of dependencies:
"net.liftmodules"%%"textile_2.5"%"1.3"
You can then use the module to render Textile using the toHtml method.
For example, starting SBT after adding the module and running the SBT console command allows you to try out the module:
scala>importnet.liftmodules.textile._importnet.liftmodules.textile._scala>TextileParser.toHtml("""| h1. Hi!|| The module in "Lift":http://www.liftweb.net for turning Textile markup| into HTML is pretty easy to use.|| * As you can see.| * In this example.| """)res0:scala.xml.NodeSeq=NodeSeq(,<h1>Hi!</h1>,
,<p>The module in<ahref="http://www.liftweb.net">Lift</a>for turning Textile markup<br></br>into HTML is pretty easy to use.</p>, ,<ul><li>As you can see.</li><li>In this example.</li></ul>, , )
It’s a little easier to see the output if we pretty print it:
scala>valpp=newPrettyPrinter(width=35,step=2)pp:scala.xml.PrettyPrinter=scala.xml.PrettyPrinter@54c19de8scala>pp.formatNodes(res0)res1:String=
<h1>Hi!</h1><p>The module in<ahref="http://www.liftweb.net">Lift</a>for turning Textile markup<br></br>into HTML is pretty easy to use.</p><ul><li>As you can see.</li><li>In this example.</li></ul>
There’s nothing special code has to do to become a Lift module, although there are common conventions: they typically are packaged as net.liftmodules, but don’t have to be; they usually depend on a version of Lift; they sometimes use the hooks provided by LiftRules to provide a particular behaviour. Anyone can create and publish a Lift module, and anyone can contribute to existing modules. In the end, they are declared as dependencies in SBT, and pulled into your code just like any other dependency.
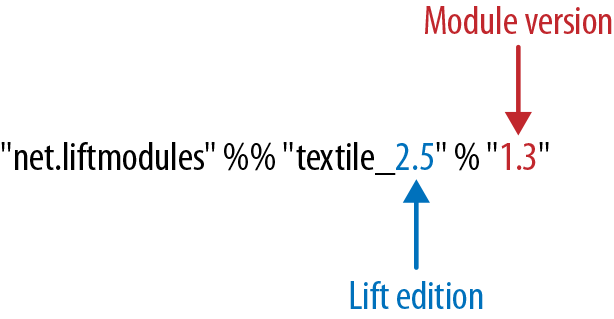
The dependency name is made up of two elements: the name and the "edition" of Lift that the module is compatible with, as shown in Figure 2-1. By "edition" we just mean the first part of the Lift version number. A "2.5" edition implies the module is compatible with any Lift release that starts "2.5."
This structure has been adopted because modules have their own release cycle, independent of Lift. However, modules may also depend on certain features of Lift, and Lift may change APIs between major releases, hence the need to use part of the Lift version number to identify the module.
There’s no real specification of what Textile is, but there are references available that cover the typical kinds of markup to enter and what HTML you can expect to see.
The unit tests for the Textile module give you a good set of examples of what is supported.
Sharing Code in Modules describes how to create modules.
This chapter looks at how to process form data with Lift: submitting forms, working with form elements. The end result of a form submission can be records being updated in a database, so you may also find Relational Database Persistence with Record and Squeryl or MongoDB Persistence with Record useful, as they discuss relational databases and MongoDB, respectively.
To the extent that form processing is passing data to a server, there are also recipes in JavaScript, Ajax, and Comet that are relevant to form processing.
You’ll find many of the examples from this chapter as source code at https://github.com/LiftCookbook/cookbook_forms.
You want to process form data in a regular, old-fashioned, non-Ajax way.
Extract form values with S.param, process the values, and produce some output.
For example, we can show a form, process an input value, and give a message back as a notice. The template is a regular HTML form, with the addition of a snippet:
<formdata-lift="Plain"action="/plain"method="post"><inputtype="text"name="name"placeholder="What's your name?"><inputtype="submit"value="Go"></form>
In the snippet, we can pick out the value of the field name with S.param("name"):
packagecode.snippetimportnet.liftweb.common.Fullimportnet.liftweb.http.Simportnet.liftweb.util.PassThruobjectPlain{defrender=S.param("name")match{caseFull(name)=>S.notice("Hello "+name)S.redirectTo("/plain")case_=>PassThru}}
The first time through this snippet, there will be no parameter, so we just pass back the form unchanged to the browser, which is what PassThru is doing. You can then enter a value into the name field and submit the form. This will result in Lift processing the template again, but this time, with a value for the name input. The result will be your browser redirected to a page with a message set for display.
Manually plucking parameters from a request isn’t making the best use of Lift, but sometimes you need to do it, and S.param is the way you can process request parameters.
The result of S.param is a Box[String], and in the previous example, we pattern match on this value. With more than one parameter, you’ve probably seen S.param used in this way:
defrender={for{name<-S.param("name")pet<-S.param("petName")}{S.notice("Hello %s and %s".format(name,pet))S.redirectTo("/plain")}PassThru}
If both name and petName are provided, the body of the for will be evaluated.
Related functions on S include:
S.params(name)Produces a List[String] for all the request parameters with the given name
S.post_? and S.get_?Tells you if the request was a GET or POST
S.getRequestHeader(name)Gives the Box[String] for a header in the request with the given name
S.requestAccesses the Box[Req], which gives you access to further HTTP-specific information about the request
As an example of using S.request, we could produce a List[String] for the values of all request parameters that have name somewhere in their parameter name:
valnames=for{req<-S.request.toListparamName<-req.paramNamesifparamName.toLowerCasecontains"name"value<-S.param(paramName)}yieldvalue
Note that by opening up S.request we can access all the parameter names via the paramNames function on Req.
Screen or Wizard provide alternatives for form processing, but sometimes you just want to pull values from a request, as demonstrated in this recipe.
Simply Lift covers a variety of ways of processing forms.
You want to process a form on the server via Ajax, without reloading the whole page.
Mark your form as an Ajax form with data-lift="form.ajax" and supply a
function to run on the server when the form is submitted.
Here’s an example of a form that will collect our name and submit it via Ajax to the server:
<formdata-lift="form.ajax"><divdata-lift="EchoForm"><inputtype="text"name="name"placeholder="What's your name?"><inputtype="submit"></div></form><divid="result">Your name will be echoed here</div>
The following snippet will echo back the name via Ajax:
packagecode.snippetimportnet.liftweb.util.Helpers._importnet.liftweb.http.SHtml.{text,ajaxSubmit}importnet.liftweb.http.js.JsCmdimportnet.liftweb.http.js.JsCmds.SetHtmlimportxml.TextobjectEchoForm{defrender={varname=""defprocess():JsCmd=SetHtml("result",Text(name))"@name"#>text(name,s=>name=s)&"type=submit"#>ajaxSubmit("Click Me",process)}}
The render method is binding the name input field to a function that will assign whatever the user enters to the variable name. Note you’ll more typically see s => name = s written in the shorter form of name = _.
When the button is pressed, the process function is called, which will return the
value of the name back to the element in the HTML with an ID of result.
The data-lift="form.ajax" part of this recipe ensures that Lift adds the Ajax processing mechanics to the form. This means the <form> element in the output will end up as something like this:
<formid="F2203365740CJME2G"action="javascript://"onsubmit="liftAjax.lift_ajaxHandler(jQuery('#'+"F2203365740CJME2G").serialize(),null, null, "javascript");return false;">...</form>
In other words, when the form is asked to submit, Lift will serialise the form via Ajax. This means you don’t necessarily need the submit button at all. In this example with a single text field, if you omit the submit button you can trigger serialisation by pressing Return. This will trigger the s => name = s function, which was bound in our regular data-lift="EchoForm" snippet. In other words, the value name will be assigned even without a submit button.
Adding in a submit button gives us a way to perform actions once all the field’s functions have been executed.
Notice that Lift’s approach is to serialise the form to the server, execute the functions associated with the fields, execute the submit function (if any), then return a JavaScript result to the client. The default serialisation process is to use jQuery’s serialization method on the form. This serialises fields except submit buttons and file uploads.
The SHtml.ajaxSubmit function generates a <input type="submit"> element for the page. You may prefer to use a styled button for submit. For example, with Twitter Bootstrap, a button with an icon would require the following markup:
<buttonid="submit"class="btn btn-primary btn-large"><iclass="icon-white icon-ok"></i>Submit</button>
Pressing a <button> inside a form triggers the submit. However, if you bound that button with SHtml.ajaxSubmit, the content, and therefore the styling, would be lost.
To fix this, you can assign a function to a hidden field. This function will be called when the form is submitted just like any other field. The only part of our snippet that changes is the CSS selector binding:
importnet.liftweb.http.SHtml.hidden"@name"#>text(name,s=>name=s)&"button *+"#>hidden(process)
The *+ replacement rule means append a value to the child node of the button. This will include a hidden field in the form, something like this:
<inputtype="hidden"name="F11202029628285OIEC2"value="true">
When the form is submitted, the hidden field is submitted, and like any field, Lift will call the function associated with it: process, in this case.
The effect is something like ajaxSubmit, but not exactly the same. In this instance, we’re appending a hidden field after the <button>, but you could place it anywhere on the form you find convenient. However, there’s one complication: when is process called? Is it before the name has been assigned or after? That depends on the order in which the fields are rendered. That’s to say, in your HTML template, placing the button before the text field (and therefore moving the hidden field’s position in this example), the process function is called before the name has been set.
There are a couple of ways around that. Either, ensure your hidden fields used in this way appear late in your form, or make sure the function is called late with a formGroup:
importnet.liftweb.http.SHtml.hiddenimportnet.liftweb.http.S"@name"#>text(name,s=>name=s)&"button *+"#>S.formGroup(1000){hidden(process)}
The formGroup addition manipulates the function identifier to ensure it sorts later, resulting in the function process being called later than fields in the default group (0).
Lift 2.6 and 3.0 may contain ajaxOnSubmit, which will give the reliability of ajaxSubmit and the flexibility of the hidden-field approach. If you want to try it in Lift 2.5,
Antonio Salazar Cardozo has created a helper you can include in your project.
Function order is discussed in the Lift Cool Tips wiki page.
For more details about the form serialisation process, take a look at the jQuery documentation.
Ajax File Upload describes Ajax file uploads.
You want to process a form via Ajax, sending the data in JSON format.
Make use of Lift’s jlift.js JavaScript library and JsonHandler class.
As an example, we can create a "motto server" that will accept an institution name and the institution’s motto and perform some action on these values. We’re just going to echo the name and motto back to the client.
Consider this HTML, which is not in a form, but includes jlift.js:
<html><head><title>JSON Form</title></head><bodydata-lift-content-id="main"><divid="main"data-lift="surround?with=default;at=content"><h1>Json Form example</h1><!-- Required for JSON forms processing --><scriptsrc="/classpath/jlift.js"data-lift="tail"></script><divdata-lift="JsonForm"><scriptid="jsonScript"data-lift="tail"></script><divid="jsonForm"><labelfor="name">Institution<inputid="name"type="text"name="name"value="Royal Society"/></label><labelfor="motto">Motto<inputid="motto"type="text"name="motto"value="Nullius in verba"/></label><inputtype="submit"value="Send"/></div><divid="result">Result will appear here.</div></div></div></body></html>
This HTML presents the user with two fields, a name and a motto, wrapped in a <div> called jsonForm. There’s also a placeholder for some results, and you’ll notice a jsonScript placeholder for some JavaScript code. The jsonForm will be manipulated to ensure it is sent via Ajax, and the jsonScript will be replaced with Lift’s code to perform the serialisation. This happens in the snippet code:
packagecode.snippetimportscala.xml.{Text,NodeSeq}importnet.liftweb.util.Helpers._importnet.liftweb.util.JsonCmdimportnet.liftweb.http.SHtml.jsonFormimportnet.liftweb.http.JsonHandlerimportnet.liftweb.http.js.JsCmdimportnet.liftweb.http.js.JsCmds.{SetHtml,Script}objectJsonForm{defrender="#jsonForm"#>((ns:NodeSeq)=>jsonForm(MottoServer,ns))&"#jsonScript"#>Script(MottoServer.jsCmd)objectMottoServerextendsJsonHandler{defapply(in:Any):JsCmd=inmatch{caseJsonCmd("processForm",target,params:Map[String,String],all)=>valname=params.getOrElse("name","No Name")valmotto=params.getOrElse("motto","No Motto")SetHtml("result",Text("The motto of %s is %s".format(name,motto)))}}}
Like many snippets, this Scala code contains a render method that binds to elements on the page. Specifically, jsonForm is being replaced with SHtml.jsonForm, which will take a NodeSeq (which are the input fields), and turns it into a form that will submit the values as JSON. The submission will be to our MottoServer code.
The jsonScript element is bound to JavaScript that will perform the transmission and encoding of the values to the server.
If you click the "Send" button and observe the network traffic, you’ll see the following sent to the server:
{"command":"processForm","params":{"name":"Royal Society","motto":"Nullius in verba"}}
This is the value of the all parameter in the JsonCmd being pattern matched against in MottoServer.apply. Lift has taken care of the plumbing to make this happen.
The result of the pattern match in the example is to pick out the two field values and send back JavaScript to update the results <div> with:
"The motto of the Royal Society is Nullius in verba."
The JsonHandler class and the SHtml.jsonForm method are together performing a lot of work for us. The jsonForm method is arranging for form fields to be encoded as JSON and sent, via Ajax, to our MottoServer as a JsonCmd. In fact, it’s a JsonCmd with a default command name of "processForm".
Our MottoServer class is looking for (matching on) this JsonCmd, extracting the values of the form fields, and echoing these back to the client as a JsCmd that updates a <div> on the page.
The MottoServer.jsCmd part is generating the JavaScript required to deliver the form fields to the server. As we will see later, this is providing a general purpose function we can use to send different JSON values and commands to the server.
Notice also, from the network traffic, that the form fields sent are serialised with the names they are given on the page. There are no "F…" values sent that map to function calls on the server. A consequence of this is that any fields dynamically added to the page will also be serialised to the server, where they can be picked up in the MottoServer.
The script jlift.js is providing the plumbing to make much of this happen.
Before going on, convince yourself that we’re generating JavaScript on the server side (MottoServer.jsCmd), which is executed on the client side when the form is submitted, to deliver results to the server.
In the previous example, we match on a JsonCmd with a command name of "processForm". You may be wondering what other commands can be supplied, or what the meaning of the target value is.
To demonstrate how you can implement other commands, we can add two additional buttons. These buttons will just convert the motto to upper- or lowercase. The server-side render method changes as follows:
defrender="#jsonForm"#>((ns:NodeSeq)=>jsonForm(MottoServer,ns))&"#jsonScript"#>Script(MottoServer.jsCmd&Function("changeCase",List("direction"),MottoServer.call("processCase",JsVar("direction"),JsRaw("$('#motto').val()"))))
The JsonForm is unchanged. We still include MottoServer.jsCmd, and we still want to wrap the fields and submit them as before. What we’ve added
is an extra JavaScript function called changeCase, which takes one argument called direction and as a body calls the MottoServer with various parameters. When it is rendered on the page, it would appear as something like this:
functionchangeCase(direction){F299202CYGIL({'command':"processCase",'target':direction,'params':$('#motto').val()});}
The F299202CYGIL function (or similar name) is generated by Lift as part of MottoServer.jsCmd, and it is responsible for delivering data
to the server. The data it is delivering, in this case, is a JSON structure consisting of a different command (processCase), a target of whatever
the JavaScript value direction evaluates to, and a parameter that is the result of the jQuery expression for the value
of the #motto form field.
When is the changeCase function called? That’s up to us, and one very simple way to call the function would be by this addition to the HTML:
<buttononclick="javascript:changeCase('upper')">Upper case the Motto</button><buttononclick="javascript:changeCase('lower')">Lower case the Motto</button>
When either of these buttons are pressed, the result will be a JSON value sent to the server with the command of processCase and the direction and params set accordingly. All that is left is to modify our MottoServer to pick up this JsonCmd on the server:
objectMottoServerextendsJsonHandler{defapply(in:Any):JsCmd=inmatch{caseJsonCmd("processForm",target,params:Map[String,String],all)=>valname=params.getOrElse("name","No Name")valmotto=params.getOrElse("motto","No Motto")SetHtml("result",Text("The motto of %s is %s".format(name,motto)))caseJsonCmd("processCase",direction,motto:String,all)=>valupdate=if(direction=="upper")motto.toUpperCaseelsemotto.toLowerCaseSetValById("motto",update)}}
The first JsonCmd is unchanged. The second matches on the parameters sent and results in updating the form fields with an upper- or lowercase version of the motto.
The Lift demo site contains further examples of JsonHandler.
If you want to process JSON via REST, take a look at the stateless JSON examples.
Lift in Action, section 9.1.4 discusses "Using JSON forms with AJAX," as does section 10.4 of Exploring Lift.
You want to provide a date picker to make it easy for users to supply dates to your forms.
Use a standard Lift SHtml.text input field and attach a JavaScript date picker to it. In this example, we will use the jQuery UI date picker.
Our form will include an input field called birthday to be used as a date picker, and also the jQuery UI JavaScript and CSS:
<!DOCTYPE html><head><metacontent="text/html; charset=UTF-8"http-equiv="content-type"/><title>jQuery Date Picker</title></head><bodydata-lift-content-id="main"><divid="main"data-lift="surround?with=default;at=content"><h3>When's your birthday?</h3><linkdata-lift="head"type="text/css"rel="stylesheet"href="//cdnjs.cloudflare.com/ajax/libs/jqueryui/1.10.2/css/smoothness/jquery-ui-1.10.2.custom.min.css"></link><scriptdata-lift="tail"src="//cdnjs.cloudflare.com/ajax/libs/jqueryui/1.10.2/jquery-ui.min.js"></script><divdata-lift="JqDatePicker?form=post"><inputtype="text"id="birthday"><inputtype="submit"value="Submit"></div></div></body></html>
This would normally produce a regular text input field, but we can change that by adding JavaScript to attach the date picker to the input field. You could do this in the template, but in this example, we’re enhancing the text field as part of the snippet code:
packagecode.snippetimportjava.util.Dateimportjava.text.SimpleDateFormatimportnet.liftweb.util.Helpers._importnet.liftweb.http.{S,SHtml}importnet.liftweb.http.js.JsCmds.Runimportnet.liftweb.common.LoggableclassJqDatePickerextendsLoggable{valdateFormat=newSimpleDateFormat("yyyy-MM-dd")valdefault=(dateFormatformatnow)deflogDate(s:String):Unit={valdate:Date=tryo(dateFormatparses)getOrElsenowlogger.info("Birthday: "+date)}defrender={S.appendJs(enhance)"#birthday"#>SHtml.text(default,logDate)}valenhance=Run("$('#birthday').datepicker({dateFormat: 'yy-mm-dd'});")}
Notice in render we are binding a regular SHtml.text field to the element with the ID of birthday, but also appending JavaScript to the page. JavaScript selects the birthday input field and attaches a configured date picker to it.
When the field is submitted, the logDate method is called with the value of the text field. We parse the text into a java.util.Date object. The tryo Lift helper will catch any ParseException and return a Box[Date], which we open, or default to the current date if a bad date is supplied.
Running this code and submitting the form will produce a log message such as:
INFO code.snippet.DatePicker - Birthday: Sun Apr 21 00:00:00 BST 2013
The approach outlined in this recipe can be used with other date picker libraries. The key point is to configure the date picker to submit a date in a format you can parse when the value is submitted to the server. This is the "wire format" of the date, and does not have to necessarily be the same format the user sees in the browser, depending on the browser or the JavaScript library being used.
The HTML5 specification includes support for a variety of date input types: datetime, datetime-local, date, month, time, and week. For example:
<inputtype="date"name="birthday"value="2013-04-21">
This type of input field will submit a date in yyyy-mm-dd format, which our snippet would be able to process.
As more browsers implement these types, it will become possible to depend on them. However, you can default to the HTML5 browser-native date pickers today and fall back to a JavaScript library as required. The difference is shown in Figure 3-1.
To detect whether the browser supports type="date" inputs, we can use the Modernizr library. This is an additional script in our template:
<scriptdata-lift="tail"src="//cdnjs.cloudflare.com/ajax/libs/modernizr/2.6.2/modernizr.min.js"></script>
We will use this in our snippet. In fact, there are two changes we need to make to the snippet:
Add the type="date" attribute to the input field.
Modify the JavaScript to only attach the jQuery UI date picker in browsers that don’t support the type="date" input.
In code, that becomes:
defrender={S.appendJs(enhance)"#birthday"#>SHtml.text(default,logDate,("type"->"date"))}valenhance=Run("""|if (!Modernizr.inputtypes.date) {| $('input[type=date]').datepicker({dateFormat: 'yy-mm-dd'});|}""".stripMargin)
The "type" -> "date" parameter on SHtml.text is setting the attribute type to the value date on the resulting <input> field.
When this snippet runs, and the page is rendered, the jQuery UI date picker will be attached to input fields of type="date" only if the browser doesn’t support that type already.
Dive into HTML5 describes how to detect browser features.
The jQuery UI API documentation lists the various configuration options for the date picker.
The HTML5 date input types submit dates in RFC 3339 format.
You want to provide an autocomplete widget, to give users suggestions as they type into a text field.
Use a JavaScript autocomplete widget, for example, the jQuery UI autocomplete via the AutoComplete class from the Lift widgets module.
Start by adding the Lift widgets module to your build.sbt:
libraryDependencies+="net.liftmodules"%%"widgets_2.5"%"1.3"
To enable the autocomplete widget, initialise it in Boot.scala:
importnet.liftmodules.widgets.autocomplete.AutoCompleteAutoComplete.init()
We can create a regular form snippet:
<formdata-lift="ProgrammingLanguages?form=post"><inputid="autocomplete"><inputtype="submit"></form>
Connect the AutoComplete class to the element with the ID of autocomplete:
packagecode.snippetimportnet.liftweb.util.Helpers._importnet.liftweb.common.Loggableimportnet.liftmodules.widgets.autocomplete.AutoCompleteclassProgrammingLanguagesextendsLoggable{vallanguages=List("C","C++","Clojure","CoffeeScript","Java","JavaScript","POP-11","Prolog","Python","Processing","Scala","Scheme","Smalltalk","SuperCollider")defrender={valdefault=""defsuggest(value:String,limit:Int)=languages.filter(_.toLowerCase.startsWith(value))defsubmit(value:String):Unit=logger.info("Value submitted: "+value)"#autocomplete"#>AutoComplete(default,suggest,submit)}}
The last line of this snippet shows the binding of the AutoComplete class, which takes:
A default value to show
A function that will produce suggestions from the text value entered—the result is a Seq[String] of suggestions
A function to call when the form is submitted
Running this code renders as shown in Figure 3-2.
When the form is submitted, the submit function will be passed the selected value. The submit function is simply logging this value:
INFO code.snippet.ProgrammingLanguages - Value submitted: Scala
The autocomplete widget uses jQuery autocomplete. This can be seen by examining the NodeSeq produced by the AutoComplete.apply method:
<span><head><linktype="text/css"rel="stylesheet"href="/classpath/autocomplete/jquery.autocomplete.css"></link><scripttype="text/javascript"src="/classpath/autocomplete/jquery.autocomplete.js"></script><scripttype="text/javascript">// <![CDATA[jQuery(document).ready(function(){vardata="/ajax_request?F846528841915S2RBI0=foo";jQuery("#F846528841916S3QZ0V").autocomplete(data,{minChars:0,matchContains:true}).result(function(event,dt,formatted){jQuery("#F846528841917CF4ZGL").val(formatted);});});;// ]]></script></head><inputtype="text"value=""id="F846528841916S3QZ0V"></input><inputname="F846528841917CF4ZGL"type="hidden"value=""id="F846528841917CF4ZGL"></input></span>
This chunk of markup is generated from the AutoComplete(default, suggest, submit) call. What’s happening here is that the jQuery UI autocomplete JavaScript and CSS, which is bundled with the Lift widgets module, is being included on the page. Recall from Adding to the Head of a Page that Lift will merge the <head> part of this markup into the <head> of the final HTML page.
When the page loads, the jQuery UI autocomplete function is bound to the input field, and configured with a URL, which will deliver the user’s input to our suggest function. All suggest needs to do is return a Seq[String] of values for the jQuery autocomplete code to display to the user.
jQuery 1.9 removed the $.browser method that the Autocomplete
Widget needs. The work-around for this is to include the
jQuery migration package in your template:
<scriptdata-lift="head"src="http://code.jquery.com/jquery-migrate-1.2.1.js"></script>
One peculiarity of the AutoComplete widget is that if you type in a new value—one not suggested—and press submit, it is not sent to the server. That is, you need to click on one of the suggestions to select it. If that’s not the behaviour you want, you can adjust it.
Inside the render method, we can modify the behaviour by adding JavaScript to the page:
importnet.liftweb.http.Simportnet.liftweb.http.js.JsCmds.RunS.appendJs(Run("""|$('#autocomplete input[type=text]').bind('blur',function() {| $(this).next().val($(this).val());|});""".stripMargin))
With this in place, when the input field loses focus—for example, when the submit button is pressed—the value of the input field is stored as the value to be sent to the server.
Looking at the way the widget module builds autocomplete functionality may give you an insight into how you can incorporate other JavaScript autocomplete libraries into your Lift application. The idea is to include the JavaScript library, connect it to an element on the page, and then arrange for the server to be called to generate suggestions. Of course, if you only have a few items for the user to pick from, you could just include those items on the page, rather than making a round trip to the server.
As an example of server-generated suggestions, we can look at the Typeahead component that is included in Twitter Bootstrap.
To incorporate Typeahead, the template needs to change to include the library and mark the input field in the way Typeahead expects:
<linkdata-lift="head"rel="stylesheet"href="//netdna.bootstrapcdn.com/twitter-bootstrap/2.3.1/css/bootstrap-combined.min.css"><scriptdata-lift="tail"src="//netdna.bootstrapcdn.com/twitter-bootstrap/2.3.1/js/bootstrap.min.js"></script><formdata-lift="ProgrammingLanguagesTypeAhead"><scriptid="js"></script><inputid="autocomplete"type="text"data-provide="typeahead"autocomplete="off"><inputtype="submit"></form>
We’ve included a placeholder with an ID of js for the JavaScript that will call back to the server. We’ll get to that in a moment.
The way Typeahead works is that we attach it to our input field and tell it to call a JavaScript function when it needs to make suggestions. That JavaScript function is going to be called askServer, and it is given two arguments: the input the user has typed so far (query), and a JavaScript function to call when the suggestions are available (callback). The Lift snippet needs to use the query value and then call the JavaScript callback function with whatever suggestions are made.
A snippet to implement this would be as follows:
packagecode.snippetimportnet.liftweb.util.Helpers._importnet.liftweb.common.{Full,Empty,Loggable}importnet.liftweb.http._importnet.liftweb.http.js.JsCmds._importnet.liftweb.http.js.JsCmds.Runimportnet.liftweb.http.js.JE.JsVarimportnet.liftweb.json.JsonAST._importnet.liftweb.json.DefaultFormatsclassProgrammingLanguagesTypeAheadextendsLoggable{vallanguages=List("C","C++","Clojure","CoffeeScript","Java","JavaScript","POP-11","Prolog","Python","Processing","Scala","Scheme","Smalltalk","SuperCollider")defrender={implicitvalformats=DefaultFormatsdefsuggest(value:JValue):JValue={logger.info("Making suggestion for: "+value)valmatches=for{q<-value.extractOpt[String].map(_.toLowerCase).toListlang<-languages.filter(_.toLowerCasestartsWithq)}yieldJString(lang)JArray(matches)}valcallbackContext=newJsonContext(Full("callback"),Empty)valrunSuggestion=SHtml.jsonCall(JsVar("query"),callbackContext,suggest_)S.appendJs(Run("""|$('#autocomplete').typeahead({| source: askServer|});""".stripMargin))"#js *"#>Function("askServer","query"::"callback"::Nil,Run(runSuggestion.toJsCmd))&"#autocomplete"#>SHtml.text("",s=>logger.info("Submitted: "+s))}}
Working from the bottom of the snippet, we bind a regular Lift SHtml.text input to the autocomplete field. This will receive the selected value when the form is submitted. We also bind the JavaScript placeholder to a JavaScript function definition called askServer. This is the function that Typeahead will call when it wants suggestions.
The JavaScript function we’re defining takes two arguments: the query and callback. The body of askServer causes it to run something called runSuggestion, which is a jsonCall to the server, with the value of the query.
The suggestions are made by the suggest function, which expects to be able to find a String in the passed in JSON value. It uses this value to find matches in the list of languages. These are returned as a JArray of JString, which is treated as JSON data back on the client.
What does the client do with the data? It calls the callback function with the suggestions, which results in the display updating. We specify its callback via JsonContext, which is a class that lets us specify a custom function to call on success of the request to the server.
It may help to understand this by looking at the JavaScript generated in the HTML page for askServer:
<scriptid="js">functionaskServer(query,callback){liftAjax.lift_ajaxHandler('F268944843717UZB5J0='+encodeURIComponent(JSON.stringify(query)),callback,null,"json")}</script>
As the user types into the text field, Typeahead calls askServer with the input supplied. Lift’s Ajax support arranges for that value, query, to be serialised to our suggest function on the server, and for the results to be passed to callback. At that point, Typeahead takes over again and displays the suggestions.
Typing Scala to the text field and pressing submit will produce a sequence like this on the server:
INFO  c.s.ProgrammingLanguagesTypeAhead - Making suggestion for: JString(Sc)
INFO  c.s.ProgrammingLanguagesTypeAhead - Making suggestion for: JString(Sca)
INFO  c.s.ProgrammingLanguagesTypeAhead - Making suggestion for: JString(Sca)
INFO  c.s.ProgrammingLanguagesTypeAhead - Making suggestion for: JString(Scal)
INFO  c.s.ProgrammingLanguagesTypeAhead - Making suggestion for: JString(Scala)
INFO  c.s.ProgrammingLanguagesTypeAhead - Submitted: Scala
Trigger Server-Side Code from a Button describes jsonCall.
The behaviour of the widget module with respect to new values is described in a ticket on the module’s GitHub page. Enhancing modules is one route to get involved with Lift, and Contributing, Bug Reports, and Getting Help describes other ways to contribute.
The jQuery UI Autocomplete documentation describes how to configure the widget. The version included with the Lift widgets module is version 1.0.2.
The Typeahead widget is part of Twitter Bootstrap.
Use SHtml.radioElem to present the options as radio buttons.
To illustrate this, let’s create a form to allow a user to indicate his gender:
objectBirthGenderextendsEnumeration{typeBirthGender=ValuevalMale=Value("Male")valFemale=Value("Female")valNotSpecified=Value("Rather Not Say")}
We’re using an enumeration, but it could be any class. The toString of the class will be used as the label shown to the user.
To present these options and handle the selection of an option, we use this enumeration in a snippet:
packagecode.snippetimportnet.liftweb.common._importnet.liftweb.util.Helpers._importnet.liftweb.http.SHtmlimportnet.liftweb.http.SHtml.ChoiceHolderobjectRadioextendsLoggable{importBirthGender._valoptions:Seq[BirthGender]=BirthGender.values.toSeqvaldefault:Box[BirthGender]=Emptyvalradio:ChoiceHolder[BirthGender]=SHtml.radioElem(options,default){selected=>logger.info("Choice: "+selected)}defrender=".options"#>radio.toForm}
Rather than generate the radio buttons in one expression on the render method, we’ve pulled out the intermediate values to show their types. The radio.toForm call is generating the radio buttons, and we’re binding them to the CSS selector .option in the following template:
<divdata-lift="Radio?form=post"><spanclass="options"><inputtype="radio">Option 1</input><inputtype="radio">Option 2</input></span><inputtype="submit"value="Submit"></div>
The class="options" span will be replaced with the radio buttons from the code, and when the form is submitted, the function supplied to SHtml.radioElem will be called, resulting in the selected value being logged. For example, if no radio button is selected:
INFO code.snippet.Radio - Choice: Empty
or if the third button was selected:
INFO code.snippet.Radio - Choice: Full(Rather Not Say)
Many of the Lift SHtml methods return a NodeSeq, which can be directly bound into our HTML. However, radioElem is different in that it gives us a ChoiceHolder[T], and to generate a NodeSeq from that, we’re calling toForm. This has implications for how you customise radio buttons, as we’ll see later.
The radioElem method expects three parameters:
SHtml.radioElem(options,default){selected=>logger.info("Choice: "+selected)}
The first is the set of options to show, as a Seq[T]. The second is the value to be preselected, as a Box[T]. In the example, we have no preselected value, which is represented as Empty. Finally, there’s the function to run when the form is submitted, of type Box[T] => Any.
Note that even if the user selects no value, your function will be called, and it will be passed the value Empty.
To understand a little more of what’s happening, take a look at the default HTML produced by radioElem:
<span><inputvalue="F317293945993CDMQZ"type="radio"name="F317293946030HYAFP"><inputname="F317293946030HYAFP"type="hidden"value="F317293946022HCGEG">Male<br></span><span><inputvalue="F31729394600RIE253"type="radio"name="F317293946030HYAFP">Female<br></span><span><inputvalue="F317293946011OMEMM"type="radio"name="F317293946030HYAFP">Rather Not Say<br></span>
Notice that:
All the input fields have the same randomly generated name.
The input fields have randomly generated values.
There’s a hidden field added to the first item.
This might be a surprise if you were just expecting something like this:
<inputtype="radio"name="gender"value="Male">Male<br><inputtype="radio"name="gender"value="Female">Female<br><inputtype="radio"name="gender"value="NotSpecified">Rather Not Say<br>
By using random values, Lift has helped us by protecting against a range of form-based attacks, such as submitting values we’re not expected, or setting values on fields we don’t want set.
Each of the random radio button values is associated, on the server, with a BirthGender value from our options sequence. When the form is submitted, Lift picks out the selected value (if any), looks up the corresponding BirthGender value, and calls our function.
The hidden field ensures that the function will be called even if no radio button is selected. This is because the browser will at least submit the hidden field, and this is enough to trigger the server-side function.
The default HTML wraps each radio button in a <span> and separates them with a <br>. Let’s change that to make it work well with the Twitter Bootstrap framework, and put each choice in a <label> and give it a class.
To customise the HTML, you need to understand that the ChoiceHolder is a container for a sequence of items. Each item is a ChoiceItem:
finalcaseclassChoiceItem[T](key:T,xhtml:NodeSeq)
The key in our example is a BirthGender instance, and the xhtml is the radio button input field (plus the hidden field for the first option). With this knowledge, we can write a helper to generate a NodeSeq in the style we want:
importscala.xml.NodeSeqimportnet.liftweb.http.SHtml.ChoiceItemobjectLabelStyle{defhtmlize[T](item:ChoiceItem[T]):NodeSeq=<labelclass="radio">{item.xhtml}{item.key.toString}</label>deftoForm[T](holder:ChoiceHolder[T]):NodeSeq=holder.items.flatMap(htmlize)}
The htmlize method produces a <label> element with the class we want, and it contains the radio input (item.xhtml) and the text of the label (item.key.toString). The toForm is applying the htmlize function to all the choices.
We can apply this in our snippet:
defrender=".options"#>LabelStyle.toForm(radio)
and the result would be the following:
<labelclass="radio"><inputvalue="F234668654428LWW305"type="radio"name="F234668654432WS5LWK"><inputname="F234668654432WS5LWK"type="hidden"value="F234668654431KYJB3S">Male</label><labelclass="radio"><inputvalue="F234668654429MB5RF3"type="radio"name="F234668654432WS5LWK">Female</label><labelclass="radio"><inputvalue="F234668654430YULGC1"type="radio"name="F234668654432WS5LWK">Rather Not Say</label>
The toForm method could be wrapping the choices in some other HTML, such as a <ul>. But in this case, it’s not: it’s just applying htmlize to each ChoiceItem. As a consequence of this, we could make LabelStyle the default across our Lift application:
ChoiceHolder.htmlize=c=>LabelStyle.htmlize(c)
This works because toForm on ChoiceHolder defers to ChoiceHolder.htmlize, and ChoiceHolder.htmlize is a variable you can assign to.
If you want to work directly with String values for options, you can use SHtml.radio. Although it too produces a ChoiceHolder, it differs from radioElem in that it uses the same String as both the label and the value. The function associated with each option is called only if a value is selected by the user.
An SHtml.radio version of our example would look like this:
SHtml.radio("Male"::"Female"::"Rather Not Say"::Nil,Empty,selected=>logger.info("Choice: "+selected))
This is a similar structure to radioElem: there’s a list of options, a default, a function to call, and it produces a ChoiceHolder[String]. When a form is submitted, our function is passed the String value of the selected option. If no radio buttons are selected, the function is not called.
You want to add the disabled attribute to a SHtml.checkbox based on
a conditional check.
Create a CSS selector transform to add the disabled attribute, and apply it to your checkbox transform.
For example, suppose you have a simple checkbox:
classLikes{varlikeTurtles=falsedefrender="#like"#>SHtml.checkbox(likeTurtles,likeTurtles=_)}
and a corresponding template:
<!DOCTYPE html><head><metacontent="text/html; charset=UTF-8"http-equiv="content-type"/><title>Disable Checkboxes</title></head><bodydata-lift-content-id="main"><divid="main"data-lift="surround?with=default;at=content"><div>Select the things you like:</div><formdata-lift="Likes"><labelfor="like">Do you like turtles?</label><inputid="like"type="checkbox"></form></div></body></html>
Further, suppose you want to disable it roughly 50% of the time. We could do that
by adjusting the NodeSeq generated from SHtml.checkbox:
packagecode.snippetimportnet.liftweb.util.Helpers._importnet.liftweb.util.PassThruimportnet.liftweb.http.SHtmlclassLikes{varlikesTurtles=falsedefdisable=if(math.random>0.5d)"* [disabled]"#>"disabled"elsePassThrudefrender="#like"#>disable(SHtml.checkbox(likesTurtles,likesTurtles=_))}
When the checkbox is rendered, it will be disabled roughly half the time.
The disable method returns a NodeSeq => NodeSeq function, meaning
when we apply it, we need to give it a
NodeSeq, which is exactly what SHtml.checkbox provides.
The [disabled] part of the CSS selector is selecting the disabled
attribute and replacing it with the value on the right of the #>,
which is "disabled" in this example.
What this combination means is that half the time the disabled attribute
will be set on the checkbox, and half the time the checkbox NodeSeq
will be left untouched because PassThru does not change the NodeSeq.
Returning Snippet Markup Unchanged describes the PassThru function.
You want to show a number of options in a select box, and allow the user to select multiple values.
Use SHtml.multiSelect(options, default, selection). Here’s an example where a user can select up to three options:
packagecode.snippetimportnet.liftweb.util.Helpers._importnet.liftweb.http.SHtmlimportnet.liftweb.common.LoggableclassMultiSelectextendsLoggable{caseclassItem(id:String,name:String)valinventory=Item("a","Coffee")::Item("b","Milk")::Item("c","Sugar")::Nilvaloptions:List[(String,String)]=inventory.map(i=>(i.id->i.name))valdefault=inventory.head.id::Nildefrender={defselection(ids:List[String]):Unit={logger.info("Selected: "+ids)}"#opts *"#>SHtml.multiSelect(options,default,selection)}}
In this example, the user is being presented with a list of three items, with the first one selected, as shown in Figure 3-3. When the form is submitted, the selection function is called, with a list of the selected option values.
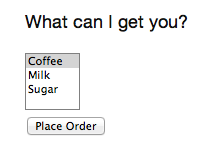
The template to go with the snippet could be:
<divdata-lift="MultiSelect?form=post"><p>What can I get you?</p><divid="opts">options go here</div><inputtype="submit"value="Place Order"></div>
This will render as something like:
<formaction="/"method="post"><div><p>What can I get you?</p><divid="opts"><selectname="F25749422319ALP1BW"multiple="true"><optionvalue="a"selected="selected">Coffee</option><optionvalue="b">Milk</option><optionvalue="c">Sugar</option></select></div><inputvalue="Place Order"type="submit"></form>
Recall that an HTML select consists of a set of options, each of which
has a value and a name. To reflect this, the previous example takes our
inventory of objects and turns it into a list of string
pairs, called options.
The function given to SHtml.multiSelect will receive the values (IDs), not
the names, of the options. That is, if you ran the code, and
selected "Coffee" and "Milk," the function would see List("a", "b").
Be aware that if no options are selected, your handling function is not called. This is described in issue 1139.
One way to work around this is to add a hidden function to reset the list. For example, we could modify the previous code to be a stateful snippet and remember the values we selected:
packagecode.snippetimportnet.liftweb.util.Helpers._importnet.liftweb.http.{StatefulSnippet,SHtml}importnet.liftweb.common.LoggableclassMultiSelectStatefulextendsStatefulSnippetwithLoggable{defdispatch={case_=>render}caseclassItem(id:String,name:String)valinventory=Item("a","Coffee")::Item("b","Milk")::Item("c","Sugar")::Nil
valoptions:List[(String,String)]=inventory.map(i=>(i.id->i.name))varcurrent=inventory.head.id::Nildefrender={deflogSelected()=logger.info("Values selected: "+current)"#opts *"#>(SHtml.hidden(()=>current=Nil)++SHtml.multiSelect(options,current,current=_))&"type=submit"#>SHtml.onSubmitUnit(logSelected)}}
The template is unchanged, and the snippet has been modified to introduce a current value and a hidden function to reset the value. We’ve bound the submit button to simply log the selected values when the form is submitted.
Each time the form is submitted the current list of IDs is set to
whatever you have selected in the browser. But note that we have started
with a hidden function that resets current to the empty list. This means
that if the receiving function in multiSelect is never called, because nothing is selected, the value stored in current would reflect this and be Nil.
That may be useful, depending on what behaviour you need in your application.
If you don’t want to work in terms of String values for an option, you
can use multiSelectObj. In this variation, the list of options still
provides a text name, but the value is in terms of a class. Likewise,
the list of default values will be a list of class instances.
The only changes to the code are to produce a List[(Item,String)] for the options, and use an Item as a default:
valoptions:List[(Item,String)]=inventory.map(i=>(i->i.name))valdefault=inventory.head::Nil
The call to generate the multiselect from this data is similar, but
note our selection function now receives a list of Item:
defrender={defselection(items:List[Item]):Unit={logger.info("Selected: "+items)}"#opts *"#>SHtml.multiSelectObj(options,default,selection)}
You can use multiSelectObj with enumerations:
packagecode.snippetimportnet.liftweb.util.Helpers._importnet.liftweb.http.SHtmlimportnet.liftweb.common.LoggableclassMultiSelectEnumextendsLoggable{objectItemextendsEnumeration{typeItem=ValuevalCoffee,Milk,Sugar=Value}importItem._valoptions:List[(Item,String)]=Item.values.toList.map(i=>(i->i.toString))valdefault=Item.Coffee::Nildefrender={defselection(items:List[Item]):Unit={logger.info("Selected: "+items)}"#opts *"#>SHtml.multiSelectObj(options,default,selection)}}
The enumeration version works in the same way as the type-safe version.
The "Submit styling" discussion in Ajax Form Processing discusses the use of hidden fields as function calls.
Call Server When Select Option Changes describes how to trigger a server-side action when a selection changes in the browser.
Chapter 6 of Exploring Lift, "Forms in Lift," discusses multiselect and other types of form elements.
You want a snippet to allow users to upload a file to your Lift application.
Use a FileParamHolder in your snippet, and extract file information from it when the form is submitted.
Start with a form that is marked as multipart=true:
<html><head><title>File Upload</title><scriptid="jquery"src="/classpath/jquery.js"type="text/javascript"></script><scriptid="json"src="/classpath/json.js"type="text/javascript"></script></head><body><formdata-lift="FileUploadSnippet?form=post;multipart=true"><labelfor="file">Select a file:<inputid="file"></input></label><inputtype="submit"value="Submit"></input></form></body></html>
We bind the file input to SHtml.fileUpload and the submit button to a function to process the uploaded file:
packagecode.snippetimportnet.liftweb.util.Helpers._importnet.liftweb.http.SHtml._importnet.liftweb.http.FileParamHolderimportnet.liftweb.common.{Loggable,Full,Empty,Box}classFileUploadSnippetextendsLoggable{defrender={varupload:Box[FileParamHolder]=EmptydefprocessForm()=uploadmatch{caseFull(FileParamHolder(_,mimeType,fileName,file))=>logger.info("%s of type %s is %d bytes long"format(fileName,mimeType,file.length))case_=>logger.warn("No file?")}"#file"#>fileUpload(f=>upload=Full(f))&"type=submit"#>onSubmitUnit(processForm)}}
The fileUpload binding ensures that the file is assigned to the upload variable. This allows us to access the Array[Byte] of the file in the processForm method when the form is submitted.
HTTP includes an encoding type of multipart/form-data that was introduced to support binary data uploads. The ?form=post;multipart=true parameters in the template mark the form with this encoding, and the HTML generated will look
like this:
<formenctype="multipart/form-data"method="post"action="/fileupload">
When the browser submits the form, Lift detects the multipart/form-data encoding and extracts any files from the request. These are available as uploadedFiles on a Req object, for example:
valfiles:List[FileParamHolder]=S.request.map(_.uploadedFiles)openOrNil
However, as we’re dealing with a form with a single upload field, it’s easier to use SHtml.fileUpload to bind the input to our upload variable. Lift arranges for the function f => upload = Full(f) to be called when a file is selected and uploaded via this field. If the file is zero length, the function is not called.
The default behaviour for Lift is to read the file into memory and present it as a FileParamHolder. In this recipe, we’re pattern matching on the fields of the FileParamHolder and simply printing out what we know about the file. We’re ignoring the first parameter, which will be Lift’s generated name for the field, but capturing the mime type, original filename, and the raw data that was in the file.
You probably don’t want to use this method for very large files. In fact, LiftRules provides a number of size restrictions that you can control:
LiftRules.maxMimeFileSizeThe maximum size of any single file uploaded (7 MB by default)
LiftRules.maxMimeSizeThe maximum size of the multipart upload in total (8 MB by default)
Why two settings? Because when the form is submitted, there may be a number of fields on the form. For example, in the recipe, the value of the submit button is sent as one of the parts, and the file is sent as another. Hence, you might want to limit file size, but allow for some field values, or multiple files, to be submitted.
If you hit the size limit, an exception will be thrown from the underlying file upload library. You can catch the exception, as described in Catch Any Exception:
LiftRules.exceptionHandler.prepend{case(_,_,x:FileUploadIOException)=>ResponseWithReason(BadResponse(),"Unable to process file. Too large?")}
Be aware that the container (Jetty, Tomcat) or any web server (Apache, Nginx) may also have limits on file upload sizes.
Uploading a file into memory may be fine for some situations, but you may want to upload larger items to disk and then process them in Lift as a stream. Lift supports this via the following setting:
LiftRules.handleMimeFile=OnDiskFileParamHolder.apply
The handleMimeFile variable expects to be given a function that takes a field name, mime type, filename, and InputStream and returns a FileParamHolder. The default implementation of this is the InMemFileParamHolder, but changing to OnDiskFileParamHolder means Lift will write the file to disk first. You can of course implement your own handler in addition to using OnDiskFileParamHolder or InMemFileParamHolder.
With OnDiskFileParamHolder, the file will be written to a temporary location (System.getProperty("java.io.tmpdir")), but it’s up to you to remove it when you’re done with the file. For example, our snippet could change to:
defprocessForm()=uploadmatch{caseFull(content:OnDiskFileParamHolder)=>logger.info("File: "+content.localFile.getAbsolutePath)valin:InputStream=content.fileStream// ...do something with the stream here...valwasDeleted_?=content.localFile.delete()case_=>logger.warn("No file?")}
Be aware that OnDiskFileParamHolder implements FileParamHolder, so would match the original FileParamHolder pattern used in the recipe. However, if you access the file field of OnDiskFileParamHolder, you’ll bring the file into memory, which would defeat the point of storing it on disk to process it as a stream.
If you want to monitor the progress of the upload on the server side, you can. There’s a hook in LiftRules that is called as the upload is running:
defprogressPrinter(bytesRead:Long,contentLength:Long,fieldIndex:Int){println("Read %d of %d for %d"format(bytesRead,contentLength,fieldIndex))}LiftRules.progressListener=progressPrinter
This is the progress of the whole multipart upload, not just the file being uploaded. In particular, the contentLength may not be known (in which case, it will be -1), but if it is known, it is the size of the complete multipart upload. In the example in this recipe, that would include the size of the file, but also the submit button value. This also explains the fieldIndex, which is a counter as to which part is being processed. It will take on the values of 0 and 1 for the two parts in this example.
The HTTP file upload mechanics are described in RFC 1867, Form-based File Upload in HTML.
Accept Binary Data in a REST Service discusses file upload in the context of a REST service.
See Ajax File Upload for an example of an Ajax file upload through integration with a JavaScript library, providing progress indicators and drag-and-drop support.
You want to use DRY declarative forms, like LiftScreen, but you want to be able
to completely control how the form is rendered, instead of a linear
layout of fields.
Use CssBoundLiftScreen, with field bindings for naming placements, and optionally
override the layout of specific individual field
elements.
Here’s an example snippet:
packagecode.snippetimportscala.xml.NodeSeqimportnet.liftweb.http._importnet.liftweb.http.FieldBinding.SelfobjectAccountInfoEditorextendsCssBoundLiftScreen{valformName="accountedit"overridedefallTemplate=savedDefaultXmlprotecteddefdefaultAllTemplate=super.allTemplate// Pull the definition of the "normal" field from a template, if it existsoverridedefdefaultFieldNodeSeq:NodeSeq=Templates("accounts"::"account_edit_field"::Nil).openOr(<div><labelclass="label field"></label><spanclass="value fieldValue"></span><spanclass="help"></span><divclass="errors"><divclass="error"></div></div></div>)overridedeffinish(){println("Account Edited for: "+firstName)S.notice("Done.")}// An example source of an account:caseclassAccount(firstName:String,lastName:String,address:String)defaccountToEdit=newAccount("Ada","Lovelace","Ockham Park, Surrey")// Fields:valfirstName=field("First Name",accountToEdit.firstName,trim,valMinLen(1,"First name is required"),FieldBinding("firstName"))vallastName=field("Last Name",accountToEdit.lastName,trim,valMinLen(1,"Last name is required"),FieldBinding("lastName"))valaddress=textarea("Address",accountToEdit.address,trim,valMinLen(1,"Address is required"),valMaxLen(255,"Address too long"),FieldBinding("address",Self))}
This snippet will present a (hypothetical) user account record, allowing a user to edit three fields. The fields have validation, and will be bound into a template.
A corresponding template might be called webapp/accountinfo.html:
<!DOCTYPE html><head><metacontent="text/html; charset=UTF-8"http-equiv="content-type"/><title>Custom CSS Binding Screen</title></head><bodydata-lift-content-id="main"><divid="main"data-lift="surround?with=default;at=content"><divdata-lift="AccountInfoEditor"><div><!--Drop regular Lift Screen elements where you want them.Here we're putting the Next (or Finish) button at the top.--><buttonclass="next"></button></div><divclass="fields"><h2>Account Details</h2><!--The template applied to each field is taken fromaccounts/account_edit_field.html--><divid="accountedit_firstName_field"class="large"></div><divid="accountedit_lastName_field"class="large"></div><!--The code binds this field with Self, meaning thefield template is inline in this template and willbe different:--><divid="accountedit_address_field"><divclass="large">The address where you like gifts sent:</div><divclass="errors"><divclass="error"></div></div><spanclass="value fieldValue"style="width:10em; height:5em"></span></div></div></div></div></body></html>
Running the snippet will cause CssBoundLiftScreen to apply the defaultFieldNodeSeq layout
to each field, with the exception of the "address" field that we have customised inside the template.
Pressing the "Finish" button triggers validations, presents errors (if any), or completes the edit via the finish method.
CssBoundLiftScreen uses the same model (by default) as LiftScreen, but with
CSS classes to identify elements in the default template (e.g.,
wizard-all.html). This powerful mechanism eliminates repetition in both
code and HTML; however, LiftScreen sacrifices flexibility in that there
is no way to make highly customized forms.
This restriction is removed in CssBoundLiftScreen by allowing you to control every
element of the form rendering. You can control everything form field placement to the layout of a
single field. You do so by embedding the custom template at the snippet usage site:
<divdata-lift="AccountInfoEditor"><!-- template for Screen goes here --></div>
and supply some additional binding hints. The form is still very minimal, while being completely under the control of the designer.
The example in the solution section demonstrates the most important aspects. In particular, you should note that you must still supply a source for the template, and that you can designate alternatives for sub-portions of the template. In the example, we allow the HTML designer direct access to the field template for this screen by making it possible to put the layout in a custom template file accounts/account_edit_field.html.
The rest is very easy. You must supply a formName declaration (in Scala) for
CssBoundLiftScreen, and a FieldBinding as an argument to each field. This,
combined with an internal function (that you can override), will generate unique
(but known) names that can be used in the template. The default pattern
is: "formName_fieldName_field". So, if you name your form
"myform", and bind a field to "address", then your
HTML template should include a div with the ID "myform_address_field". That is
all you need for normal bindings that use your field template.
To tweak the field layout for a particular field, you may
specify Self in the Scala field binding. This indicates the template for
that particular field should be sourced from the field’s div.
If you want to get even fancier there are additional field bindings, such as
Dynamic(() => NodeSeq), which uses the supplied function to generate a template
for the field each time it is rendered.
Further examples can be found in:
Peter Brant’s Lift Screen CSS Binding GitHub repository.
LiftScreen is described on the Lift Wiki and in Simply Lift.
This chapter looks at recipes around REST web services, via Lift’s RestHelper trait. For an introduction, take a look at the Lift wiki page and Chapter 5 of Simply Lift.
The sample code from this chapter is at https://github.com/LiftCookbook/cookbook_rest.
You find yourself repeating parts of URL paths in your RestHelper and
you Don’t want to Repeat Yourself (DRY).
Use prefix in your RestHelper:
packagecode.restimportnet.liftweb.http.rest.RestHelperimportnet.liftweb.http.LiftRulesobjectIssuesServiceextendsRestHelper{definit():Unit={LiftRules.statelessDispatch.append(IssuesService)}serve("issues"/"by-state"prefix{case"open"::NilXmlGet_=><p>Noneopen</p>case"closed"::NilXmlGet_=><p>Noneclosed</p>case"closed"::NilXmlDelete_=><p>Alldeleted</p>})}
This service responds to URLs of /issues/by-state/open and /issues/by-state/closed and we have
factored out the common part as a prefix.
Wire this into Boot.scala with:
importcode.rest.IssuesServiceIssuesService.init()
We can test the service with cURL:
$ curl -H 'Content-Type: application/xml'
    http://localhost:8080/issues/by-state/open
<?xml version="1.0" encoding="UTF-8"?>
<p>None open</p>

$ curl -X DELETE -H 'Content-Type: application/xml'
    http://localhost:8080/issues/by-state/closed
<?xml version="1.0" encoding="UTF-8"?>
<p>All deleted</p>
You can have many serve blocks in your RestHelper, which helps give
your REST service structure.
In this example, we’ve arbitrarily decided to return XML and to match on an XML request using XmlGet and XmlDelete. The test for an XML request requires a content type of text/xml or application/xml, or a request for a path that ends with .xml. This is why the cURL request includes a header with with the -H flag. If we hadn’t included that, the request would not match any of our patterns, and the result would be a 404 response.
Returning JSON gives an example of accepting and returning JSON.
Your RestHelper expects a filename as part of the URL, but the suffix
(extension) is missing, and you need it.
Access req.path.suffix to recover the suffix.
For example, when processing /download/123.png, you want to be able to reconstruct 123.png:
packagecode.restimportnet.liftweb.http.rest.RestHelperimportnet.liftweb.http.LiftRulesimportxml.TextobjectReuniteextendsRestHelper{privatedefreunite(name:String,suffix:String)=if(suffix.isEmpty)nameelsename+"."+suffixserve{case"download"::file::NilGetreq=>Text("You requested "+reunite(file,req.path.suffix))}definit():Unit={LiftRules.statelessDispatch.append(Reunite)}}
We are matching on download but rather than using the file value directly, we pass it through the reunite function first to attach the suffix back on (if any).
Requesting this URL with a command like cURL will show you the filename as expected:
$ curl http://127.0.0.1:8080/download/123.png
<?xml version="1.0" encoding="UTF-8"?>
You requested 123.png
When Lift parses a request, it splits the request into constituent parts
(e.g., turning the path into a List[String]). This includes a
separation of some suffixes. This is good for pattern matching when you
want to change behaviour based on the suffix, but a hindrance in this
particular situation.
Only those suffixes defined in LiftRules.explicitlyParsedSuffixes are
split from the filename. This includes many of the common file suffixes
(such as .png, .atom, .json) and also some you may not be so familiar
with, such as .com.
Note that if the suffix is not in explicitlyParsedSuffixes, the suffix
will be an empty string and the name (in the previous example) will be
the filename with the suffix still attached.
Depending on your needs, you could alternatively add a guard condition to check for the file suffix:
case"download"::file::NilGetreqifreq.path.suffix=="png"=>Text("You requested PNG file called "+file)
Or rather than simply attaching the suffix back on, you could take the opportunity to do some computation and decide what to send back. For example, if the client supports the WebP image format, you might prefer to send that:
packagecode.restimportnet.liftweb.http.rest.RestHelperimportnet.liftweb.http.LiftRulesimportxml.TextobjectReuniteextendsRestHelper{definit():Unit={LiftRules.statelessDispatch.append(Reunite)}serve{case"negotiate"::file::NilGetreq=>valtoSend=if(req.header("Accept").exists(_=="image/webp"))file+".webp"elsefile+".png"Text("You requested "+file+", would send "+toSend)}}
Calling this service would check the HTTP Accept header before deciding what resource to send:
$ curl http://localhost:8080/negotiate/123<?xml version="1.0" encoding="UTF-8"?>You requested 123, would send 123.png $ curl http://localhost:8080/negotiate/123 -H "Accept: image/webp"<?xml version="1.0" encoding="UTF-8"?>You requested 123, would send 123.webp
Missing .com from Email Addresses shows how to remove items from explicitlyParsedSuffixes.
The source for HttpHelpers.scala contains the explicitlyParsedSuffixes list, which is the default list of suffixes that Lift parses from a URL.
When submitting an email address to a REST service, a domain ending .com is stripped before your REST service can handle the request.
Modify LiftRules.explicitlyParsedSuffixes so that Lift doesn’t change URLs that end with .com.
In Boot.scala:
importnet.liftweb.util.HelpersLiftRules.explicitlyParsedSuffixes=Helpers.knownSuffixes-"com"
By default, Lift will strip off file suffixes from URLs to make it easy to match on suffixes. An example would be needing to match on all requests ending in .xml or .pdf. However, .com is also registered as one of those suffixes, but this is inconvenient if you have URLs that end with email addresses.
Note that this doesn’t impact email addresses in the middle of URLs. For example, consider the following REST service:
packagecode.restimportnet.liftweb.http.rest.RestHelperimportnet.liftweb.http.LiftRulesimportxml.TextobjectSuffixextendsRestHelper{definit():Unit={LiftRules.statelessDispatch.append(Suffix)}serve{case"email"::e::"send"::NilGetreq=>Text("In middle: "+e)case"email"::e::NilGetreq=>Text("At end: "+e)}}
With this service init method called in Boot.scala, we could then make requests and observe the issue:
$ curl http://localhost:8080/email/you@example.com/send<?xml version="1.0" encoding="UTF-8"?>In middle: you@example.com $ curl http://localhost:8080/email/you@example.com<?xml version="1.0" encoding="UTF-8"?>At end: you@example
The .com is being treated as a file suffix, which is why the solution of removing it from the list of suffixes will resolve this problem.
Note that because other top-level domains, such as .uk, .nl, .gov, are not in explicitlyParsedSuffixes, those email addresses are left untouched.
Missing File Suffix describes the suffix processing in more detail.
You’re trying to match on a file suffix (extension), but your match is failing.
Ensure the suffix you’re matching on is included in
LiftRules.explicitlyParsedSuffixes.
As an example, perhaps you want to match anything ending in .csv at your /reports/ URL:
caseReq("reports"::name::Nil,"csv",GetRequest)=>Text("Here's your CSV report for "+name)
You’re expecting /reports/foo.csv to produce "Here’s your CSV report for foo," but you get a 404.
To resolve this, include "csv" as a file suffix that Lift knows to split from URLs. In Boot.scala, call:
LiftRules.explicitlyParsedSuffixes+="csv"
The pattern will now match.
Without adding "csv" to the explicitlyParsedSuffixes, the example URL
would match with:
caseReq("reports"::name::Nil,"",GetRequest)=>Text("Here's your CSV report for "+name)
Here we’re matching on no suffix (""). In this case, name would be set to "foo.csv". This is because Lift separates file suffixes from the end of URLs only for file suffixes that are registered with explicitlyParsedSuffixes. Because "csv" is not one of the default registered suffixes, "foo.csv" is not split. That’s why "csv" in the suffix position of Req pattern match won’t match the request, but an empty string in that position will.
Missing File Suffix explains more about the suffix removal in Lift.
You want to accept an image upload, or other binary data, in your RESTful service.
Access the request body in your REST helper:
packagecode.restimportnet.liftweb.http.rest.RestHelperimportnet.liftweb.http.LiftRulesobjectUploadextendsRestHelper{definit():Unit={LiftRules.statelessDispatch.append(Upload)}serve{case"upload"::NilPostreq=>for{bodyBytes<-req.body}yield<info>Received{bodyBytes.length}bytes</info>}}
Wire this into your application in Boot.scala:
importcode.rest.UploadUpload.init()
Test this service using a tool like cURL:
$ curl -X POST --data-binary "@dog.jpg" -H 'Content-Type: image/jpg'
    http://127.0.0.1:8080/upload
<?xml version="1.0" encoding="UTF-8"?>
<info>Received 1365418 bytes</info>
In this example, the binary data is accessed via the req.body, which returns
a Box[Array[Byte]]. We turn this into a Box[Elem] to send back to the client.
Implicits in RestHelper turn this into an XmlResponse for Lift to handle.
Note that web containers, such as Jetty and Tomcat, may place limits on
the size of an upload. You will recognise this situation by an error
such as java.lang.IllegalStateException: Form too large705784>200000.
Check with documentation for the container for changing these limits.
To restrict the type of image you accept, you could add a guard condition to the match, but you may find you have more readable code by moving the logic into an unapply method on an object. For example, to restrict an upload to just a JPEG you could say:
serve{case"jpg"::NilPostJPeg(req)=>for{bodyBytes<-req.body}yield<info>JpegReceived{bodyBytes.length}bytes</info>}objectJPeg{defunapply(req:Req):Option[Req]=req.contentType.filter(_=="image/jpg").map(_=>req)}
We have defined an extractor called JPeg that returns Some[Req] if the content type of the upload is image/jpg; otherwise, the result will be None. This is used in the REST pattern match as JPeg(req). Note that the unapply needs to return Option[Req] as this is what’s expected by the Post extractor.
Odersky, et al., (2008), Programming in Scala, Chapter 24, discusses extractors in detail.
File Upload describes form-based (multipart) file uploads
You want to use the HTML5 video tag to serve videos.
Use a RestHelper to return a chunked StreamingResponse of a video.
A short example:
importnet.liftweb.http.StreamingResponseimportnet.liftweb.http.rest.RestHelperobjectStreamerextendsRestHelper{serve{casereq@Req(("video"::id::Nil),_,_)=>valfis=newFileInputStream(newFile(id))valsize=file.length-1valcontent_type="Content-Type"->"video/mp4"// replace with appropriate formatvalstart=0Lvalend=sizevalheaders=("Connection"->"close")::("Transfer-Encoding"->"chunked")::content_type::("Content-Range"->("bytes "+start.toString+"-"+end.toString+"/"+file.length.toString))::Nil()=>StreamingResponse(data=fis,onEnd=fis.close,size,headers,cookies=Nil,code=206)}}
The above example doesn’t allow the client to skip ahead in the file. The Range header must be parsed in order to facilitate this. It specifies what part of the file the client wishes to receive. Request headers are contained within the req@Req(urlParams, _, _) pattern in the previous example. The start and end can be extracted like so:
val(start,end)=req.header("Range")match{caseFull(r)=>{(parseNumber(r.substring(r.indexOf("bytes=")+6)),{if(r.endsWith("-"))file.length-1elseparseNumber(r.substring(r.indexOf("-")+1))})}case_=>(0L,file.length-1)}
Next, the response must skip ahead to the location in the video where the client wishes to begin. This is done by doing the following:
valfis:FileInputStream=...// Shown in the first examplefis.skip(start)
This recipe is based on the Streaming Response wiki article.
ObeseRabbit is a small application showcasing this feature.
Streaming Content describes StreamingResponse and similar types of response, such as OutputStreamResponse and InMemoryResponse.
Use the Lift JSON domain-specific language (DSL). For example:
packagecode.restimportnet.liftweb.http.rest.RestHelperimportnet.liftweb.http.LiftRulesimportnet.liftweb.json.JsonAST._importnet.liftweb.json.JsonDSL._objectQuotationsAPIextendsRestHelper{definit():Unit={LiftRules.statelessDispatch.append(QuotationsAPI)}serve{case"quotation"::NilJsonGetreq=>("text"->"A beach house isn't just real estate. It's a state of mind.")~("by"->"Douglas Adams"):JValue}}
Wire this into Boot.scala:
importcode.rest.QuotationsAPIQuotationsAPI.init()
Running this example produces:
$curl-H'Content-type:text/json'http://127.0.0.1:8080/quotation{"text":"A beach house isn't just real estate. It's a state of mind.","by":"Douglas Adams"}
The type ascription at the end of the JSON expression (: JValue)
tells the compiler that the expression is expected to be of type
JValue. This is required to allow the DSL to apply. It would not be
required if, for example, you were calling a function that was defined
to return a JValue.
The JSON DSL allows you to create nested structures, lists, and everything else you expect of JSON.
In addition to the DSL, you can create JSON from a case class by using the Extraction.decompose method:
importnet.liftweb.json.Extractionimportnet.liftweb.json.DefaultFormatscaseclassQuote(text:String,by:String)valquote=Quote("A beach house isn't just real estate. It's a state of mind.","Douglas Adams")implicitvalformats=DefaultFormatsvaljson:JValue=Extractiondecomposequote
This will also produce a JValue, which when printed will be:
{"text":"Abeachhouseisn'tjustrealestate.It'sastateofmind.","by":"DouglasAdams"}
The README file for the lift-json project is a great source of examples for using the JSON DSL.
You want to make a Google Sitemap using Lift’s rendering capabilities.
Create the Google site map structure, and bind to it as you would for any template in Lift. Then deliver it as XML content.
Start with a sitemap.html in your webapp folder containing valid XML-Sitemap markup:
<?xml version="1.0" encoding="utf-8" ?><urlsetxmlns="http://www.sitemaps.org/schemas/sitemap/0.9"><urldata-lift="SitemapContent.base"><loc></loc><changefreq>daily</changefreq><priority>1.0</priority><lastmod></lastmod></url><urldata-lift="SitemapContent.list"><loc></loc><lastmod></lastmod></url></urlset>
Make a snippet to fill the required gaps:
packagecode.snippetimportorg.joda.time.DateTimeimportnet.liftweb.util.CssSelimportnet.liftweb.http.Simportnet.liftweb.util.Helpers._classSitemapContent{caseclassPost(url:String,date:DateTime)lazyvalentries=Post("/welcome",newDateTime)::Post("/about",newDateTime)::NilvalsiteLastUdated=newDateTimedefbase:CssSel="loc *"#>"http://%s/".format(S.hostName)&"lastmod *"#>siteLastUpdated.toString("yyyy-MM-dd'T'HH:mm:ss.SSSZZ")deflist:CssSel="url *"#>entries.map(post=>"loc *"#>"http://%s%s".format(S.hostName,post.url)&"lastmod *"#>post.date.toString("yyyy-MM-dd'T'HH:mm:ss.SSSZZ"))}
This example is using canned data for two pages.
Apply the template and snippet in a REST service at /sitemap:
packagecode.restimportnet.liftweb.http._importnet.liftweb.http.rest.RestHelperobjectSitemapextendsRestHelper{serve{case"sitemap"::NilGetreq=>XmlResponse(S.render(<lift:embedwhat="sitemap"/>,req.request).head)}}
Wire this into your application in Boot.scala, and force Lift to process /sitemap as XML:
LiftRules.statelessDispatch.append(code.rest.Sitemap)LiftRules.htmlProperties.default.set({request:Req=>request.path.partPathmatch{case"sitemap"::Nil=>OldHtmlProperties(request.userAgent)case_=>Html5Properties(request.userAgent)}})
Test this service using a tool like cURL:
$ curl http://127.0.0.1:8080/sitemap<?xml version="1.0" encoding="UTF-8"?><urlsetxmlns="http://www.sitemaps.org/schemas/sitemap/0.9"><url><loc>http://127.0.0.1/</loc><changefreq>daily</changefreq><priority>1.0</priority><lastmod>2013-02-10T19:16:12.433+00:00</lastmod></url><url><loc>http://127.0.0.1/welcome</loc><lastmod>2013-02-10T19:16:12.434+00:00</lastmod></url><url><loc>http://127.0.0.1/about</loc><lastmod>2013-02-10T19:16:12.434+00:00</lastmod></url></urlset>
You may be wondering why we’ve used REST here when we could have used a regular HTML template and snippet. The reason is that we want XML rather than HTML output. We use the same mechanism, but invoke it and wrap it in an XmlResponse.
Using Lift’s regular snippet mechanism for rendering this XML is convenient. But although we are working with XML, Lift will be parsing sitemap.html using the default HTML5 parser. The behaviour of the parser follows the HTML5 specification and this is not the same as the behaviour you might expect from a parser for XML. For example, recognized HTML tags in an invalid position are moved by the HTML parser. To avoid these situations we have modified Boot.scala to use an XML parser for /sitemap.
The S.render method takes a NodeSeq and an HTTPRequest. The first we supply by running the sitemap.html snippet; the second is simply the current request. XmlResponse requires a Node rather than a NodeSeq, which is why we call head—as there’s only one node in the response, this does what we need.
Note that Google Sitemaps needs dates to be in ISO 8601 format. The built-in java.text.SimpleDateFormat does not support this format prior to Java 7. If you are using Java 6, you need to use org.joda.time.DateTime as we are in this example.
You’ll find an explanation of the Sitemap Protocol on Google’s Webmaster Tools site.
You want to make an HTTP POST from a native iOS device to a Lift REST service.
Use NSURLConnection, ensuring you set the content-type to application/json.
For example, suppose we want to call this service:
packagecode.restimportnet.liftweb.http.rest.RestHelperimportnet.liftweb.json.JsonDSL._importnet.liftweb.json.JsonAST._objectShoutyextendsRestHelper{defgreet(name:String):JValue="greeting"->("HELLO "+name.toUpperCase)serve{case"shout"::NilJsonPostjson->request=>for{JString(name)<-(json\\"name").toOpt}yieldgreet(name)}}
The service expects a JSON post with a parameter of name, and it returns a greeting as a JSON object. To demonstrate the data to and from the service, we can include the service in Boot.scala:
LiftRules.statelessDispatch.append(Shouty)
Call it from the command line:
$curl-d'{"name":"World"}'-XPOST-H'Content-type:application/json'http://127.0.0.1:8080/shout{"greeting":"HELLO WORLD"}
We can implement the POST request using NSURLConnection:
staticNSString*url=@"http://localhost:8080/shout";-(void)postAction{// JSON data:NSDictionary*dic=@{@"name":@"World"};NSData*jsonData=[NSJSONSerializationdataWithJSONObject:dicoptions:0error:nil];NSMutableURLRequest*request=[NSMutableURLRequestrequestWithURL:[NSURLURLWithString:url]cachePolicy:NSURLRequestUseProtocolCachePolicytimeoutInterval:60.0];// Construct HTTP request:[requestsetHTTPMethod:@"POST"];[requestsetValue:@"application/json"forHTTPHeaderField:@"Content-Type"];[requestsetValue:[NSStringstringWithFormat:@"%d",[jsonDatalength]]forHTTPHeaderField:@"Content-Length"];[requestsetHTTPBody:jsonData];// Send the request:NSURLConnection*con=[[NSURLConnectionalloc]initWithRequest:requestdelegate:self];}-(void)connection:(NSURLConnection*)connectiondidReceiveResponse:(NSURLResponse*)response{// Start off with new, empty, response dataself.receivedJSONData=[NSMutableDatadata];}-(void)connection:(NSURLConnection*)connectiondidReceiveData:(NSData*)data{// append incoming data[self.receivedJSONDataappendData:data];}-(void)connection:(NSURLConnection*)connectiondidFailWithError:(NSError*)error{NSLog(@"Error occurred ");}-(void)connectionDidFinishLoading:(NSURLConnection*)connection{NSError*e=nil;NSDictionary*JSON=[NSJSONSerializationJSONObjectWithData:self.receivedJSONDataoptions:NSJSONReadingMutableContainerserror:&e];NSLog(@"Return result: %@",[JSONobjectForKey:@"greeting"]);}
Obviously in this example we’ve used hardcoded values and URLs, but this will hopefully be a starting point for use in your application.
There are many ways to do HTTP POST from iOS, and it can be confusing to identify the correct way that works, especially without the aid of an external library. The previous example uses the iOS native API.
Another way is to use AFNetworking. This is a popular external library for iOS development, can cope with many scenarios, and is simple to use:
#import "AFHTTPClient.h"#import "AFNetworking.h"#import "JSONKit.h"staticNSString*url=@"http://localhost:8080/shout";-(void)postAction{// JSON data:NSDictionary*dic=@{@"name":@"World"};NSData*jsonData=[NSJSONSerializationdataWithJSONObject:dicoptions:0error:nil];// Construct HTTP request:NSMutableURLRequest*request=[NSMutableURLRequestrequestWithURL:[NSURLURLWithString:url]cachePolicy:NSURLRequestUseProtocolCachePolicytimeoutInterval:60.0];[requestsetHTTPMethod:@"POST"];[requestsetValue:@"application/json"forHTTPHeaderField:@"Content-Type"];[requestsetValue:[NSStringstringWithFormat:@"%d",[jsonDatalength]]forHTTPHeaderField:@"Content-Length"];[requestsetHTTPBody:jsonData];// Send the request:AFJSONRequestOperation*operation=[[AFJSONRequestOperationalloc]initWithRequest:request];[operationsetCompletionBlockWithSuccess:^(AFHTTPRequestOperation*operation,idresponseObject){NSString*response=[operationresponseString];// Use JSONKit to deserialize the response into NSDictionaryNSDictionary*deserializedJSON=[responseobjectFromJSONString];[deserializedJSONcount];// The response object can be a NSDicionary or a NSArray:if([deserializedJSONcount]>0){NSLog(@"Return value: %@",[deserializedJSONobjectForKey:@"greeting"]);}else{NSArray*deserializedJSONArray=[responseobjectFromJSONString];NSLog(@"Return array value: %@",deserializedJSONArray);}}failure:^(AFHTTPRequestOperation*operation,NSError*error){NSLog(@"Error: %@",error);}];[operationstart];}
The NSURLConnection approach is more versatile and gives you a starting point to craft your own solution, such as by making the content type more specific. However, AFNetworking is popular and you may prefer that route.
You may find the "Complete REST Example" in Simply Lift to be a good test ground for your calls to Lift.
Lift is known for its great Ajax and Comet support, and in this chapter, we’ll explore these.
For an introduction to Lift’s Ajax and Comet features, see Simply Lift, Chapter 9 of Lift in Action (Perrett, 2012, Manning Publications, Co.), or watch Diego Medina’s video presentation.
The source code for this chapter is at https://github.com/LiftCookbook/cookbook_ajax.
You want to trigger some server-side code when the user presses a button.
Use ajaxInvoke:
packagecode.snippetimportnet.liftweb.util.Helpers._importnet.liftweb.http.SHtmlimportnet.liftweb.http.js.{JsCmd,JsCmds}importnet.liftweb.common.LoggableobjectAjaxInvokeextendsLoggable{defcallback():JsCmd={logger.info("The button was pressed")JsCmds.Alert("You clicked it")}defbutton="button [onclick]"#>SHtml.ajaxInvoke(callback)}
In this snippet, we are binding the click event of a button to an ajaxInvoke: when the button is pressed, Lift
arranges for the function you gave ajaxInvoke to be executed.
That function, callback, is just logging a message and returning a JavaScript alert to the browser. The corresponding HTML might include:
<divdata-lift="AjaxInvoke.button"><button>Click Me</button></div>
The signature of the function you pass to ajaxInvoke is
Unit => JsCmd, meaning you can trigger a range of behaviours: from
returning Noop if you want nothing to happen, through changing DOM
elements, all the way up to executing arbitrary JavaScript.
The previous example uses a button but will work on any element that
has an event you can bind to. We’re binding to onclick but it could be any event
the DOM exposes.
Related to ajaxInvoke are the following functions:
SHtml.onEventCalls a function with the signature String => JsCmd because it
is passed the value of the node it is attached to. In the previous
example, this would be the empty string, as the button has no value.
SHtml.ajaxCallThis is more general than onEvent, as you give it the expression you want passed to your server-side code.
SHtml.jsonCallThis is even more general still: you give it a function that will return a JSON object when executed on the client, and this object will be passed to your server-side function.
Let’s look at each of these in turn.
You can use onEvent with any element that has a value attribute and responds to the event you choose to bind to. The function you supply to onEvent is called with the element’s value. As an example, we can write a snippet that presents a challenge to the user and validates the response:
packagecode.snippetimportscala.util.Randomimportnet.liftweb.util.Helpers._importnet.liftweb.http.SHtmlimportnet.liftweb.http.js.JsCmds.AlertobjectOnEvent{defrender={valx,y=Random.nextInt(10)valsum=x+y"p *"#>"What is %d + %d?".format(x,y)&"input [onchange]"#>SHtml.onEvent(answer=>if(answer==sum.toString)Alert("Correct!")elseAlert("Try again"))}}
This snippet prompts the user to add the two random numbers presented in the <p> tag, and binds a validation function to the <input> on the page:
<divdata-lift="OnEvent"><p>Problem appears here</p><inputplaceholder="Type your answer"></input></div>
When onchange is triggered (by pressing Return or the Tab key, for example), the text entered is sent to our onEvent function as a String. On the server-side, we check the answer and send back "Correct!" or "Try again" as a JavaScript alert.
Where onEvent sends this.value to your server-side code, ajaxCall allows you to specify the client-side expression used to produce a value.
To demonstrate this, we can create a template that includes two elements: a button and a text field. We’ll bind our function to the button, but read a value from the input field:
<divdata-lift="AjaxCall"><inputid="num"value="41"></input><button>Increment</button></div>
We want to arrange for the button to read the num field, increment it, and return it back to the input field:
packagecode.snippetimportnet.liftweb.util.Helpers._importnet.liftweb.http.SHtmlimportnet.liftweb.http.js.JE.ValByIdimportnet.liftweb.http.js.JsCmds._objectAjaxCall{defincrement(in:String):String=asInt(in).map(_+1).map(_.toString)openOrindefrender="button [onclick]"#>SHtml.ajaxCall(ValById("num"),s=>SetValById("num",increment(s)))}
The first argument to ajaxCall is the expression that will produce a value for our function. It can be any JsExp, and we’ve
used ValById, which looks up the value of an element by the ID attribute. We could have used a regular jQuery expression to achieve the same effect with JsRaw("$('#num').val()").
Our second argument to ajaxCall takes the value of the JsExp expression as a String. We’re using one of Lift’s JavaScript commands to replace the value with a new value. The new value is the result of incrementing the number (providing it is a number).
The end result is that you press the button and the number updates. It should go without saying that these are simple illustrations, and you probably don’t want a server round-trip to add one to a number. The techniques come into their own when there is some action of value to perform on the server.
You may have guessed that onEvent is implemented as an ajaxCall for JsRaw("this.value").
Both ajaxCall and onEvent end up evaluating a String => JsCmd function. By contrast, jsonCall has the signature JValue => JsCmd, meaning you can pass more complex data structures from JavaScript to your Lift application.
To demonstrate this, we’ll create a template that asks for input, has a function to convert the input into JSON, and a button to send the JSON to the server:
<divdata-lift="JsonCall"><p>Enter an addition question:</p><div><inputid="x">+<inputid="y">=<inputid="z">.</div><button>Check</button></div><scripttype="text/javascript">//<![CDATA[function currentQuestion() {return {first: parseInt($('#x').val()),second: parseInt($('#y').val()),answer: parseInt($('#z').val())};}// ]]>
The currentQuestion function is creating an object, which will be turned into a JSON string when sent to the server. On the server, we’ll check that this JSON represents a valid integer addition problem:
packagecode.snippetimportnet.liftweb.util.Helpers._importnet.liftweb.http.SHtmlimportnet.liftweb.http.js.{JsCmd,JE}importnet.liftweb.common.Loggableimportnet.liftweb.json.JsonAST._importnet.liftweb.http.js.JsCmds.Alertimportnet.liftweb.json.DefaultFormatsobjectJsonCallextendsLoggable{implicitvalformats=DefaultFormatscaseclassQuestion(first:Int,second:Int,answer:Int){defvalid_?=first+second==answer}defrender={defvalidate(value:JValue):JsCmd={logger.info(value)value.extractOpt[Question].map(_.valid_?)match{caseSome(true)=>Alert("Looks good")caseSome(false)=>Alert("That doesn't add up")caseNone=>Alert("That doesn't make sense")}}"button [onclick]"#>SHtml.jsonCall(JE.Call("currentQuestion"),validate_)}}
Working from the bottom of this snippet up, we see a binding of the <button> to the jsonCall. The value we’ll be working on is the value provided by the JavaScript function called currentQuestion. This was defined on the template page. When the button is clicked, the JavaScript function is called and the resulting value will be presented to validate, which is our JValue => JsCmd function.
All validate does is log the JSON data and alert back if the question looks correct or not. To do this, we use the Lift JSON ability to extract JSON to a case class and call the valid_? test to see if the numbers add up. This will evaluate to Some(true) if the addition works, Some(false) if the addition isn’t correct, or None if the input is missing or not a valid integer.
Running the code and entering 1, 2, and 3 into the text fields will produce the following in the server log:
JObject(List(JField(first,JInt(1)),JField(second,JInt(2)),JField(answer,JInt(3))))
This is the JValue representation of the JSON.
Call Server When Select Option Changes includes an example of SHtml.onEvents, which will bind a function to a number of events on a NodeSeq.
Exploring Lift, Chapter 10, lists various JsExp classes you can use for ajaxCall.
Ajax JSON Form Processing using JsonHandler to send JSON data from a form to the server.
When an HTML select option is selected, you want to trigger a function on the server.
Register a String => JsCmd function with SHtml.ajaxSelect.
In this example, we will look up the distance from Earth to the planet a user selects. This lookup will happen on the server and update the browser with the result. The interface is:
<divdata-lift="HtmlSelectSnippet"><div><labelfor="dropdown">Planet:</label><selectid="dropdown"></select></div><divid="distance">Distance will appear here</div></div>
The snippet code binds the <select> element to send the selected value to the server:
packagecode.snippetimportnet.liftweb.common.Emptyimportnet.liftweb.util.Helpers._importnet.liftweb.http.SHtml.ajaxSelectimportnet.liftweb.http.js.JsCmdimportnet.liftweb.http.js.JsCmds.SetHtmlimportxml.TextclassHtmlSelectSnippet{// Our "database" maps planet names to distances:typePlanet=StringtypeLightYears=Doublevaldatabase=Map[Planet,LightYears]("Alpha Centauri Bb"->4.23,"Tau Ceti e"->11.90,"Tau Ceti f"->11.90,"Gliese 876 d"->15.00,"82 G Eridani b"->19.71)defrender={// To show the user a blank label and blank value option:valblankOption=(""->"")// The complete list of options includes everything in our database:valoptions:List[(String,String)]=blankOption::database.keys.map(p=>(p,p)).toList// Nothing is selected by default:valdefault=Empty// The function to call when an option is picked:defhandler(selected:String):JsCmd={SetHtml("distance",Text(database(selected)+" light years"))}// Bind the <select> tag:"select"#>ajaxSelect(options,default,handler)}}
The last line of the code is doing the work for us. It is generating the options and binding
the selection to a function called handler. The handler function is called with the value
of the selected item.
We’re using the same String (the planet name) for the option label and value, but they could be
different.
To understand what’s going on here, take a look at the HTML that Lift produces:
<selectid="dropdown"onchange="liftAjax.lift_ajaxHandler('F470183993611Y15ZJU=' +this.options[this.selectedIndex].value, null, null, null)"><optionvalue=""></option><optionvalue="Tau Ceti e">Tau Ceti e</option>...</select>
The handler function has been stored by Lift under the identifier of F470183993611Y15ZJU (in this particular rendering). An onchange event handler is attached to the <select> element and is responsible for transporting the selected value to the server, and bringing a value back. The lift_ajaxHandler JavaScript function is defined in liftAjax.js, which is automatically added to your page.
If you need to additionally capture the selected value on a regular form submission, you can make use of SHtml.onEvents. This attaches event listeners to a NodeSeq, triggering a server-side function when the event occurs. We can use this with a regular form with a regular select box, but wire in Ajax calls to the server when the select changes.
To make use of this, our snippet changes very little:
varselectedValue:String="""select"#>onEvents("onchange")(handler){select(options,default,selectedValue=_)}&"type=submit"#>onSubmitUnit(()=>S.notice("Destination "+selectedValue))
We are arranging for the same handler function to be called when an onchange event is triggered. This event binding is applied to a regular SHtml.select, which is storing the selectedValue when the form is submitted. We also bind a submit button to a function that generates a notice of which planet was selected.
The corresponding HTML also changes little. We need to add a button and make sure the snippet is marked as a form with ?form:
<divdata-lift="HtmlSelectFormSnippet?form=post"><div><labelfor="dropdown">Planet:</label><selectid="dropdown"></select></div><divid="distance">Distance will appear here</div><inputtype="submit"value="Book Ticket"/></div>
Now when you change a selected value, you see the dynamically updated distance calculation, but pressing the "Book Ticket" button also delivers the value to the server.
Use a Select Box with Multiple Options describes how to use classes rather than String values for select boxes.
In your Lift code you want to set up an action that is run purely in client-side JavaScript.
Bind your JavaScript directly to the event handler you want to run.
Here’s an example where we make a button slowly fade away when you press it, but notice that we’re setting up this binding in our server-side Lift code:
packagecode.snippetimportnet.liftweb.util.Helpers._objectClientSide{defrender="button [onclick]"#>"$(this).fadeOut()"}
In the template, we’d perhaps say:
<divdata-lift="ClientSide"><button>Click Me</button></div>
Lift will render the page as:
<buttononclick="$(this).fadeOut()">Click Me</button>
Lift includes a JavaScript abstraction that you can use to build up more elaborate expressions for the client-side. For example, you can combine basic commands:
importnet.liftweb.http.js.JsCmds.{Alert,RedirectTo}defrender="button [onclick]"#>(Alert("Here we go...")&RedirectTo("http://liftweb.net"))
This pops up an alert dialog and then sends you to http://liftweb.net. The HTML would be rendered as:
<buttononclick="alert("Here we go...");window.location = "http://liftweb.net";">Click Me</button>
Another option is to use JE.Call to execute a JavaScript function with
parameters. Suppose we have this function defined:
functiongreet(who,times){for(i=0;i<times;i++)alert("Hello "+who);}
We could bind a client-side button press to this client-side function like this:
importnet.liftweb.http.js.JEdefrender="button [onclick]"#>JE.Call("greet","World!",3)
On the client-side, we’d see:
<buttononclick="greet("World!",3)">Click Me For Greeting</button>
Note that the types String and Int have been preserved in the JavaScript syntax of the call. This has happened because JE.Call takes a variable number of JsExp arguments after the JavaScript function name. There are wrappers for JavaScript primitive types (JE.Str, JE.Num, JsTrue, JsFalse) and implicit conversions to save you having to wrap the Scala values yourself.
Chapter 10 of Exploring Lift gives a list of JsCmds and JE expressions.
When a page loads, you want the browser to select a particular field for input from the keyboard.
Wrap the input with a FocusOnLoad command:
packagecode.snippetimportnet.liftweb.util.Helpers._importnet.liftweb.http.js.JsCmds.FocusOnLoadclassFocus{defrender="name=username"#>FocusOnLoad(<inputtype="text"/>)}
The CSS transform in render will match against a name="username" element in the HTML and
replace it with a text input field that will be focused on automatically
when the page loads.
Although we’re focusing on inline HTML, this could be any NodeSeq, such as the one produced by SHtml.text.
FocusOnLoad is an example of a NodeSeq => NodeSeq transformation. It appends to the NodeSeq with the
JavaScript required to set focus on that field.
The JavaScript that performs the focus simply looks up the node in the DOM by ID and calls focus on it. Although the previous example code doesn’t specify an ID, the command FocusOn is smart enough to add one automatically for us.
There are two related JsCmd choices:
FocusTakes an element ID and sets focus on the element
SetValueAndFocusSimilar to Focus, but takes an additional
String value to populate the element with
These two are useful if you need to set focus from Ajax or Comet components dynamically.
The source for FocusOnLoad is worth checking out to understand how it and related commands are constructed. This may help you package your own JavaScript functionality up into commands that can be used in CSS binding expressions.
Add a CSS Class to an Ajax Form ~~~~~~~~~~~
Name the class via ?class= query parameter:
<formdata-lift="form.ajax?class=boxed">...</form>
If you need to set multiple CSS classes, encode a space between the
class names (e.g., class=boxed+primary).
The form.ajax construction is a regular snippet call: the Form snippet is one of the handful of built-in snippets, and in this case, we’re calling the ajax method on that object. However, normally snippet calls do not copy attributes into the resulting markup, but this snippet is implemented to do exactly that.
For an example of accessing these query parameters in your own snippets, see HTML Conditional Comments.
Simply Lift, Chapter 4, introduces Ajax forms.
You want to load an entire page—a template with snippets—inside of the current page (i.e., without a browser refresh).
Use Template to load the template and SetHtml to place the content
on the page.
Let’s populate a <div> with the site home page when a button is pressed:
<divdata-lift="TemplateLoad"><divid="inject">Content will appear here</div><button>Load Template</button></div>
The corresponding snippet would be:
packagecode.snippetimportnet.liftweb.util.Helpers._importnet.liftweb.http.{SHtml,Templates}importnet.liftweb.http.js.JsCmds.{SetHtml,Noop}importnet.liftweb.http.js.JsCmdobjectTemplateLoad{defcontent:JsCmd=Templates("index"::Nil).map(ns=>SetHtml("inject",ns))openOrNoopdefrender="button [onclick]"#>SHtml.ajaxInvoke(content_)}
Clicking the button will cause the content of /index.html to be
loaded into the inject element.
Templates produces a Box[NodeSeq]. In the previous example, we map this content into a JsCmd that will populate the inject <div>.
If you write unit tests to access templates, be aware that you may need to modify your development or testing environment to include the webapps folder. To do this for SBT, add the following to build.sbt:
unmanagedResourceDirectoriesinTest<+=(baseDirectory){_/"src/main/webapp"}
For this to work in your IDE, you’ll need to add webapp as a source folder to locate templates.
Trigger Server-Side Code from a Button describes ajaxInvoke and related methods.
You want the JavaScript created in your snippet to be included at the end of the HTML page.
Use S.appendJs, which places your JavaScript just before the closing </body> tag, along with other JavaScript produced by Lift.
In this HTML, we have placed a <script> tag in the middle of the page and marked it with a snippet called JavaScriptTail:
<!DOCTYPE html><head><metacontent="text/html; charset=UTF-8"http-equiv="content-type"/><title>JavaScript in Tail</title></head><bodydata-lift-content-id="main"><divid="main"data-lift="surround?with=default;at=content"><h2>JavaScript in the tail of the page</h2><scripttype="text/javascript"data-lift="JavaScriptTail"></script><p>The JavaScript about to be run will have been moved to the end of this page, just before the closing body tag.</p></div></body></html>
The <script> content will be generated by a snippet.
It doesn’t need to be a <script> tag; the snippet just replaces the content with nothing, but
hanging the snippet on the <script> tag is a reminder of the purpose of the snippet:
packagecode.snippetimportnet.liftweb.util.Helpers._importnet.liftweb.http.js.JsCmds.Alertimportnet.liftweb.http.Simportxml.NodeSeqclassJavaScriptTail{defrender={S.appendJs(Alert("Hi"))"*"#>NodeSeq.Empty}}
Although the snippet is rendering nothing, it calls S.appendJs with a JsCmd. This will produce the following in the page just before the end of the body:
<scripttype="text/javascript">// <![CDATA[jQuery(document).ready(function(){alert("Hi");});// ]]></script>
Observe that the snippet was in the middle of the template, but the JavaScript appears at the end of the rendered page.
There are three other ways you could tackle this problem. The first is to move your JavaScript to an external file, and simply include it on the page where you want it. For substantial JavaScript code, this might make sense.
The second is a variation on S.appendJs: S.appendGlobalJs works in the same way but does not include the jQuery ready around your JavaScript. This means you have no guarantee the DOM has loaded when your function is called.
A third option is wrap your JavaScript in a <lift:tail> snippet:
classJavascriptTail{defrender="*"#><lift:tail>{Script(OnLoad(Alert("Hi")))}</lift:tail>}
Note that lift:tail is a general purpose Lift snippet and can be used to move various kinds of content to the end of the page, not just JavaScript.
Adding to the Head of a Page discusses a related Lift snippet for moving content to the head of the page.
Snippet Not Found When Using HTML5 describes the different ways of invoking a snippet, such as <lift:tail> versus data-lift="tail".
You’re using a Comet actor and you want to arrange for some JavaScript to be executed in the event of the session being lost.
Configure your JavaScript via LiftRules.noCometSessionCmd.
As an example, we can modify the standard Lift chat demo to save the message being typed in the event of the session loss. In the style of the demo, we would have an Ajax form for entering a message and the Comet chat area for displaying messages received:
<formdata-lift="form.ajax"><inputtype="text"data-lift="ChatSnippet"id="message"placeholder="Type a message"/></form><divdata-lift="comet?type=ChatClient"><ul><li>A message</li></ul></div>
To this we can add a function, stash, which we want to be called in the event of a Comet session being lost:
<scripttype="text/javascript">// <![CDATA[functionstash(){saveCookie("stashed",$('#message').val());location.reload();}jQuery(document).ready(function(){varstashedValue=readCookie("stashed")||"";$('#message').val(stashedValue);deleteCookie("stashed");});// Definition of saveCookie, readCookie, deleteCookie omitted.</script>
Our stash function will save the current value of the input field in a cookie called stashed. We arrange, on page load, to check for that cookie and insert the value into our message field.
The final part is to modify Boot.scala to register our stash function:
importnet.liftweb.http.js.JsCmds.RunLiftRules.noCometSessionCmd.default.set(()=>Run("stash()"))
In this way, if a session is lost while composing a chat message, the browser will stash the message, and when the page reloads the message will be recovered.
To test the example, type a message into the message field, then restart your Lift application. Wait 10 seconds, and you’ll see the effect.
Without changing noCometSessionCmd, the default behaviour of Lift is to arrange for the browser to load the home page, which is controlled by the LiftRules.noCometSessionPage setting. This is carried out via the JavaScript function lift_sessionLost in the file cometAjax.js.
By providing our own () => JsCmd function to LiftRules.noCometSessionCmd, Lift arranges to call this function and deliver the JsCmd to the browser, rather than lift_sessionLost. If you watch the HTTP traffic between your browser and Lift, you’ll see the stash function call being returned in response to a Comet request.
This recipe has focused on the handling of loss of session for Comet; for Ajax, there’s a corresponding LiftRules.noAjaxSessionCmd setting.
You’ll find the The ubiquitous Chat app in Simply Lift.
Being able to debug HTTP traffic is a useful way to understand how your Comet or Ajax application is performing. There are many plugins and products to help with this, such as the HttpFox plugin for Firefox.
You want to offer your users an Ajax file upload tool, with progress bars and drag-and-drop support.
Add Sebastian Tschan’s jQuery File Upload widget to your project, and implement a REST end point to receive files.
The first step is to download the widget and drag the js folder into your application as src/main/webapp/js. We can then use the JavaScript in a template:
<!DOCTYPE HTML><html><head><metacharset="utf-8"><title>jQuery File Upload Example</title></head><body><h1>Drag files onto this page</h1><inputid="fileupload"type="file"name="files[]"data-url="/upload"multiple><divid="progress"style="width:20em; border: 1pt solid silver; display: none"><divid="progress-bar"style="background: green; height: 1em; width:0%"></div></div><scriptsrc="//ajax.googleapis.com/ajax/libs/jquery/1.8.3/jquery.min.js"></script><scriptsrc="js/vendor/jquery.ui.widget.js"></script><scriptsrc="js/jquery.iframe-transport.js"></script><scriptsrc="js/jquery.fileupload.js"></script><script>$(function(){$('#fileupload').fileupload({dataType:'json',add:function(e,data){$('#progress-bar').css('width','0%');$('#progress').show();data.submit();},progressall:function(e,data){varprogress=parseInt(data.loaded/data.total*100,10)+'%';$('#progress-bar').css('width',progress);},done:function(e,data){$.each(data.files,function(index,file){$('<p/>').text(file.name).appendTo(document.body);});$('#progress').fadeOut();}});});</script></body></html>
This template provides an input field for files, an area to use as a progress indicator, and configures the widget when the page loads in a jQuery $( ... ) block. This is just regular usage of the JavaScript widget, and nothing particularly Lift-specific.
The final part is to implement a Lift REST service to receive the file or files. The URL of the service, /upload, is set in data-url on the input field, and that’s the address we match on:
packagecode.restimportnet.liftweb.http.rest.RestHelperimportnet.liftweb.http.OkResponseobjectAjaxFileUploadextendsRestHelper{serve{case"upload"::NilPostreq=>for(file<-req.uploadedFiles){println("Received: "+file.fileName)}OkResponse()}}
This implementation simply logs the name of the file received and acknowledges successful delivery with a 200 status code back to the widget.
As with all REST services, it needs to be registered in Boot.scala:
LiftRules.dispatch.append(code.rest.AjaxFileUpload)
By default, the widget makes the whole HTML page a drop-target for files, meaning you can drag a file onto the page and it will immediately be uploaded to your Lift application.
In this recipe, we’ve shown just the basic integration of the widget with a Lift application. The demo site for the widget shows other capabilities, and provides documentation on how to integrate them.
Many of the features just require JavaScript configuration. For example, we’ve used the widget’s add, progressall, and done handlers to show, update, and then fade out a progress bar. When the upload is completed, the name of the uploaded file is appended to the page.
In the REST service, the uploaded files are available via the uploadedFiles method on the request. When Lift receives a multipart form, it automatically extracts files as uploadedFiles, each of which is a FileParamHolder that gives us access to the fileName, length, mimeType, and fileStream.
By default, uploaded files are held in memory, but that can be changed (see undefined '3-203' in File Upload).
In this recipe, we return a 200 (OkResponse). If we wanted to signal to the widget that a file was rejected, we can return another code. For example, perhaps we want to reject all files except PNG images. On the server-side we can do that by replacing the OkResponse with a test:
importnet.liftweb.http.{ResponseWithReason,BadResponse,OkResponse}if(req.uploadedFiles.exists(_.mimeType!="image/png"))ResponseWithReason(BadResponse(),"Only PNGs")elseOkResponse()
We would mirror this with a fail handler in the client JavaScript:
fail:function(e,data){alert(data.errorThrown);}
If we uploaded, say, a JPEG, the browser would show an alert dialog reporting "Only PNGs."
Diego Medina has posted a Gist of Lift REST code to integrate more fully with the image upload and image reviewing features of the widget, specifically implementing the JSON response that the widget expects for that functionality.
File Upload describes the basic file upload behaviour of Lift and how to control where files are stored.
Antonio Salazar Cardozo has posted example code for performing Ajax file upload using Lift’s Ajax mechanisms. This avoids external JavaScript libraries.
You want a wired UI element to have a different format than plain conversion to a string. For example, you’d like to display a floating-point value as a currency.
Use the WiringUI.toNode method to create a wiring node that can render the output formatted as you desire.
As an example, consider an HTML template to display the quantity of an item being purchased and the subtotal:
<divdata-lift="Wiring"><table><tbody><tr><td>Quantity</td><tdid="quantity">?</td></tr><tr><td>Subtotal</td><tdid="subtotal">?</td></tr></tbody></table><buttonid="add">Add Another One</button></div>
We’d like the subtotal to display as US dollars. The snippet would be:
packagecode.snippetimportjava.text.NumberFormatimportjava.util.Localeimportscala.xml.{NodeSeq,Text}importnet.liftweb.util.Helpers._importnet.liftweb.util.{Cell,ValueCell}importnet.liftweb.http.{S,WiringUI}importnet.liftweb.http.SHtml.ajaxInvokeimportnet.liftweb.http.js.JsCmdclassWiring{valcost=ValueCell(1.99)valquantity=ValueCell(1)valsubtotal=cost.lift(quantity)(_*_)valformatter=NumberFormat.getCurrencyInstance(Locale.US)defcurrency(cell:Cell[Double]):NodeSeq=>NodeSeq=WiringUI.toNode(cell)((value,ns)=>Text(formatterformatvalue))defincrement():JsCmd={quantity.atomicUpdate(_+1)S.notice("Added One")}
defrender="#add [onclick]"#>ajaxInvoke(increment)&"#quantity *"#>WiringUI.asText(quantity)&"#subtotal *"#>currency(subtotal)}
We have defined a currency method to format the subtotal not as a Double but as a currency amount using the Java number-formatting capabilities. This will result in values like "$19.90" being shown rather than "19.9."
The primary WiringUI class makes it easy to bind a cell as text. The asText method works by converting a value to a String and wrapping it in a Text node. This is done via toNode, however, we can use the toNode method directly
to generate a transform function that is both hooked into the wiring UI and
uses our code for the translation of the item.
The mechanism is type-safe. In this example, cost is a Double cell, quantity is an Int cell, and subtotal is inferred as a Cell[Double]. This is why our formatting function is passed value as a Double.
Note that the function passed to toNode must return a NodeSeq. This gives a great deal of flexibility as you can return any kind of markup in a NodeSeq. Our example complies with this signature by wrapping a text value in a Text object.
The WiringUI.toNode requires a (T, NodeSeq) => NodeSeq. In the previous example, we ignore the NodeSeq, but the value would be the contents of the element we’ve bound to. Given the input:
<tdid="subtotal">?</td>
this would mean the NodeSeq passed to us would just be the text node representing "?". With a richer template we can use CSS selectors. For example, we can modify the template:
<td>Subtotal</td><tdid="subtotal"><i>The value is<bclass="amount">?</b></i></td>
Now we can apply a CSS selector to change just the amount element:
(value,ns)=>(".amount *"#>Text(formatterformatvalue))applyns)
Chapter 6 of Simply Lift describes Lift’s Wiring mechanism, and gives a detailed shopping example.
When a request reaches Lift, there are a number of points where you can jump in and control what Lift does, sending back a different kind of response or controlling access. This chapter looks at the pipeline through examples of different kinds of
LiftResponses and configurations.
You can get a great overview of the pipeline, including diagrams, from the Lift pipeline wiki page.
See https://github.com/LiftCookbook/cookbook_pipeline for the source code that accompanies this chapter.
You want to debug a request and see what’s arriving to your Lift application.
Add an onBeginServicing function in Boot.scala to log the request.
For example:
LiftRules.onBeginServicing.append{caser=>println("Received: "+r)}
The onBeginServicing call is called quite early in the Lift pipeline, before
S is set up, and before Lift has the chance to 404 your request. The function signature it expects is Req => Unit.
We’re just logging, but the functions could be used for other purposes.
If you want to select only certain paths, you can. For example, to track all requests starting /paypal:
LiftRules.onBeginServicing.append{caser@Req("paypal"::_),_,_)=>println(r)}
This pattern will match any request starting /paypal, and we’re ignoring the suffix on the request, if any, and the type of request (e.g., GET, POST, or so on).
There’s also LiftRules.early, which is called before onBeginServicing. It expects an HTTPRequest => Unit function, so is a little lower-level than the Req used in onBeginServicing. However, it will be called by all requests that pass through Lift. To see the difference, you could mark a request as something that the container should handle by itself:
LiftRules.liftRequest.append{caseReq("robots"::_,_,_)=>false}
With this in place, a request for robots.txt will be logged by LiftRules.early but won’t make it to any of the other methods described in this recipe.
If you need access to state (e.g., S), use earlyInStateful, which is based on a Box[Req] not a Req:
LiftRules.earlyInStateful.append{caseFull(r)=>// access S herecase_=>}
It’s possible for your earlyInStateful function to be called twice. This will happen when a new session is being set up. You can prevent this by only matching on requests in a running Lift session:
LiftRules.earlyInStateful.append{caseFull(r)ifLiftRules.getLiftSession(r).running_?=>// access S herecase_=>}
Finally, there’s also earlyInStateless, which like earlyInStateful, works on a Box[Req] but in other respects is the same as onBeginServicing. It is triggered after early and before earlyInStateful.
As a summary, the functions described in this recipe are called in this order:
LiftRules.early
LiftRules.onBeginServicing
LiftRules.earlyInStateless
LiftRules.earlyInStateful
If you need to catch the end of a request, there is also an onEndServicing that can be given functions of type
(Req, Box[LiftResponse]) => Unit.
Running Stateless describes how to force requests to be stateless.
You want to carry out actions when a session is created or destroyed.
Make use of the hooks in LiftSession. For example, in Boot.scala:
LiftSession.afterSessionCreate::=((s:LiftSession,r:Req)=>println("Session created"))LiftSession.onBeginServicing::=((s:LiftSession,r:Req)=>println("Processing request"))LiftSession.onShutdownSession::=((s:LiftSession)=>println("Session going away"))
If the request path is marked as being stateless via
LiftRules.statelessReqTest, this example would only execute the
onBeginServicing functions.
The hooks in LiftSession allow you to insert code at various points in
the session life cycle: when the session is created, at the start of
servicing the request, after servicing, when the session is about to
shut down, at shutdown, etc. The pipeline diagrams mentioned at the start of this chapter
are a useful guide to these stages.
The list of session hooks follows:
onSetupSessionThis will be the first hook called when a session is created.
afterSessionCreateThis will be called after all onSetupSession functions have been called.
onBeginServicingThis will be called at the start of request processing.
onEndServicingThis will be called at the end of request processing.
onAboutToShutdownSessionThis will be called just before a session is shut down (for example, when a session expires or the Lift application is being shut down).
onShutdownSessionThis will be called after all onAboutToShutdownSession functions have been run.
If you are testing these hooks, you might want to make the session expire faster than the 30 minutes of inactivity used by default in Lift. To do this, supply a millisecond value to LiftRules.sessionInactivityTimeout:
// 30 second inactivity timeoutLiftRules.sessionInactivityTimeout.default.set(Full(1000L*30))
There are two other hooks in LiftSession: onSessionActivate and onSessionPassivate. These may be of use if you are working with a servlet container in distributed mode and want to be notified when the servlet HTTP session is about to be serialised (passivated) and deserialised (activated) between container instances. These hooks are rarely used.
Note that the Lift session is not the same as the HTTP session. Lift bridges from the HTTP session to its own session management. This is described in some detail in Exploring Lift.
Session management is discussed in section 9.5 of Exploring Lift.
Running Stateless shows how to run without state.
You want to have some code executed when your Lift application is shutting down.
Append to LiftRules.unloadHooks:
LiftRules.unloadHooks.append(()=>println("Shutting down"))
You append functions of type () => Unit to unloadHooks, and these functions are run
right at the end of the Lift handler, after sessions have been
destroyed, Lift actors have been shut down, and requests have finished
being handled.
This is triggered, in the words of the Java servlet specification, "by the web container to indicate to a filter that it is being taken out of service."
Run Tasks Periodically includes an example of using an unload hook.
You want to force your application to be stateless at the HTTP level.
In Boot.scala:
LiftRules.enableContainerSessions=falseLiftRules.statelessReqTest.append{case_=>true}
All requests will now be treated as stateless. Any attempt to use state,
such as via SessionVar for example, will trigger a warning in
developer mode: "Access to Lift’s statefull features from Stateless mode.
The operation on state will not complete."
HTTP session creation is controlled via enableContainerSessions, and
applies for all requests. Leaving this value at the default (true)
allows more fine-grained control over which requests are stateless.
Using statelessReqTest allows you to decide, based on the
StatelessReqTest case class, if a request should be stateless (true) or not (false).
For example:
defasset(file:String)=List(".js",".gif",".css").exists(file.endsWith)LiftRules.statelessReqTest.append{caseStatelessReqTest("index"::Nil,httpReq)=>truecaseStatelessReqTest(List(_,file),_)ifasset(file)=>true}
This example would only make the index page and any GIFs, JavaScript, and
CSS files stateless. The httpReq part is an HTTPRequest instance,
allowing you to base the decision on the content of the request
(cookies, user agent, etc.).
Another option is LiftRules.statelessDispatch, which allows you to
register a function that returns a LiftResponse. This will be
executed without a session, and is convenient for REST-based services.
If you just need to mark an entry in SiteMap as being stateless, you can:
Menu.i("Stateless Page")/"demo">>Stateless
A request for /demo would be processed without state.
REST contains recipes for REST-based services in Lift.
The Lift wiki gives further details on the processing of stateless requests.
This stateless request control was introduced in Lift 2.2. The announcement on the mailing list gives more details.
You want a wrapper around all requests to catch exceptions and display something to the user.
Declare an exception handler in Boot.scala:
LiftRules.exceptionHandler.prepend{case(runMode,request,exception)=>logger.error("Failed at: "+request.uri)InternalServerErrorResponse()}
In this example, all exceptions for all requests at all run modes are being matched, causing an error to be logged and a 500 (internal server) error to be returned to the browser.
The partial function you add to exceptionHandler needs to return a
LiftResponse (i.e., something to send to the browser). The default
behaviour is to return an XhtmlResponse, which in
Props.RunModes.Development gives details of the exception, and in all
other run modes simply says: "Something unexpected happened."
You can return any kind of LiftResponse, including RedirectResponse,
JsonResponse, XmlResponse, JavaScriptResponse, and so on.
The previous example just sends a standard 500 error. That won’t be very helpful to your users. An alternative is to render a custom message but retain the 500 status code that will be useful for external site-monitoring services, if you use them:
LiftRules.exceptionHandler.prepend{case(runMode,req,exception)=>logger.error("Failed at: "+req.uri)valcontent=S.render(<lift:embedwhat="500"/>,req.request)XmlResponse(content.head,500,"text/html",req.cookies)}
Here we are sending back a response with a 500 status code, but the content is the
Node that results from running src/main/webapp/template-hidden/500.html. Create that
file with the message you want to show to users:
<html><head><title>500</title></head><bodydata-lift-content-id="main"><divid="main"data-lift="surround?with=default;at=content"><h1>Something is wrong!</h1><p>It's our fault - sorry</p></div></body></html>
You can also control what to send to clients when processing Ajax requests. In the following example, we’re matching just on Ajax POST requests, and returning custom JavaScript to the browser:
importnet.liftweb.http.js.JsCmds._valajax=LiftRules.ajaxPathLiftRules.exceptionHandler.prepend{case(mode,Req(ajax::_,_,PostRequest),ex)=>logger.error("Error handing ajax")JavaScriptResponse(Alert("Boom!"))}
You could test out this handling code by creating an Ajax button that always produces an exception:
packagecode.snippetimportnet.liftweb.util.Helpers._importnet.liftweb.http.SHtmlclassThrowsException{privatedeffail=thrownewError("not implemented")defrender="*"#>SHtml.ajaxButton("Press Me",()=>fail)}
This Ajax example will jump in before Lift’s default behaviour for Ajax
errors. The default is to retry the Ajax command three times
(LiftRules.ajaxRetryCount), and then execute
LiftRules.ajaxDefaultFailure, which will pop up a dialog saying: "The
server cannot be contacted at this time."
Custom 404 Page describes how to create a custom 404 (not found) page.
Use OutputStreamResponse, passing it a function that will write to the
OutputStream that Lift supplies.
In this example, we’ll stream all the integers from one, via a REST service:
packagecode.restimportnet.liftweb.http.{Req,OutputStreamResponse}importnet.liftweb.http.rest._objectNumbersextendsRestHelper{// Convert a number to a String, and then to UTF-8 bytes// to send down the output stream.defnum2bytes(x:Int)=(x+"\n")getBytes("utf-8")// Generate numbers using a Scala stream:definfinite=Stream.from(1).map(num2bytes)serve{caseReq("numbers"::Nil,_,_)=>OutputStreamResponse(out=>infinite.foreach(out.write))}}
Scala’s Stream class is a way to generate a sequence with lazy evaluation. The values being
produced by infinite are used as example data to stream back to the client.
Wire this into Lift in Boot.scala:
LiftRules.dispatch.append(Numbers)
Visiting http://127.0.0.1:8080/numbers will generate a 200 status code and start producing the integers from 1. The numbers are produced quite quickly, so you probably don’t want to try that in your web browser, but instead from something that is easier to stop, such as cURL.
OutputStreamResponse expects a function of type OutputStream => Unit. The
OutputStream argument is the output stream to the client. This means the bytes
we write to the stream are written to the client. The relevant line from the example is:
OutputStreamResponse(out=>infinite.foreach(out.write))
We are making use of the write(byte[]) method on out, a Java OutputStream, and sending it
the Array[Byte] being generated from our infinite stream.
Be aware that OutputStreamResponse is executed outside of the scope of S. This means if you need to access anything in the session, do so outside of the function you pass to OutputStreamResponse.
For more control over status codes, headers, and cookies, there are a
variety of signatures for the OutputStreamResponse object. For the
most control, create an instance of the OutputStreamResponse class:
caseclassOutputStreamResponse(out:(OutputStream)=>Unit,size:Long,headers:List[(String,String)],cookies:List[HTTPCookie],code:Int)
Note that
setting size to -1 causes the Content-Length header to be skipped.
There are two related types of response: InMemoryResponse and
StreamingResponse.
InMemoryResponse is useful if you have already assembled the full
content to send to the client. The signature is straightforward:
caseclassInMemoryResponse(data:Array[Byte],headers:List[(String,String)],cookies:List[HTTPCookie],code:Int)
As an example, we can modify the recipe and force our infinite sequence of numbers to produce the first few numbers as an Array[Byte] in memory:
importnet.liftweb.util.Helpers._serve{caseReq(AsInt(n)::Nil,_,_)=>InMemoryResponse(infinite.take(n).toArray.flatten,Nil,Nil,200)}
The AsInt helper in Lift matches on an integer, meaning that a request starting with a number matches, and we’ll return that many numbers from the infinite sequence. We’re not setting headers or cookies, and this request produces what you’d expect:
$ curl http://127.0.0.1:8080/3 1 2 3
StreamingResponse pulls bytes into the output stream. This contrasts
with OutputStreamResponse, where you are pushing data to the client.
Construct this type of response by providing a class with a read method that can be read
from:
caseclassStreamingResponse(data:{defread(buf:Array[Byte]):Int},onEnd:()=>Unit,size:Long,headers:List[(String,String)],cookies:List[HTTPCookie],code:Int)
Notice the use of a structural type for the data parameter. Anything
with a matching read method can be given here, including
java.io.InputStream objects, meaning StreamingResponse can act
as a pipe from input to output. Lift pulls 8 K chunks from your
StreamingResponse to send to the client.
Your data read function should follow the semantics of Java IO and
return "the total number of bytes read into the buffer, or –1 if there
is no more data because the end of the stream has been reached."
Serving Videos gives an example of streaming video data via REST.
The JavaDoc for InputStream gives the full contract for the read method.
You have a file on disk and you want to allow users to download it, but only if they are allowed to. If they are not allowed to, you want to explain why.
Use RestHelper to serve the file or an explanation page.
For example, suppose we have the file /tmp/important and we only want selected requests to download that file from the /download/important URL. The structure for that would be:
packagecode.restimportnet.liftweb.util.Helpers._importnet.liftweb.http.rest.RestHelperimportnet.liftweb.http.{StreamingResponse,LiftResponse,RedirectResponse}importnet.liftweb.common.{Box,Full}importjava.io.{FileInputStream,File}objectDownloadServiceextendsRestHelper{// (code explained below to go here)serve{case"download"::Known(fileId)::NilGetreq=>if(permitted)fileResponse(fileId)elseFull(RedirectResponse("/sorry"))}}
We are allowing users to download "known" files. That is, files we approve of for access. We do this because opening up the filesystem to any unfiltered end user input pretty much means your server will be compromised.
For our example, Known is checking a static list of names:
valknownFiles=List("important")objectKnown{defunapply(fileId:String):Option[String]=knownFiles.find(_==fileId)}
For requests to these known resources, we convert the REST request into
a Box[LiftResponse]. For permitted access we serve up the file:
privatedefpermitted=scala.math.random<0.5dprivatedeffileResponse(fileId:String):Box[LiftResponse]=for{file<-Box!!newFile("/tmp/"+fileId)input<-tryo(newFileInputStream(file))}yieldStreamingResponse(input,()=>input.close,file.length,headers=Nil,cookies=Nil,200)
If no permission is given, the user is redirected to /sorry.html.
All of this is wired into Lift in Boot.scala with:
LiftRules.dispatch.append(DownloadService)
By turning the request into a Box[LiftResponse], we are able to serve
up the file, send the user to a different page, and also allow Lift to
handle the 404 (Empty) cases.
If we added a test to see if the file existed on disk in fileResponse,
that would cause the method to evaluate to Empty for missing files,
which triggers a 404. As the code stands, if the file does not exist,
the tryo would give us a Failure that would turn into a 404 error
with a body of "/tmp/important (No such file or directory)."
Because we are testing for known resources via the Known extractor as
part of the pattern for /download/, unknown resources will not be
passed through to our File access code. Again, Lift will return a 404
for these.
Guard expressions can also be useful for these kinds of situations:
serve{case"download"::Known(id)::NilGet_ifpermitted=>fileResponse(id)case"download"::_Getreq=>RedirectResponse("/sorry")}
You can mix and match extractors, guards, and conditions in your response to best fit the way you want the code to look and work.
Chapter 24: Extractors from Programming in Scala.
You need to control access to a page based on the value of an HTTP header.
Use a custom If in SiteMap:
valHeaderRequired=If(()=>S.request.map(_.header("ALLOWED")==Full("YES"))openOrfalse,"Access not allowed")// Build SiteMapvalentries=List(Menu.i("Header Required")/"header-required">>HeaderRequired)
In this example, header-required.html can only be viewed if the request
includes an HTTP header called ALLOWED with a value of YES. Any other
request for the page will be redirected with a Lift error notice of
"Access not allowed."
This can be tested from the command line using a tool like cURL:
$ curl http://127.0.0.1:8080/header-required.html -H "ALLOWED:YES"
The If test ensures the () => Boolean function you supply as a first
argument returns true before the page it applies to is shown. In this example,
we’ll get true if the request contains a header called ALLOWED, and the optional
value of that header is Full("YES"). This is a LocParam (location parameter) that
modifies the SiteMap item. It can be appended to any menu items you want using the >> method.
Note that without the header, the test will be false. This will mean links to the page will not appear in the
menu generated by Menu.builder.
The second argument to the If() is what Lift does if the test isn’t true when the user tries to access the page. It’s
a () => LiftResponse function. This means you can return whatever you
like, including redirects to other pages. In the example, we are making use of a convenient implicit conversation
from a String ("Access not allowed") to a notice with a redirection that will take
the user to the home page.
If you visit the page without a header, you’ll
see a notice saying "Access not allowed." This will be the home page of the site, but
that’s just the default. You can request that Lift show a different page by setting LiftRules.siteMapFailRedirectLocation in Boot.scala:
LiftRules.siteMapFailRedirectLocation="static"::"permission"::Nil
If you then try to access header-required.html without the header set, you’ll be redirected to /static/permission and shown the content of whatever you put in that page.
The Lift wiki gives a summary of Lift’s SiteMap and the tests you can include in site map entries.
There are further details in Chapter 7 of Exploring Lift, and "SiteMap and access control," Chapter 7 of Lift in Action (Perrett, 2012, Manning Publications, Co.).
Accessing HttpServletRequest ~~~~~~~~~~
You have an API to call that requires access to the HttpServletRequest.
Cast S.request:
importnet.liftweb.http.Simportnet.liftweb.http.provider.servlet.HTTPRequestServletimportjavax.servlet.http.HttpServletRequestdefservletRequest:Box[HttpServletRequest]=for{req<-S.requestinner<-Box.asA[HTTPRequestServlet](req.request)}yieldinner.req
You can then make your API call:
servletRequest.foreach{r=>yourApiCall(r)}
Lift abstracts away from the low-level HTTP request, and from the details of the servlet container your application is running in. However, it’s reassuring to know, if you absolutely need it, there is a way to get back down to the low level.
Note that the results of servletRequest is a Box, because there might not be a request
when you evaluate servletRequest—or you might one day port to a
different deployment environment and not be running on a standard Java
servlet container.
As your code will have a direct dependency on the Java Servlet API, you’ll need to include this dependency in your SBT build:
"javax.servlet"%"servlet-api"%"2.5"%"provided"
Add an earlyResponse function in Boot.scala redirecting HTTP requests to HTTPS
equivalents. For example:
LiftRules.earlyResponse.append{(req:Req)=>if(req.request.scheme!="https"){valuriAndQuery=req.uri+(req.request.queryString.map(s=>"?"+s)openOr"")valuri="https://%s%s".format(req.request.serverName,uriAndQuery)Full(PermRedirectResponse(uri,req,req.cookies:_*))}elseEmpty}
The earlyResponse call is called early on in the Lift pipeline. It is
used to execute code before a request is handled and, if required, exit the
pipeline and return a response. The function signature expected is
Req => Box[LiftResponse].
In this example, we are testing for a request that is not "https", and then formulating a new URL that starts "https" and appends to it the rest of the original URL and any query parameters. With this created, we return a redirection to the new URL, along with any cookies that were set.
By evaluating to Empty for other requests (i.e., HTTPS requests), Lift will continue passing the request
through the pipeline as usual.
The ideal method to ensure requests are served using the correct scheme would be via web server configuration, such as Apache or Nginx. This isn’t possible in some cases, such as when your application is deployed to a Platform as a Service (PaaS) such as CloudBees.
For Amazon Elastic Load Balancer, note that you need to use an
X-Forwarded-Proto header to detect HTTPS. As mentioned in their
Overview of Elastic Load Balancing document, "Your server access logs
contain only the protocol used between the server and the load balancer;
they contain no information about the protocol used between the client
and the load balancer."
In this situation, modify the test from
req.request.scheme != "https" to:
req.header("X-Forwarded-Proto")!=Full("https")
So far we’ve looked at redirecting all requests to HTTPS. If you only have a handful of pages to worry about, you can use a custom location parameter in SiteMap as an alternative:
valentries=List(Menu.i("Home")/"index",Menu.i("Login")/"login">>HttpsOnly)
We have two locations and we’ve marked the login page as having to be over HTTPS.
HttpsOnly is the location parameter. It’s not built-in, but we can define it from the building
blocks included with Lift and the code we’ve already written:
// Given a request, turn it into a redirect to the HTTPS version of the pagedefredirection(req:Req):LiftResponse={valuriAndQuery=req.uri+(req.request.queryString.map(s=>"?"+s)openOr"")valuri="https://%s%s".format(req.request.serverName,uriAndQuery)PermRedirectResponse(uri,req,req.cookies:_*)}// If the request is HTTP, give us a redirect to HTTPSdefhttpsRedirect:Box[LiftResponse]=for{req<-S.requestscheme<-req.header("X-Forwarded-Proto")ifscheme=="http"}yieldredirection(req)valHttpsOnly=TestAccess(()=>httpsRedirect)
A recap of what we want to happen: any menu item marked as HttpsOnly should redirect itself to HTTPS unless it already is HTTPS. We can use TestAccess to achieve this. The function given to TestAccess must evaluate to a Box[LiftResponse]: if it’s Empty, the request carries on as normal; if it’s Full, the request is redirected to the contents of the box.
Our HttpsOnly implementation is to call httpsRedirect, where the for comprehension picks out the request, checks the scheme and only if it is "http" does it yield a Full[LiftResponse]. That’s how HTTPS requests are allowed through (httpsRedirect evaluates to Empty) but HTTP request are turned into Full[PermRedirectResponse] and TestAccess performs the redirect.
It’s worth noting that this also works out conveniently for local development. If locally there’s no X-Forwarded-Proto header in the request, the HTTPS redirect won’t be triggered. Of course that assumes the X-Forwarded-Proto checking works for you. If instead you’re using the req.request.scheme check, you might also want to make an exception for running in development mode (Props.devMode evaluates to true in development mode).
Squeryl is an object-relational mapping library. It converts Scala classes into tables, rows, and columns in a relational database, and provides a way to write SQL-like queries that are type-checked by the Scala compiler. The Lift Squeryl Record module integrates Squeryl with Record, meaning your Lift application can use Squeryl to store and fetch data while making use of the features of Record, such as data validation.
The code in this chapter can be found at https://github.com/LiftCookbook/cookbook_squeryl.
You want to configure your Lift application to use Squeryl and Record.
Include the Squeryl-Record dependency in your build, and in Boot.scala, provide a database connection function to SquerylRecord.initWithSquerylSession.
For example, to configure Squeryl with PostgreSQL, modify build.sbt to add two dependencies, one for Squeryl-Record and one for the database driver:
libraryDependencies++={valliftVersion="2.5"Seq("net.liftweb"%%"lift-webkit"%liftVersion,"net.liftweb"%%"lift-squeryl-record"%liftVersion,"postgresql"%"postgresql"%"9.1-901.jdbc4"...)}
In Boot.scala, we define a connection and register it with Squeryl:
Class.forName("org.postgresql.Driver")defconnection=DriverManager.getConnection("jdbc:postgresql://localhost/mydb","username","password")SquerylRecord.initWithSquerylSession(Session.create(connection,newPostgreSqlAdapter))
All Squeryl queries need to run in the context of a transaction. One way to provide a transaction is to configure a transaction around all HTTP requests. This is also configured in Boot.scala:
importnet.liftweb.squerylrecord.RecordTypeMode._importnet.liftweb.http.Simportnet.liftweb.util.LoanWrapperS.addAround(newLoanWrapper{overridedefapply[T](f:=>T):T={valresult=inTransaction{try{Right(f)}catch{casee:LiftFlowOfControlException=>Left(e)}}resultmatch{caseRight(r)=>rcaseLeft(exception)=>throwexception}}})
This arranges for requests to be handled in the inTransaction scope. As Lift uses an exception for redirects, we catch this exception and throw it after the transaction completes, avoiding rollbacks after an S.redirectTo or similar.
You can use any JVM persistence mechanism with Lift. What Lift Record provides is a light interface around persistence with bindings to Lift’s CSS transforms, screens, and wizards. Squeryl-Record is a concrete implementation to connect Record with Squeryl. This means you can use standard Record objects, which are effectively your schema, with Squeryl and write queries that are validated at compile time.
Plugging into Squeryl means initialising Squeryl’s session management, which allows us to wrap queries in Squeryl’s transaction and inTransaction functions. The difference between these two calls is that inTransaction will start a new transaction if one doesn’t exist, whereas transaction always creates a new transaction.
By ensuring a transaction is available for all HTTP requests via addAround, we can write queries in Lift, and for the most part, do not have to establish transactions ourselves unless we want to. For example:
importnet.liftweb.squerylrecord.RecordTypeMode._valr=myTable.insert(MyRecord.createRecord.myField(aValue))
In this recipe, the PostgreSqlAdapter is used. Squeryl also supports: OracleAdapter, MySQLInnoDBAdapter and MySQLAdapter, MSSQLServer, H2Adapter, DB2Adapter, and DerbyAdapter.
The Squeryl Getting Started Guide links to more information about session management and configuration.
See Using a JNDI DataSource for configuring connections via Java Naming and Directory Interface (JNDI).
You want to use a Java Naming and Directory Interface (JNDI) data source for your Record-Squeryl Lift application.
In Boot.scala, call initWithSquerylSession with a DataSource looked up from the JNDI context:
importjavax.sql.DataSourcevalds=newInitialContext().lookup("java:comp/env/jdbc/mydb").asInstanceOf[DataSource]SquerylRecord.initWithSquerylSession(Session.create(ds.getConnection(),newMySQLAdapter))
Replace mydb with the name given to your database in your JNDI
configuration, and replace MySQLAdapter with the appropriate adapter
for the database you are using.
JNDI is a service provided by the web container (e.g., Jetty, Tomcat) that allows you to configure a database connection in the container and then refer to the connection by name in your application. One advantage of this is that you can avoid including database credentials to your Lift source base.
The configuration of JNDI is different for each container, and may vary with versions of the container you use. The "See Also" section next includes links to the documentation pages for popular containers.
Some environments may also require that you to reference the JNDI resource in your src/main/webapp/WEB-INF/web.xml file:
<resource-ref><res-ref-name>jdbc/mydb</res-ref-name><res-type>javax.sql.DataSource</res-type><res-auth>Container</res-auth></resource-ref>
Resources for JNDI configuration include:
An example on the Lift wiki for Apache and Jetty configuration.
The documentation for Jetty gives examples for various databases.
For Tomcat, see the JNDI configuration guide.
You want to model a one-to-many relationship, such as a satellite belonging to a single planet, but a planet possibly having many satellites.
Use Squeryl’s oneToManyRelation in your schema, and on your Lift model, include a reference from the satellite to the planet.
The objective is to model the relationship as shown in Figure 7-1.
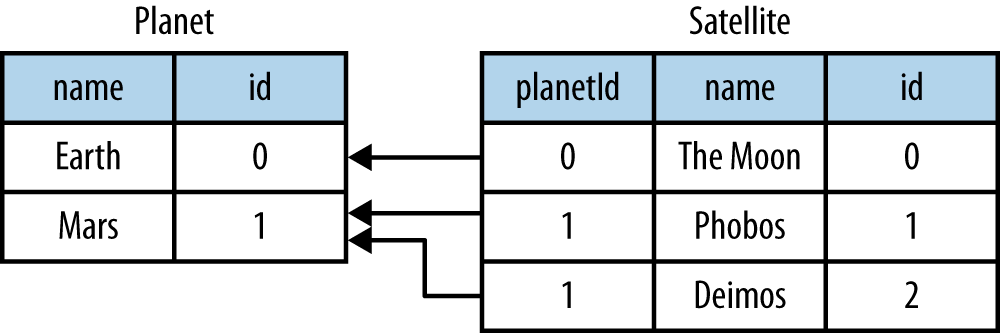
In code:
packagecode.modelimportorg.squeryl.Schemaimportnet.liftweb.record.{MetaRecord,Record}importnet.liftweb.squerylrecord.KeyedRecordimportnet.liftweb.record.field.{StringField,LongField}importnet.liftweb.squerylrecord.RecordTypeMode._objectMySchemaextendsSchema{valplanets=table[Planet]valsatellites=table[Satellite]valplanetToSatellites=oneToManyRelation(planets,satellites).via((p,s)=>p.id===s.planetId)on(satellites){s=>declare(s.planetIddefineAsindexed("planet_idx"))}classPlanetextendsRecord[Planet]withKeyedRecord[Long]{overridedefmeta=PlanetoverridevalidField=newLongField(this)valname=newStringField(this,256)lazyvalsatellites=MySchema.planetToSatellites.left(this)}objectPlanetextendsPlanetwithMetaRecord[Planet]classSatelliteextendsRecord[Satellite]withKeyedRecord[Long]{overridedefmeta=SatelliteoverridevalidField=newLongField(this)valname=newStringField(this,256)valplanetId=newLongField(this)lazyvalplanet=MySchema.planetToSatellites.right(this)}objectSatelliteextendsSatellitewithMetaRecord[Satellite]}
This schema defines the two tables based on the Record classes, as table[Planet] and table[Satellite]. It establishes a oneToManyRelation based on (via) the planetId in the satellite table.
This gives Squeryl the information it needs to produce a foreign key to constrain the planetId to reference an existing record in the planet table. This can be seen in the schema generated by Squeryl. We can print the schema in Boot.scala with:
inTransaction{code.model.MySchema.printDdl}
which will print:
-- table declarations :createtablePlanet(namevarchar(256)notnull,idFieldbigintnotnullprimarykeyauto_increment);createtableSatellite(namevarchar(256)notnull,idFieldbigintnotnullprimarykeyauto_increment,planetIdbigintnotnull);-- indexes on Satellitecreateindexplanet_idxonSatellite(planetId);-- foreign key constraints :altertableSatelliteaddconstraintSatelliteFK1foreignkey(planetId)referencesPlanet(idField);
An index called planet_idx is declared on the planetId field to improve query performance during joins.
Finally, we make use of the planetToSatellites.left and right methods to establish lookup queries as Planet.satellites and Satellite.planet. We can demonstrate their use by inserting example data and running the queries:
inTransaction{code.model.MySchema.createimportcode.model.MySchema._valearth=planets.insert(Planet.createRecord.name("Earth"))valmars=planets.insert(Planet.createRecord.name("Mars"))// .save as a short-hand for satellite.insert when we don't need// to immediately reference the record (save returns Unit).Satellite.createRecord.name("The Moon").planetId(earth.idField.is).saveSatellite.createRecord.name("Phobos").planetId(mars.idField.is).savevaldeimos=satellites.insert(Satellite.createRecord.name("Deimos").planetId(mars.idField.is))println("Deimos orbits: "+deimos.planet.single.name.is)println("Moons of Mars are: "+mars.satellites.map(_.name.is))}
Running this code produces the output:
Deimos orbits: Mars Moons of Mars are: List(Phobos, Deimos)
In this example code, we’re calling deimos.planet.single, which returns one result or will throw an exception if the associated planet was not found. headOption is the safer way if there’s a chance the record will not be found, as it will evaluate to None or Some[Planet].
The planetToSatellites.left method is not a simple collection of Satellite objects. It’s a Squeryl Query[Satellite], meaning you can treat it like any other kind of Queryable[Satellite]. For example, we could ask for those satellites of a planet that are alphabetically after "E," which for Mars would match "Phobos":
mars.satellites.where(s=>s.namegt"E").map(_.name)
The left method result is also a OneToMany[Satellite] that adds the following methods:
assignAdds a new relationship, but does not update the database
associateSimilar to assign, but updates the database
deleteAllRemoves the relationships
The assign call gives the satellite the relationship to the planet:
valexpress=Satellite.createRecord.name("Mars Express")mars.satellites.assign(express)express.save
The next time we query mars.satellites, we will find the Mars Express orbiter.
A call to associate would go one step further for us, making Squeryl insert or update the satellite automatically:
valexpress=Satellite.createRecord.name("Mars Express")mars.satellites.associate(express)
The third method, deleteAll, does what it sounds like it should do. It would execute the following SQL and return the number of rows removed:
deletefromSatellite
The right side of the one-to-many also has additional methods added by ManyToOne[Planet] of assign and delete. Be aware that to delete the "one" side of a many-to-one, anything assigned to the record will need to have been deleted already to avoid a database constraint error that would arise from, for example, leaving satellites referencing nonexistent planets.
As left and right are queries, it means each time you use them you’ll be sending a new query to the database. Squeryl refers to these forms as stateless relations.
The stateful versions of left and right look like this:
classPlanetextendsRecord[Planet]withKeyedRecord[Long]{...lazyvalsatellites:StatefulOneToMany[Satellite]=MySchema.planetToSatellites.leftStateful(this)}classSatelliteextendsRecord[Satellite]withKeyedRecord[Long]{...lazyvalplanet:StatefulManyToOne[Planet]=MySchema.planetToSatellites.rightStateful(this)}
This change means the results of mars.satellites will be cached. Subsequent calls on that instance of a Planet won’t trigger a round trip to the database. You can still associate new records or deleteAll records, which will work as you expect, but if a relationship is added or changed elsewhere you’ll need to call refresh on the relation to see the change.
Which version should you use? That will depend on your application, but you can use both in the same record if you need to.
The Squeryl Relations page provides additional details.
You want to model a many-to-many relationship, such as a planet being visited by many space probes, but a space probe also visiting many planets.
Use Squeryl’s manyToManyRelation in your schema, and implement a record to hold the join between the two sides of the relationship. Figure 7-2 shows the structure we will create in this recipe, where Visit is the record that will connect each many to the other many.

The schema is defined in terms of two tables, one for planets and one for space probes, plus a relationship between the two based on a third class, called Visit:
packagecode.modelimportorg.squeryl.Schemaimportnet.liftweb.record.{MetaRecord,Record}importnet.liftweb.squerylrecord.KeyedRecordimportnet.liftweb.record.field.{IntField,StringField,LongField}importnet.liftweb.squerylrecord.RecordTypeMode._importorg.squeryl.dsl.ManyToManyobjectMySchemaextendsSchema{valplanets=table[Planet]valprobes=table[Probe]valprobeVisits=manyToManyRelation(probes,planets).via[Visit]{(probe,planet,visit)=>(visit.probeId===probe.id,visit.planetId===planet.id)}classPlanetextendsRecord[Planet]withKeyedRecord[Long]{overridedefmeta=PlanetoverridevalidField=newLongField(this)valname=newStringField(this,256)lazyvalprobes:ManyToMany[Probe,Visit]=MySchema.probeVisits.right(this)}objectPlanetextendsPlanetwithMetaRecord[Planet]classProbeextendsRecord[Probe]withKeyedRecord[Long]{overridedefmeta=ProbeoverridevalidField=newLongField(this)valname=newStringField(this,256)lazyvalplanets:ManyToMany[Planet,Visit]=MySchema.probeVisits.left(this)}objectProbeextendsProbewithMetaRecord[Probe]classVisitextendsRecord[Visit]withKeyedRecord[Long]{overridedefmeta=VisitoverridevalidField=newLongField(this)valplanetId=newLongField(this)valprobeId=newLongField(this)}objectVisitextendsVisitwithMetaRecord[Visit]}
In Boot.scala, we can print out this schema:
inTransaction{code.model.MySchema.printDdl}
which will produce something like this, depending on the database in use:
-- table declarations :createtablePlanet(namevarchar(256)notnull,idFieldbigintnotnullprimarykeyauto_increment);createtableProbe(namevarchar(256)notnull,idFieldbigintnotnullprimarykeyauto_increment);createtableVisit(idFieldbigintnotnullprimarykeyauto_increment,planetIdbigintnotnull,probeIdbigintnotnull);-- foreign key constraints :altertableVisitaddconstraintVisitFK1foreignkey(probeId)referencesProbe(idField);altertableVisitaddconstraintVisitFK2foreignkey(planetId)referencesPlanet(idField);
Notice that the visit table will hold a row for each relationship between a planetId and probeId.
Planet.probes and Probe.planets provide an associate method to establish a new relationship. For example, we can establish a set of planets and probes:
valjupiter=planets.insert(Planet.createRecord.name("Jupiter"))valsaturn=planets.insert(Planet.createRecord.name("Saturn"))valjuno=probes.insert(Probe.createRecord.name("Juno"))valvoyager1=probes.insert(Probe.createRecord.name("Voyager 1"))
and then connect them:
juno.planets.associate(jupiter)voyager1.planets.associate(jupiter)voyager1.planets.associate(saturn)
We can also use Probe.planets and Planet.probes as a query to look up the associations. To access all the probes that had visited each planet in a snippet, we can write this:
packagecode.snippetclassManyToManySnippet{defrender="#planet-visits"#>planets.map{planet=>".planet-name *"#>planet.name.is&".probe-name *"#>planet.probes.map(_.name.is)}}
The snippet could be combined with a template like this:
<divdata-lift="ManyToManySnippet"><h1>Planet facts</h1><divid="planet-visits"><p><spanclass="planet-name">Name will be here</span>was visited by:</p><ul><liclass="probe-name">Probe name goes here</li></ul></div></div>
The top half of Figure 7-3 gives an example of the output from this snippet and template.
The Squeryl DSL manyToManyRelation(probes, planets).via[Visit] is the core element here connecting our Planet, Probe, and Visit records together. It allows us to access the "left" and "right" sides of the relationship in our model as Probe.planets and Planet.probes.
As with One-to-Many Relationship for one-to-many relationships, the left and right sides are queries. When you ask for Planet.probes, the database is queried appropriately with a join on the Visit records:
SelectProbe.name,Probe.idFieldFromVisit,ProbeWhere(Visit.probeId=Probe.idField)and(Visit.planetId=?)
Also as described in One-to-Many Relationship, there are stateful variants of left and right to cache the query results.
In the data we inserted into the database, we did not have to mention Visit. The Squeryl manyToManyRelation has enough information to know how to insert a visit as the relationship. Incidentally, it doesn’t matter which way round we make the calls in a many-to-many relationship. The following two expressions are equivalent and result in the same database structure:
juno.planets.associate(jupiter)// ..or..jupiter.probes.associate(juno)
You might even wonder why we had to bother with defining a Visit record at all, but there are benefits in doing so. For example, you can attach additional information onto the join table, such as the year the probe visited a planet.
To do this, we modify the record to include the additional field:
classVisitextendsRecord[Visit]withKeyedRecord[Long]{overridedefmeta=VisitoverridevalidField=newLongField(this)valplanetId=newLongField(this)valprobeId=newLongField(this)valyear=newIntField(this)}
Visit is still a container for the planetId and probeId references, but we also have a plain integer holder for the year of the visit.
To record a visit year, we need the assign method provided by ManyToMany[T]. This will establish the relationship but not change the database. Instead, it returns the instance Visit, which we can change and then store in the database:
probeVisits.insert(voyager1.planets.assign(saturn).year(1980))
The return type of assign in this case is Visit, and Visit has a year field. Inserting the Visit record via probeVisits will create a row in the table for visits.
To access this extra information on the Visit object, you can make use of a couple of methods provided by ManyToMany[T]:
associationsA query returning the Visit objects related to the Planet.probes or Probe.planets
associationMapA query returning pairs of (Planet,Visit) or (Probe,Visit), depending on which side of the join you call it on (probes or planets)
For example, in a snippet, we could list all the space probes and, for each probe, show the planet it visited and what year it was there. The snippet would look like this:
"#probe-visits"#>probes.map{probe=>".probe-name *"#>probe.name.is&".visit"#>probe.planets.associationMap.collect{case(planet,visit)=>".planet-name *"#>planet.name.is&".year"#>visit.year.is}}
We are using collect here rather than map just to match the (Planet,Visit) tuple and give the values meaningful names. You could also use (for { (planet, visit) <- probe.planets.associationMap } yield ...) if you prefer.
The lower half of Figure 7-3 demonstrates how this snippet would render when combined with the following template:
<h1>Probe facts</h1><divid="probe-visits"><p><spanclass="probe-name">Space craft name</span>visited:</p><ul><liclass="visit"><spanclass="planet-name">Name here</span>in<spanclass="year">n</span></li></ul></div>
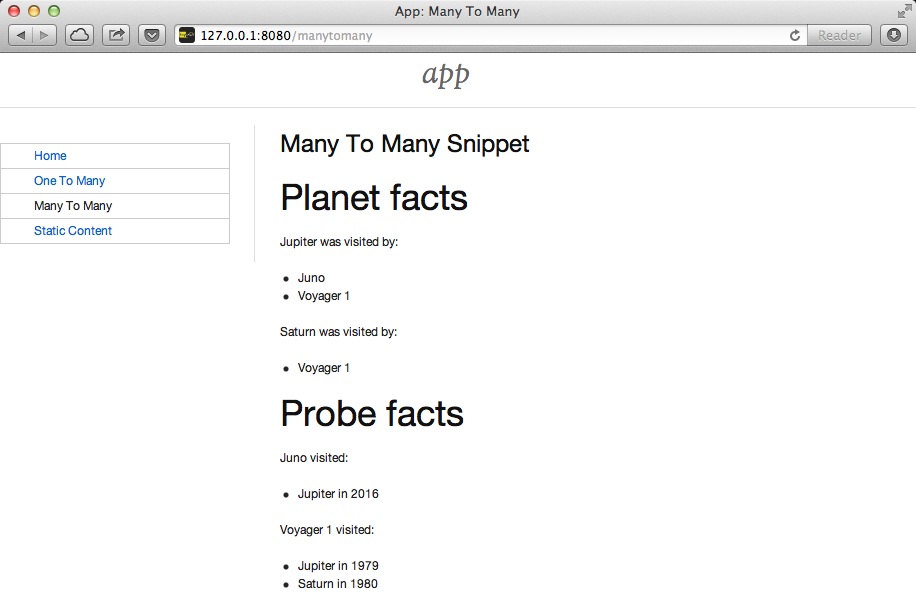
To remove an association, use the dissociate or dissociateAll methods on the left or right queries. To remove a single association:
valnumRowsChanged=juno.planets.dissociate(jupiter)
This would be executed in SQL as:
deletefromVisitwhereprobeId=?andplanetId=?
To remove all the associations:
valnumRowsChanged=jupiter.probes.dissociateAll
The SQL for this is:
deletefromVisitwhereVisit.planetId=?
What you cannot do is delete a Planet or Probe if that record still has associations in the Visit relationship. What you’d get is a referential integrity exception thrown. Instead, you’ll need to dissociateAll first:
jupiter.probes.dissociateAllplanets.delete(jupiter.id)
However, if you do want cascading deletes, you can achieve this by overriding the default behaviour in your schema:
// To automatically remove probes when we remove planets:probeVisits.rightForeignKeyDeclaration.constrainReference(onDeletecascade)// To automatically remove planets when we remove probes:probeVisits.leftForeignKeyDeclaration.constrainReference(onDeletecascade)
This is part of the schema, in that it will change the table constraints, with printDdl producing this (depending on the database you use):
altertableVisitaddconstraintVisitFK1foreignkey(probeId)referencesProbe(idField)ondeletecascade;altertableVisitaddconstraintVisitFK2foreignkey(planetId)referencesPlanet(idField)ondeletecascade;
One-to-Many Relationship, on one-to-many relationships, discusses leftStateful and rightStateful relations, which are also applicable for many-to-many relationships.
Foreign keys and cascading deletes are described on the Squeryl Relations page.
You want to add validation to a field in your model, so that users are informed of missing fields or fields that aren’t acceptable to your application.
Override the validations method on your field and provide one or more validation functions.
As an example, imagine we have a database of planets and we want to ensure any new planets entered by users have names of at least five characters. We add this as a validation on our record:
classPlanetextendsRecord[Planet]withKeyedRecord[Long]{overridedefmeta=PlanetoverridevalidField=newLongField(this)valname=newStringField(this,256){overridedefvalidations=valMinLen(5,"Name too short")_::super.validations}}
To check the validation, in our snippet we call validate on the record, which will return all the errors for the record:
packagecodepackagesnippetimportnet.liftweb.http.{S,SHtml}importnet.liftweb.util.Helpers._importmodel.MySchema._classValidateSnippet{defrender={valnewPlanet=Planet.createRecorddefvalidateAndSave():Unit=newPlanet.validatematch{caseNil=>planets.insert(newPlanet)S.notice("Planet '%s' saved"formatnewPlanet.name.is)caseerrors=>S.error(errors)}"#planetName"#>newPlanet.name.toForm&"type=submit"#>SHtml.onSubmitUnit(validateAndSave)}}
When the snippet runs, we render the Planet.name field and wire up a submit button to call the validateAndSave method.
If the newPlanet.validate call indicates there are no errors (Nil), we can save the record and inform the user via a notice. If there are errors, we render all of them with S.error.
The corresponding template could be:
<html><head><title>Planet Name Validation</title></head><bodydata-lift-content-id="main"><divid="main"data-lift="surround?with=default;at=content"><h1>Add a planet</h1><divdata-lift="Msgs?showAll=false"><lift:notice_class>noticeBox</lift:notice_class></div><p>Planet names need to be at least 5 characters long.</p><formclass="ValidateSnippet?form"><div><labelfor="planetName">Planet name:</label><inputid="planetName"type="text"></input><spandata-lift="Msg?id=name_id&errorClass=error">Msg to appear here</span></div><inputtype="submit"></input></form></div></body></html>
In this template, the error message is shown next to the input field, styled with a CSS class of errorClass. The success notice
is shown near the top of the page, just below the <h1> heading, using a style called noticeBox.
valMinLenValidates that a string is at least a given length, as shown previously
valMaxLenValidates that a string is not above a given length
valRegexValidates that a string matches the given pattern
An example of regular expression validation on a field would be:
importjava.util.regex.Patternvalurl=newStringField(this,1024){overridedefvalidations=valRegex(Pattern.compile("^https?://.*"),"URLs should start http:// or https://")_::super.validations}
The list of errors from validate are of type List[FieldError]. The S.error method accepts this list and registers each validation error message so it can be shown on the page. It does this by associating the message with an ID for the field, allowing you to pick out just the errors for an individual field, as we do in this recipe. The ID is stored on the field, and in the case of Planet.name, it is available as Planet.name.uniqueFieldId. It’s a Box[String] with a value of Full("name_id"). It is this name_id value that we used in the lift:Msg?id=name_id&errorClass=error markup to pick out just the error for this field.
You don’t have to use S.error to display validation messages. You can roll your own display code, making use of the FieldError directly. As you can see from the source for FieldError, the error is available as a msg property:
caseclassFieldError(field:FieldIdentifier,msg:NodeSeq){overridedeftoString=field.uniqueFieldId+" : "+msg}
BaseField.scala in the Lift source code contains the definition of the built-in StringValidators.
Forms Processing in Lift describes form processing, notices, and errors.
You want to provide your own validation logic and apply it to a field in a record.
Implement a function from the type of the field to
List[FieldError], and reference the function in the validations on the field.
Here’s an example: we have a database of planets, and when a user
enters a new planet, we want the name to be unique. The name of the planet
is a String, so we need to provide a function from String => List[FieldError].
With the validation function defined (valUnique, next), we include it in the list of validations on the
name field:
importnet.liftweb.util.FieldErrorclassPlanetextendsRecord[Planet]withKeyedRecord[Long]{overridedefmeta=PlanetoverridevalidField=newLongField(this)valname=newStringField(this,256){overridedefvalidations=valUnique("Planet already exists")_::super.validations}privatedefvalUnique(errorMsg:=>String)(name:String):List[FieldError]=Planet.unique_?(name)match{casetrue=>FieldError(this.name,errorMsg)::Nilcasefalse=>Nil}}objectPlanetextendsPlanetwithMetaRecord[Planet]{defunique_?(name:String)=from(planets){p=>where(lower(p.name)===lower(name))select(p)}.isEmpty}
The validation is triggered just like any other validation, as described in Adding Validation to a Field.
By convention, validation functions have two argument lists: the first for the error message, and the second to receive the value to validate. This allows you to easily reuse your validation function on other fields. For example, if you wanted to validate that satellites have a unique name, you could use exactly the same function but provide a different error message.
The FieldError you return needs to know the field it applies to as
well as the message to display. In the example, the field is name, but
we’ve used this.name to avoid confusion with the name parameter passed
into the valUnique function.
The example code has used text for the error message, but there is a variation of FieldError that
accepts NodeSeq. This allows you to produce safe markup as part of the error if you need to. For example:
FieldError(this.name,<p>Pleasesee<ahref="/policy">ournamepolicy</a></p>)
For internationalisation, you may prefer to pass in a key to the validation function, and
resolve it via S.?:
valname=newStringField(this,256){overridedefvalidations=valUnique("validation.planet")_::super.validations}// ...combined with...privatedefvalUnique(errorKey:=>String)(name:String):List[FieldError]=Planet.unique_?(name)match{casefalse=>FieldError(this.name,S?errorKey)::Nilcasetrue=>Nil}
Adding Validation to a Field discusses field validation and the built-in validations.
Text localisation is discussed on the Lift wiki.
You want to modify the value of a field before storing it (for example, to clean a value by removing leading and trailing whitespace).
Override setFilter and provide a list of functions to apply to the field.
To remove leading and trailing whitespace entered by the user, the field would use the trim filter:
valname=newStringField(this,256){overridedefsetFilter=trim_::super.setFilter}
The built-in filters are:
cropEnforces the field’s min and max length by truncation
trimApplies String.trim to the field value
toUpper and toLowerChange the case of the field value
removeRegExCharsRemoves matching regular expression characters
notNullConverts null values to an empty string
Filters are run before validation. This means if you have a minimum length validation and the trim filter, for example, users cannot pass the validation test by just including spaces on the end of the value they enter.
A filter for a String field would be of type String => String, and the setFilter function expects a List of these. Knowing this, it’s straightforward to write custom filters. For example, here’s is a filter that applies a simple form of title case on our name field:
deftitleCase(in:String)=in.split("\\s").map(_.toList).collect{casex::xs=>(Character.toUpperCase(x).toString::xs).mkString}.mkString(" ")
This function is splitting the input string on spaces, converting each word into a list of characters, converting the first character into uppercase, and then gluing the strings back together.
We install titleCase on a field like any other filter:
valname=newStringField(this,256){overridedefsetFilter=trim_::titleCase_::super.setFilter}
Now when a user enters "jaglan beta" as a planet name, it is stored in the database as "Jaglan Beta."
The best place to understand the filters is the trait StringValidators in the source for BaseField.
If you really do need to apply title case to a value, the Apache Commons WordUtils class provides ready-made functions for this.
You want to write Specs2 unit tests that access your database model with Squeryl and Record.
Use an in-memory database, and arrange for it to be set up before your test and destroyed after it.
There are three parts to this: including a database in your project and connecting to it in an in-memory mode; creating a reusable trait to set up the database; and then using the trait in your test.
The H2 database has an in-memory mode, meaning it won’t save data to disk. It needs to be included in build.sbt as a dependency. Whilst you are editing build.sbt, also disable SBT’s parallel test execution to prevent database tests from influencing each other:
libraryDependencies+="com.h2database"%"h2"%"1.3.170"parallelExecutioninTest:=false
Create a trait to initialise the database and create the schema:
packagecode.modelimportjava.sql.DriverManagerimportorg.squeryl.Sessionimportorg.squeryl.adapters.H2Adapterimportnet.liftweb.util.StringHelpersimportnet.liftweb.common._importnet.liftweb.http.{S,Req,LiftSession}importnet.liftweb.squerylrecord.SquerylRecordimportnet.liftweb.squerylrecord.RecordTypeMode._importorg.specs2.mutable.Aroundimportorg.specs2.execute.ResulttraitTestLiftSession{defsession=newLiftSession("",StringHelpers.randomString(20),Empty)definSession[T](a:=>T):T=S.init(Req.nil,session){a}}traitDBTestKitextendsLoggable{Class.forName("org.h2.Driver")Logger.setup=Full(net.liftweb.util.LoggingAutoConfigurer())Logger.setup.foreach{_.apply()}defconfigureH2()={SquerylRecord.initWithSquerylSession(Session.create(DriverManager.getConnection("jdbc:h2:mem:dbname;DB_CLOSE_DELAY=-1","sa",""),newH2Adapter))}defcreateDb(){inTransaction{try{MySchema.dropMySchema.create}catch{casee:Throwable=>logger.error("DB Schema error",e)throwe}}}}caseclassInMemoryDB()extendsAroundwithDBTestKitwithTestLiftSession{defaround[T<%Result](testToRun:=>T)={configureH2createDbinSession{inTransaction{testToRun}}}}
In summary, this trail provides an InMemoryDB context for Specs2. This context ensures that the database is configured, the schema created, and a transaction is supplied around your test.
Finally, mix the trait into your test and execute in the scope of the InMemoryDB context.
As an example, using the schema from One-to-Many Relationship, we can test that the planet Mars has two moons:
packagecode.modelimportorg.specs2.mutable._importnet.liftweb.squerylrecord.RecordTypeMode._importMySchema._classPlanetsSpecextendsSpecificationwithDBTestKit{sequential
"Planets">>{"know that Mars has two moons">>InMemoryDB(){valmars=planets.insert(Planet.createRecord.name("Mars"))Satellite.createRecord.name("Phobos").planetId(mars.idField.is).saveSatellite.createRecord.name("Deimos").planetId(mars.idField.is).savemars.satellites.sizemust_==2}}}
Running this with SBT’s test command would show a success:
> test [info] PlanetsSpec [info] [info] Planets [info] + know that Mars has two moons [info] [info] [info] Total for specification PlanetsSpec [info] Finished in 1 second, 274 ms [info] 1 example, 0 failure, 0 error [info] [info] Passed: : Total 1, Failed 0, Errors 0, Passed 1, Skipped 0 [success] Total time: 3 s, completed 03-Feb-2013 11:31:16
The DBTestKit trait has to do quite a lot of work for us. At the lowest level, it loads the H2 driver and configures Squeryl with an in-memory connection. The mem part of the JDBC connection string (jdbc:h2:mem:dbname;DB_CLOSE_DELAY=-1) means that H2 won’t try to persist the data to disk. The database just resides in memory, so there are no files in disk to maintain, and it runs quickly.
By default, when a connection is closed, the in-memory database is destroyed. In this recipe, we’ve disabled that by adding the DB_CLOSE_DELAY=-1, which will allow us to write unit tests that span connections if we want to.
The next step up from connection management is the creation of the database schema in memory. We do this in createDb by throwing away the schema and any data when we start a test, and create it afresh. If you have very common test datasets, this might be a good place to insert that data before your test runs.
These steps are brought together at the InMemoryDB class, which implements a Specs2 interface for code to run Around a test. We’ve also wrapped the test around a TestLiftSession. This provides an empty session, which is useful if you are accessing state-related code (such as the S object). It’s not necessary for running tests against Record and Squeryl, but it has been included here because you may want to do that at some point.
In our specification itself, we mix in the DBTestKit and reference the InMemoryDB context on the tests that access the database. You’ll note that we’ve used >> rather than Specs2's should and in that you may have seen elsewhere. This is to avoid name conflicts between Specs2 and Squeryl that you might come across.
As we disabled parallel execution with SBT, we also disable parallel execution in Specs2 with sequential. We are doing this to prevent a situation where one test might be expecting data that another test is modifying at the same time.
If all the tests in a specification are going to use the database, you can use the Specs2 AroundContextExample[T] to avoid having to mention InMemoryDB on every test. To do that, mix in AroundContextExample[InMemoryDB] and define aroundContext:
packagecode.modelimportMySchema._importorg.specs2.mutable._importorg.specs2.specification.AroundContextExampleimportnet.liftweb.squerylrecord.RecordTypeMode._classAlternativePlanetsSpecextendsSpecificationwithAroundContextExample[InMemoryDB]{sequentialdefaroundContext=newInMemoryDB()"Solar System">>{"know that Mars has two moons">>{valmars=planets.insert(Planet.createRecord.name("Mars"))Satellite.createRecord.name("Phobos").planetId(mars.idField.is).saveSatellite.createRecord.name("Deimos").planetId(mars.idField.is).savemars.satellites.sizemust_==2}}}
All the tests in AlternativePlanetsSpec will now be run with an InMemoryDB around them.
We’ve used a database with an in-memory mode for the advantages of speed and no files to clean up. However, you could use any regular database: you’d need to change the driver and connection string.
See the H2 database website for more about H2's in-memory database settings.
Unit Testing Record with MongoDB discusses unit testing with MongoDB, but the comments on SBT’s other testing commands and testing in an IDE would apply to this recipe, too.
Use UniqueIdField:
importnet.liftweb.record.field.UniqueIdFieldvalrandomId=newUniqueIdField(this,32){}
Note the {} in the example; this is required as UniqueIdField is an
abstract class.
The size value, 32, indicates how many random characters to create.
The UniqueIdField field is a kind of StringField and the default value for the field
comes from StringHelpers.randomString. The value is randomly generated, but not guaranteed to be unique in the database.
The database column backing the UniqueIdField in this recipe will be a varchar(32) not null or similar. The value stored will look like:
GOJFGQRLS5GVYGPH3L3HRNXTATG3RM5M
As the value is made up of just letters and numbers, it makes it easy to use in URLs as there are no characters to escape. For example, it could be used in a link to allow a user to validate her account when sent the link over email, which is one of the uses in ProtoUser.
If you need to change the value, the reset method on the field will generate a new random string for the field.
If you need an automatic value that is even more likely to be unique per-row, you can add a field that wraps a universally unique identifier (UUID):
importjava.util.UUIDvaluuid=newStringField(this,36){overridedefdefaultValue=UUID.randomUUID().toString}
This will automatically insert values of the form "6481a844-460a-a4e0-9191-c808e3051519" in records you create.
Java’s UUID support includes a link to RFC 4122, which defines UUIDs.
You want created and updated timestamps on your records and would like them automatically updated when a row is added or updated.
Define the following traits:
packagecode.modelimportjava.util.Calendarimportnet.liftweb.record.field.DateTimeFieldimportnet.liftweb.record.RecordtraitCreated[T<:Created[T]]extendsRecord[T]{self:T=>valcreated:DateTimeField[T]=newDateTimeField(this){overridedefdefaultValue=Calendar.getInstance}}traitUpdated[T<:Updated[T]]extendsRecord[T]{self:T=>valupdated=newDateTimeField(this){overridedefdefaultValue=Calendar.getInstance}defonUpdate=this.updated(Calendar.getInstance)}traitCreatedUpdated[T<:Updated[T]withCreated[T]]extendsUpdated[T]withCreated[T]{self:T=>}
Add the trait to the model. For example, we can modify a Planet record to include
the time the record was created and updated:
classPlanetprivate()extendsRecord[Planet]withKeyedRecord[Long]withCreatedUpdated[Planet]{overridedefmeta=Planet// field entries as normal...}
Finally, arrange for the updated field to be updated:
classMySchemaextendsSchema{...overridedefcallbacks=Seq(beforeUpdate[Planet]call{_.onUpdate})...
Although there is a built-in net.liftweb.record.LifecycleCallbacks
trait that allows you to trigger behaviour onUpdate, afterDelete, and so
on, it is only for use on individual fields, rather than records. As our
goal is to update the updated field when any part of the record
changes, we can’t use the LiftcycleCallbacks here.
Instead, the CreatedUpdated trait simplifies adding updated and
created fields to a record, but we do need to remember to add a hook
into the schema to ensure the updated value is changed when a record
is modified. This is why we set the callbacks on the Schema.
The schema for records with CreatedUpdated mixed in will include two additional columns:
updatedtimestampnotnull,createdtimestampnotnull
The timestamp is used for the H2 database. For other databases, the type may be different.
The values can be accessed like any other record field. Using the example data from One-to-Many Relationship, we could run the following:
valupdated:Calendar=mars.updated.idvalcreated:Calendar=mars.created.is
If you only need created time, or updated time, just mix in the Created[T] or Updated[T] trait instead of CreatedUpdated[T].
It should be noted that onUpdate is called only on full updates and
not on partial updates with Squeryl. A full update is when the object is
altered and then saved; a partial update is where you attempt to alter objects via a query.
If you’re interested in other automations for Record, the Squeryl schema callbacks support these triggered behaviours:
beforeInsert and afterInsert
afterSelect
beforeUpdate and afterUpdate
beforeDelete and afterDelete
Full and partial updates are described in Insert, Update, and Delete.
Add the following any time you have a Squeryl season, such as just before your query:
org.squeryl.Session.currentSession.setLogger(s=>println(s))
By providing a String => Unit function to setLogger, Squeryl will
execute that function with the SQL it runs. In this example, we are
simply printing the SQL to the console.
You’ll probably want to use the logging facilities in Lift to capture SQL. For example:
packagecode.snippetimportnet.liftweb.common.Loggableimportorg.squeryl.SessionclassMySnippetextendsLoggable{defrender={Session.currentSession.setLogger(s=>logger.info(s))// ...your snippet code here...}}
This will log queries according to the settings for the logging system, typically the Logback project configured in src/resources/props/default.logback.xml.
It can be inconvenient to have to enable logging in each snippet during development. To trigger logging for all snippets, you can modify the addAround call in Boot.scala (Configuring Squeryl and Record) to include a setLogger call while inTransaction:
S.addAround(newLoanWrapper{overridedefapply[T](f:=>T):T={valresult=inTransaction{Session.currentSession.setLogger(s=>logger.info(s))// ... rest of addAround as normal
You can learn about logging in Lift from the Logging wiki page.
You want to use MySQL’s MEDIUMTEXT for a column, but StringField
doesn’t have this option.
Use Squeryl’s dbType in your schema:
objectMySchemaextendsSchema{on(mytable)(t=>declare(t.mycolumndefineAsdbType("MEDIUMTEXT")))}
This schema setting will give you the correct column type in MySQL:
createtablemytable(mycolumnMEDIUMTEXTnotnull);
On the record you can use StringField as usual.
This recipe points towards the flexibility available with Squeryl’s schema definition DSL. The column attribute in this example is just one of a variety of adjustments you can make to the default choices that Squeryl uses.
For example, you can use the syntax to chain column attributes for a single column, and also define multiple columns at the same time:
objectMySchemaextendsSchema{on(mytable)(t=>declare(t.mycolumndefineAs(dbType("MEDIUMTEXT"),indexed),t.iddefinedAs(unique,named("MY_ID"))))}
The schema definition page for Squeryl gives examples of attributes you can apply to tables and columns.
Some characters stored in your MySQL database are appearing as ???.
Ensure that:
LiftRules.early.append(_.setCharacterEncoding("UTF-8")) is included in Boot.scala.
?useUnicode=true&characterEncoding=UTF-8 is included in your JDBC connections URL.
Your MySQL database has been created using a UTF-8 character set.
There are a number of interactions here that can impact characters going into, and coming out of, a MySQL database. The basic problem is that bytes transferred across networks have no meaning unless you know the encoding.
The setCharacterEncoding("UTF-8") call in Boot.scala is being applied to every HTTPRequest that ultimately, in a servlet container, is applied to a ServletRequest. This is how parameters in a request are going to be interpreted by the servlet container when received.
The flip side of this is that responses from Lift are encoded as UTF-8. You’ll see this in a number of places. For example, templates-hidden/default includes:
<metahttp-equiv="content-type"content="text/html; charset=UTF-8"/>
Also, the LiftResponse classes set the encoding as UTF-8.
Another aspect is how character data from Lift is sent to the database over the network. This is controlled by the parameters to the JDBC driver. The default for MySQL is to detect the encoding, but it seems from experience that this is not a great option, so we force the UTF-8 encoding.
Finally, the MySQL database itself needs to store the data as UTF-8. The default character encoding is not UTF-8, so you’ll need to specify the encoding when you create the database:
CREATEDATABASEmyDbCHARACTERSETutf8
This chapter gives recipes for making use of MongoDB in your Lift application. Many of the code examples in this chapter can be found at https://github.com/LiftCookbook/cookbook_mongo.
Add the Lift MongoDB dependencies to your build and configure a connection using net.liftweb.mongodb and com.mongodb.
In build.sbt, add the following to libraryDependencies:
"net.liftweb"%%"lift-mongodb-record"%liftVersion
In Boot.scala, add:
importcom.mongodb.{ServerAddress,Mongo}importnet.liftweb.mongodb.{MongoDB,DefaultMongoIdentifier}valserver=newServerAddress("127.0.0.1",27017)MongoDB.defineDb(DefaultMongoIdentifier,newMongo(server),"mydb")
This will give you a connection to a local MongoDB database called
mydb.
If your database needs authentication, use MongoDB.defineDbAuth:
MongoDB.defineDbAuth(DefaultMongoIdentifier,newMongo(server),"mydb","username","password")
Some cloud services will give you a URL to connect to, such as mongodb://alex.mongohq.com:10050/fglvBskrsdsdsDaGNs1. In this case, the host and the port make up the first part, and the database name is the part after the /.
If you need to turn a URL like this into a connection, you can do so by
using java.net.URI to parse the URL and make a connection:
objectMongoUrl{defdefineDb(id:MongoIdentifier,url:String){valuri=newURI(url)valdb=uri.getPathdrop1valserver=newMongo(newServerAddress(uri.getHost,uri.getPort))Option(uri.getUserInfo).map(_.split(":"))match{caseSome(Array(user,pass))=>MongoDB.defineDbAuth(id,server,db,user,pass)case_=>MongoDB.defineDb(id,server,db)}}}MongoUrl.defineDb(DefaultMongoIdentifier,"mongodb://user:pass@127.0.0.1:27017/myDb")
The full URL scheme for MongoDB is more complicated, allowing for multiple hosts and connection parameters, but the previous code handles optional username and password fields and may be enough to get you up and running with your MongoDB configuration.
The DefaultMongoIdentifier is a value used to identify a particular connection. Lift keeps a map of identifiers to connections, meaning you can connect to more than one database. The common case is a single database, and that is usually assigned to DefaultMongoIdentifier.
However, if you do need to access two MongoDB databases, you can create a new identifier and assign it as part of your record. For example:
objectOtherMongoIdentifierextendsMongoIdentifier{defjndiName:String="other"}MongoUrl.defineDb(OtherMongoIdentifier,"mongodb://127.0.0.1:27017/other")objectCountryextendsCountrywithMongoMetaRecord[Country]{overridedefcollectionName="example.earth"overridedefmongoIdentifier=OtherMongoIdentifier}
The lift-mongodb-record dependency itself depends on another Lift module, lift-mongodb, which provides connectivity and other lower-level access to MongoDB. Both bottom out with the MongoDB Java driver.
Connection configuration that includes replica sets and MongoDB options, such as timeout settings, are described on the Lift wiki.
The full MongoDB connection format is described in Connection String URI Format.
Create a MongoDB record that contains a MongoMapField:
importnet.liftweb.mongodb.record._importnet.liftweb.mongodb.record.field._classCountryprivate()extendsMongoRecord[Country]withStringPk[Country]{overridedefmeta=CountryobjectpopulationextendsMongoMapField[Country,Int](this)}objectCountryextendsCountrywithMongoMetaRecord[Country]{overridedefcollectionName="example.earth"}
In this example, we are creating a record for information about a country,
and the population is a map from a String key, representing a city in that country, to an Integer value, representing the population of that city.
We can use it in a snippet like this:
classPlaces{valuk=Country.find("uk")openOr{valinfo=Map("Brighton"->134293,"Birmingham"->970892,"Liverpool"->469017)Country.createRecord.id("uk").population(info).save}deffacts="#facts"#>(for{(name,pop)<-uk.population.is}yield".name *"#>name&".pop *"#>pop)}
When this snippet is called, it looks up a record by _id of uk or
creates it using some canned information. The template to go with the
snippet could include:
<divdata-lift="Places.facts"><table><thead><tr><th>City</th><th>Population</th></tr></thead><tbody><trid="facts"><tdclass="name">Name here</td><tdclass="pop">Population</td></tr></tbody></table></div>
In MongoDB, the resulting data structure would be:
$mongocookbookMongoDBshellversion:2.0.6connectingto:cookbook>showcollectionsexample.earthsystem.indexes>db.example.earth.find().pretty(){"_id":"uk","population":{"Brighton":134293,"Birmingham":970892,"Liverpool":469017}}
If you do not set a value for the map, the default will be an empty map, represented in MongoDB as the following:
{"_id":"uk","population":{}}
An alternative is to mark the field as optional:
objectpopulationextendsMongoMapField[Country,Int](this){overridedefoptional_?=true}
If you now write the document without a population set, the field will be omitted in MongoDB:
>db.example.earth.find();{"_id":"uk"}
To append data to the map from your snippet, you can modify the record to supply a
new Map:
uk.population(uk.population.is+("Westminster"->81766)).update
Note that we are using update here, rather than save. The save method is pretty smart and will either insert a new document into a MongoDB collection or replace an existing document based on the _id. Update is different: it detects just the changed fields of the document and updates them. It will send this command to MongoDB for the document:
{"$set":{"population":{"Brighton":134293,"Liverpool":469017,"Birmingham":970892,"Westminster":81766}}
You’ll probably want to use update over save for changes to existing records.
To access an individual element of the map, you can use get (or value):
uk.population.get("San Francisco")// will throw java.util.NoSuchElementException
or you can access via the standard Scala map interface:
valsf:Option[Int]=uk.population.is.get("San Francisco")
You should be aware that MongoMapField supports only primitive types.
The mapped field used in this recipe is typed String => Int, but of course
MongoDB will let you mix types such as putting a String or a Boolean as a population value.
If you do modify the MongoDB record in the database outside of Lift and mix types, you’ll get a java.lang.ClassCastException at
runtime.
There’s a discussion on the mailing list regarding the limited type support in MongoMapField and a possible way around it by overriding asDBObject.
Use EnumNameField to store the string value of the enumeration. Here’s an example using days of the week:
objectDayOfWeekextendsEnumeration{typeDayOfWeek=ValuevalMon,Tue,Wed,Thu,Fri,Sat,Sun=Value}
We can use this to model someone’s birth day-of-week:
packagecode.modelimportnet.liftweb.mongodb.record._importnet.liftweb.mongodb.record.field._importnet.liftweb.record.field.EnumNameFieldclassBirthdayprivate()extendsMongoRecord[Birthday]withStringPk[Birthday]{overridedefmeta=BirthdayobjectdowextendsEnumNameField(this,DayOfWeek)}objectBirthdayextendsBirthdaywithMongoMetaRecord[Birthday]
When creating records, the dow field will expect a DayOfWeek value:
importDayOfWeek._Birthday.createRecord.id("Albert Einstein").dow(Fri).saveBirthday.createRecord.id("Richard Feynman").dow(Sat).saveBirthday.createRecord.id("Isaac Newton").dow(Sun).save
Take a look at what’s stored in MongoDB:
>db.birthdays.find(){"_id":"Albert Einstein","dow":"Fri"}{"_id":"Richard Feynman","dow":"Sat"}{"_id":"Isaac Newton","dow":"Sun"}
The dow value is the toString of the enumeration, not the id value:
Fri.toString// java.lang.String = FriFri.id// Int = 4
If you want to store the ID, use EnumField instead.
Be aware that other tools, notably Rogue, expect the string value, not the integer ID, of an enumeration, so you may prefer to use EnumNameField for that reason.
Using Rogue introduces Rogue.
You have a MongoDB record, and you want to embed another set of values inside it as a single entity.
Use BsonRecord to define the document to embed, and embed it using
BsonRecordField. Here’s an example of storing information about an
image within a record:
importnet.liftweb.record.field.{IntField,StringField}classImageprivate()extendsBsonRecord[Image]{defmeta=ImageobjecturlextendsStringField(this,1024)objectwidthextendsIntField(this)objectheightextendsIntField(this)}objectImageextendsImagewithBsonMetaRecord[Image]
We can reference instances of the Image class via BsonRecordField:
classCountryprivate()extendsMongoRecord[Country]withStringPk[Country]{overridedefmeta=CountryobjectflagextendsBsonRecordField(this,Image)}objectCountryextendsCountrywithMongoMetaRecord[Country]{overridedefcollectionName="example.earth"}
To associate a value:
valunionJack=Image.createRecord.url("http://bit.ly/unionflag200").width(200).height(100)Country.createRecord.id("uk").flag(unionJack).save(true)
In MongoDB, the resulting data structure would be:
>db.example.earth.findOne(){"_id":"uk","flag":{"url":"http://bit.ly/unionflag200","width":200,"height":100}}
If you don’t set a value on the embedded document, the default will be saved as:
"flag":{"width":0,"height":0,"url":""}
You can prevent this by making the image optional:
objectimageextendsBsonRecordField(this,Image){overridedefoptional_?=true}
With optional_? set in this way, the image part of the MongoDB document
won’t be saved if the value is not set. Within Scala you will then want
to access the value with a valueBox call:
valimg:Box[Image]=uk.flag.valueBox
In fact, regardless of the setting of optional_?, you can access the
value using valueBox.
An alternative to optional values is to always provide a default value for the embedded document:
objectimageextendsBsonRecordField(this,Image){overridedefdefaultValue=Image.createRecord.url("http://bit.ly/unionflag200").width(200).height(100)}
The Lift wiki describes BsonRecord in more detail.
You have a MongoDB record and want to include a link to another record.
Create a reference using a MongoRefField such as ObjectIdRefField or
StringRefField, and dereference the record using the obj call.
As an example, we can create records representing countries, where a country references the planet where you can find it:
classPlanetprivate()extendsMongoRecord[Planet]withStringPk[Planet]{overridedefmeta=PlanetobjectreviewextendsStringField(this,1024)}objectPlanetextendsPlanetwithMongoMetaRecord[Planet]{overridedefcollectionName="example.planet"}classCountryprivate()extendsMongoRecord[Country]withStringPk[Country]{overridedefmeta=CountryobjectplanetextendsStringRefField(this,Planet,128)}objectCountryextendsCountrywithMongoMetaRecord[Country]{overridedefcollectionName="example.country"}
To make this example easier to follow, our model mixes in StringPk[Planet] to use strings as the primary key on our documents, rather than the more usual MongoDB object IDs. Consequently, the link is established with a StringRefField.
In a snippet we can make use of the planet reference by resolving it with .obj:
classHelloWorld{valuk=Country.find("uk")openOr{valearth=Planet.createRecord.id("earth").review("Harmless").saveCountry.createRecord.id("uk").planet(earth.id.is).save}deffacts=".country *"#>uk.id&".planet"#>uk.planet.obj.map{p=>".name *"#>p.id&".review *"#>p.review}}
For the value uk, we look up an existing record, or create one if none
is found. We create earth as a separate MongoDB record, and
then reference it in the planet field with the ID of the planet.
Retrieving the reference is via the obj method, which returns a
Box[Planet] in this example.
Referenced records are fetched from MongoDB when you call the obj method
on a MongoRefField. You can see this by turning on logging in the
MongoDB driver. Do this by adding the following to the start of your
Boot.scala:
System.setProperty("DEBUG.MONGO","true")System.setProperty("DB.TRACE","true")
Having done this, the first time you run the previous snippet, your console will include:
INFO: find: cookbook.example.country { "_id" : "uk"}
INFO: update: cookbook.example.planet { "_id" : "earth"} { "_id" : "earth" ,
"review" : "Harmless"}
INFO: update: cookbook.example.country { "_id" : "uk"} { "_id" : "uk" ,
"planet" : "earth"}
INFO: find: cookbook.example.planet { "_id" : "earth"}
What you’re seeing here is the initial lookup for uk, followed by the
creation of the earth record and an update that is saving the uk
record. Finally, there is a lookup of earth when uk.obj is called in
the facts method.
The obj call will cache the planet reference. That means you could
say:
".country *"#>uk.id&".planet *"#>uk.planet.obj.map(_.id)&".review *"#>uk.planet.obj.map(_.review)
and you’d still only see one query for the earth record despite
calling obj multiple times. The flip side of that is if the earth
record was updated elsewhere in MongoDB after you called obj you would
not see the change from a call to uk.obj unless you reloaded the uk
record first.
Searching for records by a reference is straightforward:
valearth:Planet=...valonEarth:List[Country]=Country.findAll(Country.planet.name,earth.id.is)
Or in this case, because we have String references, we could just say:
valonEarth:List[Country]=Country.findAll(Country.planet.name,"earth")
Updating a reference is as you’d expect:
uk.planet.obj.foreach(_.review("Mostly harmless.").update)
This would result in the changed field being set:
INFO: update: cookbook.example.planet { "_id" : "earth"} { "$set" : {
"review" : "Mostly harmless."}}
A uk.planet.obj call will now return a planet with the new review.
Or you could replace the reference with another:
uk.planet(Planet.createRecord.id("mars").save.id.is).save
Again, note that the reference is via the ID of the record (id.is), not the record itself.
To remove the reference:
uk.planet(Empty).save
This removes the link, but the MongoDB record pointed to by the link will remain in the database. If you remove
the object being referenced, a later call to obj will return an
Empty box.
The example uses a StringRefField, as the MongoDB records themselves use String as the _id. Other reference types are:
ObjectIdRefFieldThis is possibly the most frequently used kind of reference, when you want to reference via the usual default ObjectId in MongoDB.
UUIDRefFieldThis is used for records with an ID based on java.util.UUID.
StringRefFieldThis is used in this example, where you control the ID as a String.
IntRefField and LongRefFieldThis is used when you have a numeric value as an ID.
10Gen, Inc.'s Data Modeling Decisions describes embedding of documents compared to referencing objects.
You want to use Foursquare’s type-safe domain specific language (DSL), Rogue, for querying and updating MongoDB records.
You need to include the Rogue dependency in your build and import Rogue into your code.
For the first step, edit build.sbt and add:
"com.foursquare"%%"rogue"%"1.1.8"intransitive()
In your code, run import com.foursquare.rogue._ and then start using Rogue. For example, using the Scala console (see Running Queries from the Scala Console):
scala>importcom.foursquare.rogue.Rogue._importcom.foursquare.rogue.Rogue._scala>importcode.model._importcode.model._scala>Country.where(_.ideqs"uk").fetchres1:List[code.model.Country]=List(classcode.model.Country={_id=uk,population=Map(Brighton->134293,Liverpool->469017,Birmingham->970892)})scala>Country.where(_.ideqs"uk").countres2:Long=1scala>Country.where(_.ideqs"uk").modify(_.populationat"Brighton"inc1).updateOne()
Rogue is able to use information in your Lift record to offer an elegant way to query and update records. It’s type-safe, meaning, for example, if you try to use an Int where a String is expected in a query, MongoDB would allow that and fail to find results at runtime, but Rogue enables Scala to reject the query at compile time:
scala>Country.where(_.ideqs7).fetch<console>:20:error:typemismatch;found:Int(7)required:StringCountry.where(_.ideqs7).fetch
The DSL constructs a query that we then fetch to send the query to MongoDB. That last method, fetch, is just one of the ways to run the query. Others include:
countQueries MongoDB for the size of the result set
countDistinctShows the number of distinct values in the results
existsTrue if there’s any record that matches the query
getReturns an Option[T] from the query
fetch(limit: Int)Similar to fetch, but returns at most limit results
updateOne, updateMulti, upsertOne, and upsertMultiModify a single document, or all documents, that match the query
findAndDeleteOne and bulkDelete_!!Delete records
The query language itself is expressive, and the best place to explore the variety of queries is in the QueryTest specification in the source for Rogue. You’ll find a link to this in the README of the project on GitHub.
Rogue is working towards a version 2 release that introduces a number of new concepts. If you want to give it a try, take a look at the instructions and comments on the Rogue mailing list.
For geospacial queries, see Storing Geospatial Values.
The README page for Rogue is a great starting point, and includes a link to QueryTest giving plenty of example queries to crib.
The motivation for Rogue is described in a Foursquare engineering blog post.
You want to store latitude and longitude information in MongoDB.
Use Rogue’s LatLong class to embed location information in your model. For
example, we can store the location of a city like this:
importcom.foursquare.rogue.Rogue._importcom.foursquare.rogue.LatLongclassCityprivate()extendsMongoRecord[City]withObjectIdPk[City]{overridedefmeta=CityobjectnameextendsStringField(this,60)objectlocextendsMongoCaseClassField[City,LatLong](this)}objectCityextendsCitywithMongoMetaRecord[City]{importnet.liftweb.mongodb.BsonDSL._ensureIndex(loc.name->"2d",unique=true)overridedefcollectionName="example.city"}
We can store values like this:
valplace=LatLong(50.819059,-0.136642)valcity=City.createRecord.name("Brighton, UK").loc(pos).save(true)
This will produce data in MongoDB that looks like this:
{"_id":ObjectId("50f2f9d43004ad90bbc06b83"),"name":"Brighton, UK","loc":{"lat":50.819059,"long":-0.136642}}
MongoDB supports geospatial indexes, and we’re making use of this by doing two things. First, we are storing the location information in one of MongoDB’s permitted formats. The format is an embedded document containing the coordinates. We could also have used an array of two values to represent the point.
Second, we’re creating an index of type 2d, which allows us to use MongoDB’s geospatial functions such as $near and $within. The unique=true in the ensureIndex highlights that you can control
whether locations needs to be unique (true, no duplications) or not (false).
With regard to the unique index, you’ll note that we’re calling save(true) on the City in
this example, rather than the plain save in most other recipes. We could use save here, and
it would work fine, but the difference is that save(true) raises the write concern level
from "normal" to "safe."
With the normal write concern, the call to save would return as soon
as the request has gone down the wire to the MongoDB server. This gives a certain degree of reliability in that
save would fail if the network had gone away. However, there’s no indication that the server has
processed the request. For example, if we tried to insert a city at the exact same location as one that was already in the database, the index uniqueness rule would be violated and the record would not be saved. With just save (or save(false)), our Lift application would not receive this error, and the call would fail silently. Raising the concern to "safe" causes save(true) to wait for an acknowledgment from the MongoDB server, which means the application will receive exceptions for some kinds of errors.
As an example, if we tried to insert a duplicate city, our call to save(true) would result in:
com.mongodb.MongoException$DuplicateKey:E11000duplicatekeyerrorindex:cookbook.example.city.$loc_2d
There are other levels of write concern, available via another variant of save that takes a WriteConcern as an argument.
If you ever need to drop an index, the MongoDB command is:
db.example.city.dropIndex("loc_2d")
The reason this recipe uses Rogue’s LatLong class is to enable us to query using the Rogue DSL. Suppose we’ve inserted other cities into our collection:
>db.example.city.find({},{_id:0}){"name":"London, UK","loc":{"lat":51.5,"long":-0.166667}}{"name":"Brighton, UK","loc":{"lat":50.819059,"long":-0.136642}}{"name":"Paris, France","loc":{"lat":48.866667,"long":2.333333}}{"name":"Berlin, Germany","loc":{"lat":52.533333,"long":13.416667}}{"name":"Sydney, Australia","loc":{"lat":-33.867387,"long":151.207629}}{"name":"New York, USA","loc":{"lat":40.714623,"long":-74.006605}}
We can now find those cities within 500 kilometers of London:
importcom.foursquare.rogue.{LatLong,Degrees}valcentre=LatLong(51.5,-0.166667)valradius=Degrees((500/6378.137).toDegrees)valnearby=City.where(_.locnear(centre.lat,centre.long,radius)).fetch()
This would query MongoDB with this clause:
{"loc":{"$near":[51.5,-0.166667,4.491576420597608]}}
which will identify London, Brighton, and Paris as near to London.
The form of the query is a centre point and a spherical radius. Records falling
inside that radius match the query and are returned closest first. We calculate
the radius in radians: 500 km divided by the radius of the Earth, approximately 6,378 km, gives
us an angle in radians. We convert this to Degrees as required by Rogue.
The MongoDB Manual discusses geospatial indexes.
Learn more about write concerns from the MongoDB Manual.
You want to try out a few queries interactively from the Scala console.
Start the console from your project, call boot(), and then interact with your model.
For example, using the MongoDB records developed as part of Connecting to a MongoDB Database, we can perform a basic query:
$ sbt
...
> console
[info] Compiling 1 Scala source to /cookbook_mongo/target/scala-2.9.1/classes...
[info] Starting scala interpreter...
[info]
Welcome to Scala version 2.9.1.final ...
Type in expressions to have them evaluated.
Type :help for more information.
scala> import bootstrap.liftweb._
import bootstrap.liftweb._
scala> new Boot().boot
scala> import code.model._
import code.model._
scala> Country.findAll
res2: List[code.model.Country] = List(class code.model.Country={_id=uk,
population=Map(Brighton -> 134293, Liverpool -> 469017,
Birmingham -> 970892)})
scala> :q
Running everything in Boot may be a little heavy handed, especially if you are starting up various services and background tasks. All we need to do is define a database connection. For example, using the sample code presented in Connecting to a MongoDB Database, we could initialise a conection with:
scala> import bootstrap.liftweb._
import bootstrap.liftweb._
scala> import net.liftweb.mongodb._
import net.liftweb.mongodb._
scala> MongoUrl.defineDb(DefaultMongoIdentifier,
"mongodb://127.0.0.1:27017/cookbook")
scala> Country.findAll
res2: List[code.model.Country] = List(class code.model.Country={_id=uk,
population=Map(Brighton -> 134293, Liverpool -> 469017,
Birmingham -> 970892)})
Connecting to a MongoDB Database explains connecting to MongoDB and Using Rogue describes querying with Rogue.
You want to write unit tests to run against your Lift Record code with MongoDB.
Using the Specs2 testing framework, surround your specification with a context that creates and connects to a database for each test and destroys it after the test runs.
First, create a Scala trait to set up and destroy a connection to MongoDB. We’ll be mixing this trait into our specifications:
importnet.liftweb.http.{Req,S,LiftSession}importnet.liftweb.util.StringHelpersimportnet.liftweb.common.Emptyimportnet.liftweb.mongodb._importcom.mongodb.ServerAddressimportcom.mongodb.Mongoimportorg.specs2.mutable.Aroundimportorg.specs2.execute.ResulttraitMongoTestKit{valserver=newMongo(newServerAddress("127.0.0.1",27017))defdbName="test_"+this.getClass.getName.replace(".","_").toLowerCasedefinitDb():Unit=MongoDB.defineDb(DefaultMongoIdentifier,server,dbName)defdestroyDb():Unit={MongoDB.use(DefaultMongoIdentifier){d=>d.dropDatabase()}MongoDB.close}traitTestLiftSession{defsession=newLiftSession("",StringHelpers.randomString(20),Empty)definSession[T](a:=>T):T=S.init(Req.nil,session){a}}objectMongoContextextendsAroundwithTestLiftSession{defaround[T<%Result](testToRun:=>T)={initDb()try{inSession{testToRun}}finally{destroyDb()}}}}
This trait provides the plumbing for connection to a MongoDB server running locally, and creates a database based on the name of the class it is mixed into. The important part is the MongoContext, which ensures that around your specification the database is initialised, and that after your specification is run, it is cleaned up.
If you’re using Scala 2.10, you’ll also be using a newer version of
Specs2, and in that case MongoContent needs to be modified. For
Specs2 2.1 you’ll need this code:
objectMongoContextextendsAroundwithTestLiftSession{defaround[T:AsResult](testToRun:=>T):Result={initDb()try{inSession{ResultExecution.execute(AsResult(testToRun))}}finally{destroyDb()}}}
The changes in the 2.x series of Specs2 are documented on Eric Torreborre’s blog.
To use this in a specification, mix in the trait and then add the context:
importorg.specs2.mutable._classMySpecextendsSpecificationwithMongoTestKit{sequential"My Record"should{"be able to create records"inMongoContext{valr=MyRecord.createRecord// ...your useful test here...r.valueBox.isDefinedmustbeTrue}}}
You can now run the test in SBT by typing test:
> test [info] Compiling 1 Scala source to target/scala-2.9.1/test-classes... [info] My Record should [info] + be able to create records [info] [info] [info] Total for specification MySpec [info] Finished in 1 second, 199 ms [info] 1 example, 0 failure, 0 error [info] [info] Passed: : Total 1, Failed 0, Errors 0, Passed 0, Skipped 0 [success] Total time: 1 s, completed 03-Jan-2013 22:47:54
Lift normally provides all the scaffolding you need to connect and run against MongoDB. Without a running Lift application, we need to ensure MongoDB is configured when our tests run outside of Lift, and that’s what the MongoTestKit trait is providing for us.
The one unusual part of the test setup is including a TestLiftSession. This provides an empty session around your test, which is useful if you are accessing or testing state-related code (e.g., access to S). It’s not strictly necessary for running tests against Record, but it has been included here because you may want to do that at some point, for example if you are testing user login via MongoDB records.
There are a few nice tricks in SBT to help you run tests. Running test will run all the tests in your project. If you want to focus on just one test, you can:
> test-only org.example.code.MySpec
This command also supports wildcards, so if we only wanted to run tests that start with the word "Mongo" we could:
> test-only org.example.code.Mongo*
There’s also test-quick (in SBT 0.12), which will only run tests that have not been run, have changed, or failed last time, and ~test to watch for changes in tests and run them.
test-only together with modifications to around in MongoTestKit can be a good way to track down any issues you have with a test. By disabling the call to destroyDb(), you can jump into the MongoDB shell and examine the state of the database after a test has run.
Around each test, we’ve simply deleted the database so the next time we try to use it, it’ll be empty. In some situations, you may not be able to do this. For example, if you’re running tests against a database hosted with companies such as MongoLabs or MongoHQ, then deleting the database will mean you won’t be able to connect to it next time you run.
One way to resolve that is to clean up each individual collection, by defining the collections you need to clean up and replacing destroyDb with a method that will remove all entries in those collections:
lazyvalcollections:List[MongoMetaRecord[_]]=List(MyRecord)defdestroyDb():Unit={collections.foreach(_bulkDelete_!!newBasicDBObject)MongoDB.close}
Note that the collection list is lazy to avoid start up of the Record system before we’ve initialised our database connections.
If your tests are modifying data and have the potential to interact, you’ll want to stop SBT from running your tests in parallel. A symptom of this would be tests that fail apparently randomly, or working tests that stop working when you add a new test, or tests that seem to lock up. Disable by adding the following to build.sbt:
parallelExecutioninTest:=false
You’ll notice that the example specification includes the line: sequential. This disables the default behaviour in Specs2 of running all tests concurrently.
IntelliJ IDEA detects and allows you to run Specs2 tests automatically. With Eclipse, you’ll need to include the JUnit runner annotation at the start of your specification:
importorg.junit.runner.RunWithimportorg.specs2.runner.JUnitRunner@RunWith(classOf[JUnitRunner])classMySpecextendsSpecificationwithMongoTestKit{...
You can then "Run As…" the class in Eclipse.
The Specs2 site contains examples and a user guide.
If you prefer to use the Scala Test framework, take a look at Tim Nelson’s Mongo Auth Lift module. It includes tests using that framework. Much of what Tim has written there has been adapted to produce this recipe for Specs2.
The Lift MongoDB Record library includes a variation on testing with Specs2, using just Before and After rather than the around example used in this recipe.
Flapdoodle provides a way to automate the download, install, setup, and cleanup of a MongoDB database. This automation is something you can wrap around your unit tests, and a Specs2 integration is included using the same Before and After approach to testing used by Lift MongoDB Record.
The test interface provided by SBT, such as the test command, also supports the ability to fork tests, set specific configurations for test cases, and ways to select which tests are run.
The Lift wiki describes more about unit testing and Lift sessions.
This chapter looks at interacting with other systems from within Lift, such as sending email, calling URLs, or scheduling tasks.
Many of the recipes in this chapter have code examples in a project at https://github.com/LiftCookbook/cookbook_around.
You want to send a plain-text email from your Lift application.
Use the Mailer:
importnet.liftweb.util.Mailerimportnet.liftweb.util.Mailer._Mailer.sendMail(From("you@example.org"),Subject("Hello"),To("other@example.org"),PlainMailBodyType("Hello from Lift"))
Mailer sends the message asynchronously, meaning sendMail will
return immediately, so you don’t have to worry about the time costs of
negotiating with an SMTP server. However, there’s also a blockingSendMail
method if you do need to wait.
By default, the SMTP server used will be localhost. You can change
this by setting the mail.smtp.host property.
For example, edit src/mail/resources/props/default.props and add the line:
.smtp.host=smtp.example.org
The signature of sendMail requires a From, Subject, and then any
number of MailTypes:
To, CC, and BCCThe recipient email address
ReplyToThe address that mail clients should use for replies
MessageHeaderKey/value pairs to include as headers in the message
PlainMailBodyTypeA plain-text email sent with UTF-8 encoding
PlainPlusBodyTypeA plain-text email, where you specify the encoding
XHTMLMailBodyTypeFor HTML email (HTML Email)
XHTMLPlusImagesFor attachments (Sending Email with Attachments)
In the previous example, we added two types: PlainMailBodyType
and To. Adding more is as you’d expect:
Mailer.sendMail(From("you@example.org"),Subject("Hello"),To("other@example.org"),To("someone@example.org"),MessageHeader("X-Ignore-This","true"),PlainMailBodyType("Hello from Lift"))
The address-like MailTypes (To, CC, BCC, ReplyTo) can be given an optional "personal name":
From("you@example.org",Full("Example Corporation"))
This would appear in your mailbox as:
From: Example Corporation <you@example.org>
The default character set is UTF-8. If you need to change this, replace
the use of PlainMailBodyType with
PlainPlusBodyType("Hello from Lift", "ISO8859_1").
Sending Email with Attachments describes email with attachments.
For HTML email, see HTML Email.
You don’t want email sent when developing your Lift application locally, but you do want to see what would have been sent.
Assign a logging function to Mailer.devModeSend in Boot.scala:
importnet.liftweb.util.Mailer._importjavax.mail.internet.{MimeMessage,MimeMultipart}Mailer.devModeSend.default.set((m:MimeMessage)=>logger.info("Would have sent: "+m.getContent))
When you send an email with Mailer, no SMTP server will be contacted, and
instead, you’ll see output to your log:
Would have sent: Hello from Lift
The key part of this recipe is setting a
MimeMessage => Unit function on Mailer.devModeSend. We happen to be logging, but you can use this function to handle the email any way you want.
The Lift Mailer allows you to control how email is sent at each run mode: by default, email is sent for devModeSend, profileModeSend, pilotModeSend, stagingModeSend, and productionModeSend; whereas, by default, testModeSend only logs that a message would have been sent.
The testModeSend logs a reference to the MimeMessage, meaning your log
would show a message like:
Sending javax.mail.internet.MimeMessage@4a91a883
This recipe has changed the behaviour of Mailer when your Lift
application is in developer mode (which it is by default). We’re logging
just the body part of the message.
Java Mail doesn’t include a utility to display all the parts of an email, so if you want more information, you’ll need to roll your own function. For example:
defdisplay(m:MimeMessage):String={valnl=System.getProperty("line.separator")valfrom="From: "+m.getFrom.map(_.toString).mkString(",")valsubj="Subject: "+m.getSubjectdefparts(mm:MimeMultipart)=(0untilmm.getCount).map(mm.getBodyPart)valbody=m.getContentmatch{casemm:MimeMultipart=>valbodyParts=for(part<-parts(mm))yieldpart.getContent.toStringbodyParts.mkString(nl)caseotherwise=>otherwise.toString}valto=for{rt<-List(RecipientType.TO,RecipientType.CC,RecipientType.BCC)address<-Option(m.getRecipients(rt))getOrElseArray()}yieldrt.toString+": "+address.toStringList(from,to.mkString(nl),subj,body)mkStringnl}Mailer.devModeSend.default.set((m:MimeMessage)=>logger.info("Would have sent: "+display(m)))
This would produce output of the form:
Would have sent: From: you@example.org To: other@example.org To: someone@example.org Subject: Hello Hello from Lift
This example display function is long but mostly straightforward. The body value handles multipart messages by extracting each body part. This is triggered when sending more structured emails, such as the HTML emails described in HTML Email.
If you want to debug the mail system while it’s actually sending the email, enable the Java Mail debug mode. In default.props add:
mail.debug=true
This produces low-level output from the Java Mail system when email is sent:
DEBUG: JavaMail version 1.4.4 DEBUG: successfully loaded resource: /META-INF/javamail.default.providers DEBUG SMTP: useEhlo true, useAuth false DEBUG SMTP: trying to connect to host "localhost", port 25, isSSL false ...
Run modes are described on the Lift wiki.
Give Mailer a NodeSeq containing your HTML message:
importnet.liftweb.util.Mailerimportnet.liftweb.util.Mailer._valmsg=<html><head><title>Hello</title></head><body><h1>Hello</h1></body></html>Mailer.sendMail(From("me@example.org"),Subject("Hello"),To("you@example.org"),msg)
An implicit converts the NodeSeq into an XHTMLMailBodyType. This
ensures the mime type of the email is text/html. Despite the name of
"XHTML," the message is converted for transmission using
HTML5 semantics.
The character encoding for HTML email, UTF-8, can be changed by setting
mail.charset in your Lift properties file.
If you want to set both the text and HTML version of a message, supply each body wrapped in the appropriate BodyType class:
valhtml=<html><head><title>Hello</title></head><body><h1>Hello!</h1></body></html>vartext="Hello!"Mailer.sendMail(From("me@example.org"),Subject("Hello"),To("you@example.org"),PlainMailBodyType(text),XHTMLMailBodyType(html))
This message would be sent as a multipart/alternative:
Content-Type: multipart/alternative;
boundary="----=_Part_1_1197390963.1360226660982"
Date: Thu, 07 Feb 2013 02:44:22 -0600 (CST)
------=_Part_1_1197390963.1360226660982
Content-Type: text/plain; charset=UTF-8
Content-Transfer-Encoding: 7bit
Hello!
------=_Part_1_1197390963.1360226660982
Content-Type: text/html; charset=UTF-8
Content-Transfer-Encoding: 7bit
<html>
<head>
<title>Hello</title>
</head>
<body>
<h1>Hello!</h1>
</body>
</html>
------=_Part_1_1197390963.1360226660982--
When receiving a message with this content, it is up to the mail client to decide which version to show (text or HTML).
For sending with attachments, see Sending Email with Attachments.
Set the Mailer.authenticator in Boot with the credentials for your
SMTP server, and enable the mail.smtp.auth flag in your Lift properties
file.
Modify Boot.scala to include:
importnet.liftweb.util.{Props,Mailer}importjavax.mail.{Authenticator,PasswordAuthentication}Mailer.authenticator=for{user<-Props.get("mail.user")pass<-Props.get("mail.password")}yieldnewAuthenticator{overridedefgetPasswordAuthentication=newPasswordAuthentication(user,pass)}
In this example, we expect the username and password to come from Lift properties, so we need to modify src/main/resources/props/default.props to include them:
.smtp.auth=true.user=me@example.org.password=correcthorsebatterystaple.smtp.host=smtp.sendgrid.net
When you send email, the credentials in default.props will be used to authenticate with the SMTP server.
We’ve used Lift properties as a way to configure SMTP authentication. This has the benefit of allowing us to enable authentication for just some run modes. For example, if our default.props did not contain authentication settings, but our production.default.props did, then no authentication would happen in development mode, ensuring we can’t accidentally send email outside of a production environment.
You don’t have to use a properties file for this: the Lift Mailer
also supports JNDI, or you could look up a username and password some other way and set Mailer.authenticator when you have the values.
However, some mail services such as SendGrid do require mail.smtp.auth=true to be set, and that should go into your Lift properties file or set as a JVM argument: -Dmail.smtp.auth=true.
As well as mail.smtp.auth, there are a range of settings to control the Java Mail API. Examples include controlling port numbers and timeouts.
Use the Mailer XHTMLPlusImages to package a message with attachments.
Suppose we want to construct a CSV file and send it via email:
valcontent="Planet,Discoverer\r\n"+"HR 8799 c, Marois et al\r\n"+"Kepler-22b, Kepler Science Team\r\n"caseclassCSVFile(bytes:Array[Byte],filename:String="file.csv",mime:String="text/csv; charset=utf8; header=present")valattach=CSVFile(content.mkString.getBytes("utf8"))valbody=<p>Pleaseresearchtheenclosed.</p>valmsg=XHTMLPlusImages(body,PlusImageHolder(attach.filename,attach.mime,attach.bytes))Mailer.sendMail(From("me@example.org",Subject("Planets"),To("you@example.org"),msg)
What’s happening here is that our message is an XHTMLPlusImages instance, which accepts
a body message and attachment. The attachment, the PlusImageHolder, is an Array[Byte], mime type, and a filename.
XHTMLPlusImages can also accept more than one PlusImageHolder if you
have more than one file to attach. Although the name PlusImageHolder may suggest it is for attachment images, you can attach any kind of data as an Array[Byte] with an appropriate mime type.
By default, the attachment is sent with an inline disposition. This controls the Content-Disposition header in the message, and inline means the content is intended for display automatically when the message is shown. The alternative is attachment, and this can be indicated with an optional final parameter to PlusImageHolder:
PlusImageHolder(attach.filename,attach.mime,attach.bytes,attachment=true)
In reality, the mail client will display the message how it wants to, but this extra parameter may give you a little more control.
To attach a premade file, you can use LiftRules.loadResource to fetch content from the classpath. If our project contained a file called Kepler-22b_System_Diagram.jpg in the src/main/resources/ folder, we could load and attach it like this:
valfilename="Kepler-22b_System_Diagram.jpg"valmsg=for(bytes<-LiftRules.loadResource("/"+filename))yieldXHTMLPlusImages(<p>Pleaseresearchthisplanet.</p>,PlusImageHolder(filename,"image/jpg",bytes))msgmatch{caseFull(m)=>Mailer.sendMail(From("me@example.org"),Subject("Planet attachment"),To("you@example.org"),m)case_=>logger.error("Planet file not found")}
As the content of src/main/resources is included on the classpath, we pass the filename to loadResource with a leading / character so the file can be found at the right place on the classpath.
The loadResource returns a Box[Array[Byte]] as we have no guarantee the file will exist. We map this to a Box[XHTMLPlusImages] and match on that result to either send the email or log that the file wasn’t found.
Messages are sent using the multipart/related mime heading, with an inline disposition. Lift ticket #1197 links to a discussion regarding multipart/mixed that may be preferable for working around issues with Microsoft Exchange.
RFC 2183 describes the Content-Disposition header.
Use net.liftweb.util.Schedule:
importnet.liftweb.util.Scheduleimportnet.liftweb.util.Helpers._Schedule(()=>println("doing it"),30seconds)
This would cause "doing it" to be printed on the console 30 seconds from now.
The signature for Schedule used previously expects a function of type () => Unit, which is the thing we want to happen in the future, and a TimeSpan from Lift’s TimeHelpers, which is when we want it to happen. The 30 seconds value gives us a TimeSpan via the Helpers._ import, but there’s a variation called perform that accepts a Long millisecond value if you prefer that:
Schedule.perform(()=>println("doing it"),30*1000L)
Behind the scenes, Lift is making use of the ScheduledExecutorService from java.util.concurrent and, as such, returns a ScheduledFuture[Unit]. You can use this future to cancel the operation before it runs.
It may be a surprise to find that you can call Schedule with just a function as an argument, and not a delay value. This version runs the function immediately, but on a worker thread. This is a convenient way to asynchronously run other tasks without going to the trouble of creating an actor for the purpose.
There is also a Schedule.schedule method that will send an
actor a specified message after a given delay. This takes a TimeSpan delay, but again there’s also a Schedule.perform version that accepts a Long as a delay.
The Helpers._ import brings with it some implicit conversions for TimeSpan. For example, a JodaTime Period can be given to schedule and that will be used as a delay before executing your function. Don’t be tempted in this situation to use a JodaTime DateTime. This would be converted to a TimeSpan, but doesn’t make sense as a delay.
Run Tasks Periodically includes an example of scheduling with actors.
ScheduledFuture is documented via the Java Doc for Future. If you’re building complex, low-level, cancellable concurrency functions, it’s advisable to have a copy of Java Concurrency in Practice close by (written by Goetz, et al., Addison-Wesley Professional).
Use net.liftweb.util.Schedule ensuring that you call schedule again
during your task to reschedule it. For example, using an actor:
importnet.liftweb.util.Scheduleimportnet.liftweb.actor.LiftActorimportnet.liftweb.util.Helpers._objectMyScheduledTaskextendsLiftActor{caseclassDoIt()caseclassStop()privatevarstopped=falsedefmessageHandler={caseDoItif!stopped=>Schedule.schedule(this,DoIt,10minutes)// ... do useful work herecaseStop=>stopped=true}}
The example creates a LiftActor for the work to be done. On receipt of
a DoIt message, the actor reschedules itself before doing whatever
useful work needs to be done. In this way, the actor will be called
every 10 minutes.
The Schedule.schedule call is ensuring that this actor is sent the
DoIt message after 10 minutes.
To start this process off, possibly in Boot.scala, just send the
DoIt message to the actor:
MyScheduledTask!MyScheduledTask.DoIt
To ensure the process stops correctly when Lift shuts down, we register
a shutdown hook in Boot.scala to send the Stop message to prevent
future reschedules:
LiftRules.unloadHooks.append(()=>MyScheduledTask!MyScheduledTask.Stop)
Without the Stop message, the actor would continue to be rescheduled
until the JVM exits. This may be acceptable, but note that during
development with SBT, without the Stop message, you will continue to
schedule tasks after issuing the container:stop command.
Schedule returns a ScheduledFuture[Unit] from the Java concurrency
library, which allows you to cancel the activity.
Chapter 1 of Lift in Action (by Perrett, Manning Publications, Co.) includes a Comet Actor clock example that uses Schedule.
You want your Lift application to fetch a URL and process it as text, JSON, XML, or HTML.
Use Dispatch, "a library for asynchronous HTTP interaction."
Before you start, include Dispatch dependency in build.sbt:
libraryDependencies+="net.databinder.dispatch"%%"dispatch-core"%"0.9.5"
Using the example from the Dispatch documentation, we can make an HTTP request to try to determine the country from the service at http://www.hostip.info/use.html:
importdispatch._valsvc=url("http://api.hostip.info/country.php")valcountry:Promise[String]=Http(svcOKas.String)println(country())
Note that the result country is not a String but a Promise[String], and we use apply to wait for the resulting value.
The result printed will be a country code such as GB, or XX if the country cannot be determined from your IP address.
This short example expects a 200 (OK) status result and turns the result into a String, but that’s a tiny part of what Dispatch is capable of. We’ll explore further in this section.
What if the request doesn’t return a 200? In that case, with the code we have, we’d get an exception such as: "Unexpected response status: 404." There are a few ways to change that.
We can ask for an Option:
valresult:Option[String]=country.option()
As you’d expect, this will give a None or Some[String]. However, if you have debug level logging enabled in your application, you’ll see the request and response and error messages from the underlying Netty library. You can tune these messages by adding a logger setting to default.logback.xml file:
<loggername="com.ning.http.client"level="WARN"/>
A second possibility is to use either with the usual convention that the Right is the expected result and Left signifies a failure:
country.either()match{caseLeft(status)=>println(status.getMessage)caseRight(cc)=>println(cc)}
This will print a result as we are forcing the evaluation with an apply via either().
Promise[T] implements map, flatMap, filter, fold, and all the usual methods you’d expect it to allow you to compose. This means you can use the promise with a for comprehension:
valcodeLength=for(cc<-country)yieldcc.length
Note that codeLength is a Promise[Int]. To get the value, you can evaluate codeLength() and you’ll get a result of 2.
As well as extracting string values with as.String, there are other options, including:
as.BytesTo work with Promise[Array[Byte]]
as.FileTo write to a file, as in Http(svc > as.File(new File("/tmp/cc")))
as.ResponseTo allow you to provide a client.Response => T function to use on the response
as.xml.ElemTo parse an XML response
As an example of as.xml.Elem:
valsvc=url("http://api.hostip.info/?ip=12.215.42.19")valcountry=Http(svc>as.xml.Elem)println(country.map(_\\"description")())
This example is parsing the XML response to the request, which returns a Promise[scala.xml.Elem]. We’re picking out the description node of the XML via a map, which will be a Promise[NodeSeq] that we then force to evaluate. The output is something like:
<gml:descriptionxmlns:xsi="http://www.w3.org/2001/XMLSchema-instance"xmlns:gml="http://www.opengis.net/gml">This is the Hostip Lookup Service</gml:description>
That example assumes the request is going to be well formed. In addition to the core Databinder library, there are extensions for JSoup and TagSoup to assist in parsing HTML that isn’t necessarily well formed.
For example, to use JSoup, include the dependency:
libraryDependencies+="net.databinder.dispatch"%%"dispatch-jsoup"%"0.9.5"
You can then use the features of JSoup, such as picking out elements of a page using CSS selectors:
importorg.jsoup.nodes.Documentvalsvc=url("http://www.example.org").setFollowRedirects(true)valtitle=Http(svc>as.jsoup.Document).map(_.select("h1").text).optionprintln(title()getOrElse"unknown title")
Here we are applying JSoup’s select function to pick out the <h1> element on the page, taking the text of the element, which we turn into a Promise[Option[String]]. The result, unless example.org has changed, will be "Example Domain."
As a final example of using Dispatch, we can pipe a request into Lift’s JSON library:
importnet.liftweb.json._importcom.ning.http.clientobjectasJsonextends(client.Response=>JValue){defapply(r:client.Response)=JsonParser.parse(r.getResponseBody)}valsvc=url("http://api.hostip.info/get_json.php?ip=212.58.241.131")valjson:Promise[JValue]=Http(svc>asJson)caseclassHostInfo(country_name:String,country_code:String)implicitvalformats=DefaultFormatsvalhostInfo=json.map(_.extract[HostInfo])()
The URL we’re calling returns a JSON representation for location information of the IP address we’ve passed.
By providing a Response => JValue to Dispatch, we’re able to pass the response body through to the JSON parser. We can then map on the Promise[JValue] to apply whatever Lift JSON functions we want to. In this case, we’re extracting a simple case class.
The result would show hostInfo as:
HostInfo(UNITEDKINGDOM,GB)
The Dispatch documentation is well written and guides you through the way Dispatch approaches HTTP. Do spend some time with it.
For questions about Dispatch, the best place is the Dispatch Google Group.
The previous major version of Dispatch, 0.8.x ("Dispatch Classic"), is quite different from the "reboot" of the project as version 0.9. Consequently, examples you may see that use 0.8.x will need some conversion to run with 0.9.x. Nathan Hamblen’s blog describes the change.
For working with JSoup, take a look at the JSoup Cookbook.
Deploying a Lift application to production means little more than packaging it and ensuring you set the run mode to production. The recipes in this chapter show how to do this for various hosted services.
You can also install and run a container such as Tomcat or Jetty on your own servers. Containers were introduced in Running your application. This brings with it the need to understand how to install, configure, start, stop, and manage each container, and how to integrate it with load balancers or other frontends. These are large topics, and you can find out more from such sources as:
The deployment section of the Lift wiki.
Timothy Perrett, Lift in Action, Chapter 15, "Deployment and Scaling," Manning Publications, Co.
Jason Brittain and Ian F. Darwin, Tomcat: The Definitive Guide, O’Reilly Media, Inc.
Tanuj Khare, Apache Tomcat 7 Essentials, Packt Publishing.
The Lift wiki includes a page on Tomcat configuration options relevant to Lift.
You have an account with the CloudBees PaaS hosting environment, and you want to deploy your Lift application there.
CloudBees have announced they are closing their hosting service as of 31st December 2014.
Use the SBT package command to produce a WAR file that can be deployed
to CloudBees, and then use the CloudBees SDK to configure and deploy your
application.
From within the CloudBees "Grand Central" console, create a new application under your account. In what follows, we’ll assume your account is called myaccount and your application is called myapp.
For the best performance, you will want to ensure the Lift run mode is set to "production." Do this from the CloudBees SDK command line:
$bees config:set -a myaccount/myapp run.mode=production
This will set the run mode to production for your CloudBees applications
identified as myaccount/myapp. Omitting the -a will set it for your
whole CloudBees account.
CloudBees will remember this setting, so you only need to do it once.
You can then deploy:
$sbt package ...[info]Packaging /Users/richard/myapp/target/scala-2.9.1/myapp.war... ...$bees app:deploy -a myaccount/myapp ./target/scala-2.9.1/myapp.war
This will send your WAR file to CloudBees and deploy it. You’ll see the location (URL) of your application output from the bees app:deploy command when it completes.
If you change a configuration setting, you will need to restart the application for the setting
to take effect. Deploying the application will do this, otherwise, run the bees app:restart command:
$ bees app:restart -a myaccount/myappIf you are deploying an application to multiple CloudBees instances, be aware that, by default, CloudBees will round robin requests to each instance. If you use any of Lift’s state features, you’ll want to enable session affinity (sticky sessions):
$bees app:update -a myaccount/myappstickySession=true
If you are using Comet, it’ll work fine, but the CloudBees default is to enable request buffering. This allows CloudBees to do smart things, such as rerouting requests in a cluster if one machine does not respond. A consequence of request buffering is that long-polling Comet requests will time out more often. To turn this feature off, run the following:
$bees app:update -a myaccount/myappdisableProxyBuffering=true
As with the run mode setting, CloudBees will remember these settings, so you only need to set them once.
Finally, you may want to increase the permanent generation memory setting of the JVM. By default, an application has 64 MB assigned for the PermGen. To increase this to 128 MB, run the bees app:update command:
$bees app:update -a myaccount/myappjvmPermSize=128
The commands bees app:info and bees config:list will report back the settings for your application.
If you are using a SQL database in your application, you’ll want to configure src/main/webapp/WEB-INF/cloudbees-web.xml. For example:
<?xml version="1.0"?><cloudbees-web-appxmlns="http://www.cloudbees.com/xml/webapp/1"><appid>myaccount/myapp</appid><resourcename="jdbc/mydb"auth="Container"type="javax.sql.DataSource"><paramname="username"value="dbuser"/><paramname="password"value="dbpassword"/><paramname="url"value="jdbc:cloudbees://mydb"/><!-- For these connections settings, see:http://commons.apache.org/dbcp/configuration.html--><paramname="maxActive"value="10"/><paramname="maxIdle"value="2"/><paramname="maxWait"value="15000"/><paramname="removeAbandoned"value="true"/><paramname="removeAbandonedTimeout"value="300"/><paramname="logAbandoned"value="true"/><!-- Avoid idle timeouts --><paramname="validationQuery"value="SELECT 1"/><paramname="testOnBorrow"value="true"/></resource></cloudbees-web-app>
This is a JNDI database configuration, defining a connection to a
CloudBees database called mydb. This will be used by Lift if the JNDI
name is referenced in Boot.scala:
DefaultConnectionIdentifier.jndiName="jdbc/mydb"if(!DB.jndiJdbcConnAvailable_?){// set up alternative local database connection here}
Because the JNDI setting is only defined in cloudbees-web.xml, it will only be available in a CloudBees environment. This means you can develop against a different database locally and use your CloudBees database when deploying.
Generally, you don’t need to know about your deployed instance’s public host name and port number. Requests to your application URL are routed to a specific instance by CloudBees. However there are situations, especially when you have multiple instances, where you do need to find this out. For example, if you want to receive messages from Amazon’s Simple Notification Service (SNS), then each instance will need to give a direct URL to SNS when the application boots.
CloudBees has provided documentation on how to do this. To get the public hostname, you need to make an HTTP request to http://instance-data/latest/meta-data/public-hostname. For example:
importio.SourcevalbeesPublicHostname:Box[String]=tryo{Source.fromURL("http://instance-data/latest/meta-data/public-hostname").getLines().toStream.head}
This will return a Full hostname on the CloudBees environment, but when running locally will fail and return a Failure. For example:
Failure(instance-data,Full(java.net.UnknownHostException:instance-data),Empty)
The port number can be found from the name of a file in the .genapps/ports folder of your application deployment:
valbeesPort:Option[Int]={valportsDir=newFile(System.getenv("PWD"),".genapp/ports")for{files<-Option(portsDir.list)port<-files.flatMap(asInt).headOption}yieldport}
The java.io.File list method returns a list of filenames in a directory, but will return null if the directory doesn’t exist or if there are any IO errors. For this reason, we wrap it in Option to convert null values to None.
Running locally, this will return a None, but on CloudBees, you’ll see a Full[Int] port number.
You might put these two values together as follows:
importjava.net.InetAddressvalhostAndPort:String=(beesPublicHostnameopenOrInetAddress.getLocalHost.getHostAddress)+":"+(beesPortgetOrElse8080).toString
Running locally, hostAndPort might be 192.168.1.60:8080 and running on CloudBees, it would be something like ec2-204-236-222-252.compute-1.amazonaws.com:8520.
Currently the default JVM provided by CloudBees is JDK 7, but you can select 6, 7, and 8.
To change the default Java Virtual Machine, use the bees config:set command:
$bees config:set -a myaccount/myapp -Rjava_version=1.8
Excluding the application identifier -a myaccount/myapp from the command will set the JVM as the default for all applications in the account. The bees config:set command will update the configuration, but not take effect until the application has been updated or restarted.
The JVM can also be changed when an application is deployed or updated via the following commands:
$bees app:deploy -a myaccount/myapp sample.war -Rjava_version=1.6$bees app:update -a myaccount/myapp -Rjava_version=1.7
To confirm which JVM an application is currently running, use the
bees config:list command, which will display the Java version:
$bees config:list -a myaccount/myapp Runtime Parameters:java_version=1.6
CloudBees offers several containers: Tomcat 6.0.32 (the default), Tomcat 7, JBoss 7.02, JBoss 7.1, and GlassFish 3.
To change containers, the application will need to be redeployed, as CloudBees uses different file configurations for the various containers. Hence we use the bees app:deploy command. The following example updates to Tomcat 7:
$ bees app:deploy -t tomcat7 -a myaccount/myapp sample.warThe JVM and container commands can be run as a single bees app:deploy, as follows:
$bees app:deploy -t tomcat -a myaccount/myapp sample.war -Rjava_version=1.6
This would deploy sample.war to the myapp application on myaccount with Tomcat 6.0.32 and JDK 6.
To determine which container an application is deployed to, use the command bees app:info:
$bees app:info -a myaccount/myapp Application : myaccount/myapp Title : myapp Created : Wed Mar2011:02:40 EST 2013 Status : active URL : myapp.myaccount.cloudbees.net clusterSize : 1 container : java_free containerType : tomcat idleTimeout : 21600 maxMemory : 256 proxyBuffering :falsesecurityMode : PUBLIC serverPool : stax-global(Stax Global Pool)
ClickStart applications are templates to quickly get an application and automated build up and running at CloudBees. The Lift ClickStart creates a private Git source repository at CloudBees that contains a Lift 2.4 application, provisions a MySQL database, creates a Maven-based Jenkins build, and deploys the application. All you need to do is provide a name for the application (without whitespace).
To access the Git source repository created for you, you’ll need to upload an SSH public key. You can do this in the "My Keys" section of your account settings on the CloudBees website.
The build that’s created for you will automatically build and deploy your application to CloudBees when you push changes to your Git repository.
If all of that’s a good match to the technologies and services you want to use, ClickStart is a great way to deploy your application. Alternatively, it gives you a starting point from which you can modify elements; or you could fork the CloudBees Lift template and create your own.
The CloudBees SDK provides command-line tools for configuring and controlling applications.
The CloudBees developer portal contains a "Resources" section that provides details of the CloudBees services. In it, you’ll find details on PermGen settings, JVM selection, and servlet containers.
You want to run your Lift application on Amazon Web Services (AWS) Elastic Beanstalk.
Create a new Tomcat 7 environment, use SBT to package your Lift application as a WAR file, and then deploy the application to your environment.
To create a new environment, visit the AWS console, navigate to Elastic Beanstalk, and select "Apache Tomcat 7" as your environment. This will create and launch a default Beanstalk application. This may take a few minutes, but will eventually report "Successfully running version Sample Application." You’ll be shown the URL of the application (something like http://default-environment-nsdmixm7ja.elasticbeanstalk.com), and visiting the URL you’re given will show the running default Amazon application.
Prepare your WAR file by running:
$ sbt packageThis will write a WAR file into the target folder. To deploy this WAR file from the AWS Beanstalk web console (see Figure 10-1), select the "Versions" tab under the "Elastic Beanstalk Application Details" and click the "Upload new version" button. You’ll be given a dialog where you give a version label and use the "Choose file" button to select the WAR file you just built. You can either upload and deploy in one step, or upload first and then select the version in the console and hit the "Deploy" button.
The Beanstalk console will show "Environment updating…", and after some minutes, it’ll report "Successfully running." Your Lift application is now deployed and running on Beanstalk.
A final step is to enable Lift’s production run mode. From the environment in the AWS Beanstalk web console, follow the "Edit Configuration" link. A dialog will appear, and under the "Container" tab, add -Drun.mode=production to the "JVM Command Line Options" and hit "Apply Changes" to redeploy your application.
Elastic Beanstalk provides a prebuilt stack of software and infrastructure, in this case: Linux, Tomcat 7, a 64 bit "t1.micro" EC2 instance, load balancing, and an S3 bucket. That’s the environment and it has reasonable default settings. Beanstalk also provides an easy way to deploy your Lift application. As we’ve seen in this recipe, you upload an application (WAR file) to Beanstalk and deploy it to the environment.
As with many cloud providers, keep in mind that you want to avoid local file storage. The reason for this is to allow instances to be terminated or restarted without data loss. With your Beanstalk application, you do have a filesystem and you can write to it, but it is lost if the image is restarted. You can get persistent local file storage—for example, using Amazon Elastic Block Storage—but you’re fighting against the nature of the platform.
Logfiles are written to the local filesystem. To access them, from the AWS console, navigate to your environment, into the "Logs" tab, and hit the "Snapshot" button. This will take a copy of the logs and store them in an S3 bucket, and give you a link to the file contents. This is a single file showing the content of a variety of logfiles, and catalina.out will be the one showing any output from your Lift application. If you want to try to keep these logfiles around, you can configure the environment to rotate the logs to S3 every hour from the "Container" tab under "Edit Configuration."
The Lift application WAR files are stored in the same S3 bucket that the logs are stored in. From the AWS console, you’ll find it under the S3 page listed with a name like "elasticbeanstalk-us-east-1-5989673916964." You’ll note that the AWS uploads makes your WAR filename unique by adding a prefix to each filename. If you need to be able to tell the difference between these files in S3, one good approach is to bump the version value in your build.sbt file. This version number is included in the WAR filename.
Beanstalks enables autoscaling by default. That is, it launches a single instance of your Lift application, but if the load increases above a threshold, up to four instances may be running.
If you’re making use of Lift’s state features, you’ll need to enable sticky sessions from the "Load Balancer" tab of the environment configuration. It’s a checkbox named "Enable Session Stickiness"—it’s easy to miss, but that tab does scroll to show more options if you don’t see it the first time.
There’s nothing unusual you have to do to use Lift and a database from Beanstalk. However, Beanstalk does try to make it easy for you to work with Amazon’s Relational Database Service (RDS). Either when creating your Beanstalk environment, or from the configuration options later, you can add an RDS instance, which can be an Oracle, SQL-Server, or MySQL database.
The MySQL option will create a MySQL InnoDB database. The database will be accessible from Beanstalk, but not from elsewhere on the Internet. To change that, modify the security groups for the RDS instance from the AWS web console. For example, you might permit access from your IP address.
When your application launches with an associated RDS instance, the JVM system properties include settings for the database name, host, port, user, and password. You could pull them together like this in Boot.scala:
Class.forName("com.mysql.jdbc.Driver")valconnection=for{host<-Box!!System.getProperty("RDS_HOSTNAME")port<-Box!!System.getProperty("RDS_PORT")db<-Box!!System.getProperty("RDS_DB_NAME")user<-Box!!System.getProperty("RDS_USERNAME")pass<-Box!!System.getProperty("RDS_PASSWORD")}yieldDriverManager.getConnection("jdbc:mysql://%s:%s/%s"format(host,port,db),user,pass)
That would give you a Box[Connection] that, if Full, you could use in a SquerylRecord.initWithSquerylSession call, for example (see Relational Database Persistence with Record and Squeryl).
Alternatively, you might want to guarantee a connection by supplying defaults for all the values with something like this:
Class.forName("com.mysql.jdbc.Driver")valconnection={valhost=System.getProperty("RDS_HOSTNAME","localhost")valport=System.getProperty("RDS_PORT","3306")valdb=System.getProperty("RDS_DB_NAME","db")valuser=System.getProperty("RDS_USERNAME","sa")valpass=System.getProperty("RDS_PASSWORD","")DriverManager.getConnection("jdbc:mysql://%s:%s/%s"format(host,port,db),user,pass)}
Amazon provided a walkthrough with screenshots, showing how to create a Beanstalk application.
Elastic Beanstalk, by van Vliet et al. (O’Reilly) goes into the details of the Beanstalk infrastructure, how to work with Eclipse, enabling continuous integration, and how to hack the instance (for example, to use Nginx as a frontend to Beanstalk).
The Amazon documentation for "Configuring Databases with AWS Elastic Beanstalk" describes the RDS settings in more detail.
You want to deploy your Lift application to your account on the Heroku cloud platform.
Package your Lift application as a WAR file and use the Heroku deploy plugin to send and run your application. This will give you an application running under Tomcat 7. Anyone can use this method to deploy an application, but Heroku provides support only for Enterprise Java customers.
This recipe walks through the process in three stages: one-time setup; deployment of the WAR; and configuration of your Lift application for production performance.
If you’ve not already done so, download and install the Heroku command-line tools ("Toolbelt") and log in using your Heroku credentials and upload an SSH key:
$ heroku login Enter your Heroku credentials. Email: you@example.org Password (typing will be hidden): Found the following SSH public keys: 1) github.pub 2) id_rsa.pub Which would you like to use with your Heroku account? 2 Uploading SSH public key ~/.ssh/id_rsa.pub... done Authentication successful.
Install the deploy plugin:
$ heroku plugins:install https://github.com/heroku/heroku-deploy Installing heroku-deploy... done
With that one-time setup complete, you can create an application on Heroku. Here we’ve not specified a name, so we are given a random name of "glacial-waters-6292" that we will use throughout this recipe:
$ heroku create Creating glacial-waters-6292... done, stack is cedar http://glacial-waters-6292.herokuapp.com/ | git@heroku.com:glacial-waters-6292.git
Before deploying, we set the Lift run mode to production. This is done via the config:set command. First check the current settings for JAVA_OPTS and then modify the options by adding -Drun.mode=production:
$ heroku config:get JAVA_OPTS --app glacial-waters-6292 -Xmx384m -Xss512k -XX:+UseCompressedOops $ heroku config:set JAVA_OPTS="-Drun.mode=production -Xmx384m -Xss512k -XX:+UseCompressedOops" --app glacial-waters-6292
We can deploy to Heroku by packaging the application as a WAR file and then running the Heroku deploy:war command:
$sbt package ....[info]Packaging target/scala-2.9.1/myapp-0.0.1.war ... ....$heroku deploy:war --war target/scala-2.9.1/myapp-0.0.1.war --app glacial-waters-6292 Uploading target/scala-2.9.1/myapp-0.0.1.war............done Deploying to glacial-waters-6292.........done Created release v6
Your Lift application is now running on Heroku.
There are a few important comments regarding Lift applications on Heroku. First, note that there’s no support for session affinity. This means if you deploy to multiple dynos (Heroku terminology for instances), there is no coordination over which requests go to which servers. As a consequence, you won’t be able to make use of Lift’s stateful features and will want to turn them off (Running Stateless describes how to do that).
Second, if you are using Lift Comet features, there’s an adjustment to make in Boot.scala to work a little better in the Heroku environment:
LiftRules.cometRequestTimeout=Full(25)
This setting controls how long Lift waits before testing a Comet connection. We’re replacing the Lift default of 120 seconds with 25 seconds, because Heroku terminates connections after 30 seconds. Although Lift recovers from this, the user experience may be to see a delay when interacting with a page.
A third important point to note is that the dyno will be restarted every day. Additionally, if you are only running one web dyno, it will be idled after an hour of inactivity. You can see this happening by tailing your application log:
$heroku logs -t --app glacial-waters-6292 ... 2012-12-31T11:31:39+00:00 heroku[web.1]: Idling 2012-12-31T11:31:41+00:00 heroku[web.1]: Stopping all processes with SIGTERM 2012-12-31T11:31:43+00:00 heroku[web.1]: Process exited with status 143 2012-12-31T11:31:43+00:00 heroku[web.1]: State changed from up to down
Anyone visiting your Lift application will cause Heroku to unidle your application.
Note, though, that the application was stopped with a SIGTERM. This is a Unix signal sent to a process, the JVM in this case, to request it to stop. Unfortunately, the Tomcat application on Heroku does not use this signal to request Lift to shut down. This may be of little consequence to you, but if you do have external resources you want to release to other actions to take at shutdown, you need to register a shutdown hook with the JVM.
For example, you might add this to Boot.scala if you’re running on Heroku:
Runtime.getRuntime().addShutdownHook(newThread{overridedefrun(){println("Shutdown hook being called")// Do useful clean up here}})
Do not count on being able to do much during shutdown. Heroku allows around 10 seconds before killing the JVM after issuing the SIGTERM.
Possibly a more general approach is to perform cleanup using Lift’s unload hooks (see Run Code When Lift Shuts Down) and then arrange the hooks to be called when Heroku sends the signal to terminate:
Runtime.getRuntime().addShutdownHook(newThread{overridedefrun(){LiftRules.unloadHooks.toList.foreach{f=>tryo{f()}}}})
This handling of SIGTERM may be a surprise, but if we look at how the application is running on Heroku, things become clearer. The dyno is an allocation of resources (512 MB of memory) and allows an arbitrary command to run. The command being run is a Java process starting a "webapp runner" package. You can see this in two ways. First, if you shell to your dyno, you’ll see a WAR file as well as a JAR file:
$heroku run bash --app glacial-waters-6292 Running`bash`attached to terminal... up, run.8802 ~$ls Procfile myapp-0.0.1.war webapp-runner-7.0.29.3.jar
Second, by looking at the processes executing:
$ heroku ps --app glacial-waters-6292
=== web: `${PRE_JAVA}java ${JAVA_OPTS} -jar webapp-runner-7.0.29.3.jar
--port ${PORT} ${WEBAPP_RUNNER_OPTS} myapp-0.0.1.war`
web.1: up 2013/01/01 22:37:35 (~ 31s ago)
Here we see a Java process executing a JAR file called webapp-runner-7.0.29.3.jar that is passed our WAR file as an argument. This is not identical to the Tomcat catalina.sh script you may be more familiar with, but instead is this launcher process. As it does not register a handler to deal with SIGTERM, we will have to if we need to release any resources during shutdown.
All of this means that if you want to launch a Lift application in a different way, you can. You’d need to wrap an appropriate container (Jetty or Tomcat, for example), and provide a main method for Heroku to call. This is sometimes called containerless deployment.
If you are not a Heroku Enterprise Java customer, and you’re uncomfortable with the unsupported nature of the deploy:war plugin, you now know what you need to do to run in a supported way: provide a main method that launches your application and listen for connections. The "See Also" section gives pointers for how to do this.
Heroku makes no restrictions on which databases you can connect to from your Lift application, but they try to make it easy to use their PostgreSQL service by attaching a free database to applications you create.
You can find out if you have a database by running the pg command:
$heroku pg --app glacial-waters-6292===HEROKU_POSTGRESQL_BLACK_URL(DATABASE_URL)Plan: Dev Status: available Connections: 0 PG Version: 9.1.6 Created: 2012-12-31 10:02 UTC Data Size: 5.9 MB Tables: 0 Rows: 0/10000(In compliance)Fork/Follow: Unsupported
The URL of the database is provided to your Lift application as the DATABASE_URL environment variable. It will have a value of something like this:
postgres://gghetjutddgr:RNC_lINakkk899HHYEFUppwG@ec2-54-243-230-119.compute-1. amazonaws.com:5432/d44nsahps11hda
This URL contains a username, password, host, and database name, but needs to be manipulated to be used by JDBC. To do so, you might include the following in Boot.scala:
Box!!System.getenv("DATABASE_URL")match{caseFull(url)=>initHerokuDb(url)case_=>// configure local database perhaps}definitHerokuDb(dbInfo:String){Class.forName("org.postgresql.Driver")// Extract credentials from Heroku database URL:valdbUri=newURI(dbInfo)valArray(user,pass)=dbUri.getUserInfo.split(":")// Construct JDBC connection string from the URI:defconnection=DriverManager.getConnection("jdbc:postgresql://"+dbUri.getHost+':'+dbUri.getPort+dbUri.getPath,user,pass)SquerylRecord.initWithSquerylSession(Session.create(connection,newPostgreSqlAdapter))}
Here we are testing for the presence of the DATABASE_URL environment variable, which would indicate that we are in the Heroku environment. We can then extract out the connection information to use in Session.create. We would additionally need to complete the usual addAround configuration described in Configuring Squeryl and Record.
For it to run, build.sbt needs the appropriate dependencies for Record and PostgreSQL:
..."postgresql"%"postgresql"%"9.1-901.jdbc4","net.liftweb"%%"lift-record"%liftVersion,"net.liftweb"%%"lift-squeryl-record"%liftVersion,...
With this in place, your Lift application can make use of the Heroku database. You can also access the database from the shell, for example:
$ pg:psql --app glacial-waters-6292 psql (9.1.4, server 9.1.6) SSL connection (cipher: DHE-RSA-AES256-SHA, bits: 256) Type "help" for help. d44nsahps11hda=> \d No relations found. d44nsahps11hda=> \q $
To access via a JDBC tool outside of the Heroku environment, you’ll need to include parameters to force SSL. For example:
jdbc:postgresql://ec2-54-243-230-119.compute-1.amazonaws.com:5432/d44nsahps11hda?username=gghetjutddgr&password=RNC_lINakkk899HHYEFUppwG&ssl=true&sslfactory=org.postgresql.ssl.NonValidatingFactory
The Scala and Java articles at Heroku, and Dynos and the Dyno Manager, are useful to learn more of the details described in this recipe.
The JVM shutdown hooks are described in the JDK documentation.
Heroku’s guide to containerless deployment makes use of Maven to package your application. There is also a template SBT project from Matthew Henderson that includes a JettyLauncher class.
Request Timeout describes how Heroku deals with Comet long polling.
Ask a question on the Lift mailing list.
You will find some information about Lift on StackOverflow, Quora, and elsewhere, but the mailing list is the place to go to get help and support. You can search the archive to see if your question has already been addressed, but questions are very welcome as it helps the Lift community understand what users need and what might be causing problems or need explanation. Much of what you’re reading here originates from questions that have been asked on the mailing list.
New members to the mailing list are moderated to help reduce spam. This means the first time you post, your message may take a few hours to show up.
The Lift community is one of the things that makes Lift what it is. Please take a look at http://liftweb.net/community before posting: you’ll get the best response with a polite question.
If you need paid consulting, development, or SLA-backed support, there’s a list of organizations on the wiki.
Discuss your findings on the Lift mailing list, describing what you’re seeing, and what you’d expected to see.
By all means look at the existing tickets to see if your issue is there or recently fixed, but please do not raise a ticket unless asked to do so by a Lift committer on the mailing list.
If Lift is not behaving as you expect, please ask questions about what you’re seeing. The ideal form of these questions is "When I do X, my Lift app does Y, but I expect it to do Z, why?" This provides a set of language to discuss your application and the way that Lift responds to requests. Perhaps there’s a way of improving Lift. Perhaps there’s a concept that’s different in Lift than you might be used to. Perhaps there’s a documentation issue that can help bridge the gap between what Lift is doing and what you expect it to do. Most importantly, just because Lift is behaving differently than you expect it to, it’s not necessarily a bug in Lift.
David Pollack, http://bit.ly/lift-expects
A great way to get help with the issue you have, or get a bug fixed, is to produce a small example to illustrate the problem and post it on GitHub. The key is to provide instructions so someone can run the example and see exactly what you see without having to jump through hoops.
You’ll find a list of tickets at http://ticket.liftweb.net/.
If you’re asked to, or want to, post example code, please follow the guide.
If you’ve found a bug, and you’re asked to create a ticket, the main thing to do is include a link to the mailing list discussion of the issue, as described in Creating tickets.
You have a small change or ScalaDoc improvement you’d like incorporated into Lift.
You can issue pull requests against the Lift source, providing your change meets one of the following requirements:
It’s a change to a comment.
It’s example code.
It’s a small change, enhancement, or bug fix to Lift.
Your pull request must include an edit to add your signature to the bottom of the contributors.md file.
Historically, Lift had a strict contributor policy of simply not accepting any code contributions except from committers who had signed an agreement to assign copyright to the Lift project. This allowed corporations wanting to adopt Lift to do so without litigation concerns.
The safety is still there, now via the requirement for a signature on the contributors file, which reads:
By submitting this pull request which includes my name and email address (the email address may be in a non-robot readable format), I agree that the entirety of the contribution is my own original work, that there are no prior claims on this work including, but not limited to, any agreements I may have with my employer or other contracts, and that I license this work under an Apache 2.0 license.
What’s a small change? That’s a good question, and if you’re unsure, talk about your proposed change on the mailing list.
This contribution policy was introduced in November 2012.
The contributors.md file is found on GitHub.
The Lift source is on GitHub. The framework project is probably the one you want, although you’ll also find Git repositories for examples and Lift websites there.
GitHub provides an introduction to pull requests.
Sharing Code in Modules describes how to share code of any size via Lift modules.
Update or add to the Lift wiki.
You’ll need to sign in, or create a free account, with Assembla, the company that hosts the wiki. You then need to become a watcher of the Lift wiki, which is offered as a link on the top right of the Lift wiki page. As a watcher, you can edit pages and create new pages.
If you’re unsure about a change you’d like to make, just ask for feedback on the Lift mailing list.
One limitation of the watcher role on Assembla is that you cannot move pages. If you create a new page in the wrong section, or want to reorganise pages, you’ll need to ask on the Lift mailing list for someone with permissions to do that for you.
The markup format for the wiki pages is Textile.
If you’re comfortable using Git, you can fork the repository and send a pull request.
Alternatively, download a template file, write your recipe, and email it to the Lift mailing list.
You can find the template file on GitHub.
Anything you’ve puzzled over, or things that have surprised you, impressed you, or are nonobvious are great topics for recipes. Improvements, discussions, and clarifications of existing recipes are welcome, too.
The cookbook is structured using a markup language called AsciiDoc. If you’re familiar with Markdown or Textile, you’ll find similarities. For the cookbook, you only need to know about section headings, source code formatting, and links. Examples of all of these are in the template.asciidoc file.
To find out where to make a change, you need to know that each chapter is a separate file, and each recipe is a section in that file.
We ask contributors the following:
You agree to license your work (including the words you write, the code you use, and any images) to us under the Creative Commons Attribution, Non Commercial, No Derivatives license.
You assert that the work is your own, or you have the necessary permission for the work.
To keep things simple, all author royalties from this book are given to charity.
The source to this book is on GitHub.
The AsciiDoc cheatsheet is a quick way to get into AsciiDoc, but if you need more, the AsciiDoc home page has the details.
GitHub provides an introduction to pull requests.
Contributing Documentation describes other ways to contribute documentation to Lift.
You have code you’d like to share between Lift projects or with the community.
Create a Lift module, and then reference the module from your Lift projects.
As an example, let’s create a module to embed the snowstorm snowfall effect on every page in your Lift web application (please don’t do this).
There’s nothing special about modules: they are coded, packaged, and used like any other dependency. What makes them possible is the exposure of extension points via LiftRules. The main convention is to have an init method that Lift applications can use to initialise your module.
For our snowstorm, we’re going to package some JavaScript and inject the script onto every page.
Starting with the lift_blank template downloaded from liftweb.net, we can remove all the source and HTML files, as this won’t be a runnable Lift application in itself. However, it will leave us with the regular Lift structure and build configuration.
Our module will need the snowstorm JavaScript file copied as resources/toserve/snowstorm.js. This will place the JavaScript file on the classpath of our Lift application.
The final piece of the module is to ensure the JavaScript is included on every page:
packagenet.liftmodules.snowstormimportnet.liftweb.http._objectSnowstorm{definit():Unit={ResourceServer.allow{case"snowstorm.js"::Nil=>true}defaddSnow(s:LiftSession,r:Req)=S.putInHead(<scripttype="text/javascript"src="/classpath/snowstorm.js"></script>)LiftSession.onBeginServicing=addSnow_::LiftSession.onBeginServicing}}
Here we are plugging into Lift’s processing pipeline and adding the required JavaScript to the head of every page.
We modify build.sbt to give the module a name, organisation, and version number. We also can remove many of the dependencies and the web plugin as we only depend on the web API elements of Lift:
name:="snowstorm"version:="1.0.0"organization:="net.liftmodules"scalaVersion:="2.9.1"resolvers++=Seq("snapshots"at"http://oss.sonatype.org/content/repositories/snapshots","releases"at"http://oss.sonatype.org/content/repositories/releases")scalacOptions++=Seq("-deprecation","-unchecked")libraryDependencies++={valliftVersion="2.5"Seq("net.liftweb"%%"lift-webkit"%liftVersion%"compile")}
We can publish this plugin to the repository on disk by starting SBT and typing:
publish-local
With our module built and published, we can now include it in our Lift applications. To do that, modify the Lift application’s build.sbt to reference this new "snowstorm" dependency:
libraryDependencies++={valliftVersion="2.5"Seq(..."net.liftmodules"%%"snowstorm"%"1.0.0",...
In our Lift application’s Boot.scala, we finally initialise the plugin:
importnet.liftmodules.snowstorm.SnowstormSnowstorm.init()
When we run our Lift application, white snow will be falling on every page, supplied by the module.
The module is self contained: there’s no need for users to copy JavaScript files around or modify their templates. To achieve that, we’ve made use of ResourceServer. When we reference the JavaScript file via /classpath/snowstorm.js, Lift will attempt to locate snowstorm.js from the classpath. This is what we want for our Lift application, because snowstorm.js will be inside the module JAR file.
However, we do not want to expose all files on the classpath to anyone visiting our application. To avoid that, Lift looks for resources inside a toserve folder, which for our purposes means files and folders inside src/main/resources/toserve. You can think of /classpath meaning toserve (although, you can change those values via LiftRules.resourceServerPath and ResourceServer.baseResourceLocation).
As a further precaution, you need to explicitly allow access to these resources. That’s done with:
ResourceServer.allow{case"snowstorm.js"::Nil=>true}
We’re just always returning true for anyone who asks for this resource, but we could dynamically control access here if we wanted.
S.putInHead adds the JavaScript to the head of a page and is triggered on every page by LiftSession.onBeginServicing (also discussed in Running Code When Sessions Are Created (or Destroyed)). We could make use of Req here to restrict the snowstorm to particular pages, but we’re adding it to every page.
Hopefully you can see that anything you can do in a Lift application you can probably turn into a Lift module. A typical approach might be to have functionality in a Lift application, and then factor out settings in Boot into a module init method. For example, if you wanted to provide REST services as a module, that would be possible and is an approach taken by the Lift PayPal module.
If you do want your module to be used by a wider audience, you need to publish it to a public repository, such as Sonatype or CloudBees. You’ll also want to keep your module up-to-date with Lift releases. There are a few conventions around this.
One convention is to include the Lift "edition" as part of the module name. For example, version 1.0.0 of your foo module for Lift 2.5 would have the name foo_2.5. This makes it clear your module is compatible with Lift for all of 2.5, including milestones, release candidates, snapshots, and final releases. It also means you need to publish your module only once, at least until Lift 2.6 or 3.0 is available.
One way to manage updates is to make a modification to your module build to allow the Lift version number to change. This makes it possible to automate the build when new versions of Lift are released. To do that, create project/LiftModule.scala in your module:
importsbt._importsbt.Keys._objectLiftModuleBuildextendsBuild{valliftVersion=SettingKey[String]("liftVersion","Full version number of the Lift Web Framework")valliftEdition=SettingKey[String]("liftEdition","Lift Edition (short version number to append to artifact name)")valproject=Project("LiftModule",file("."))}
This defines a setting to control the Lift version number. You use it in your module build.sbt like this:
name:="snowstorm"organization:="net.liftmodules"version:="1.0.0-SNAPSHOT"liftVersion<<=liftVersion??"2.5-SNAPSHOT"liftEdition<<=liftVersionapply{_.substring(0,3)}name<<=(name,liftEdition){(n,e)=>n+"_"+e}...libraryDependencies<++=liftVersion{v=>"net.liftweb"%%"lift-webkit"%v%"provided"::Nil}
Note the "provided" configuration for Lift in the build file. This means that when your module is used, the version of Lift’s WebKit will be the version provided by the application being built by the person using your module.
What the previous code gives you is a way for your module to depend on Lift ("2.5"), without locking your module into a specific release if it happens to be built with "2.5-SNAPSHOT." By using a setting of liftVersion, we can control the version via a script for all modules. This is what we do to publish a range of Lift modules after each Lift release, as described on the Lift wiki.
When your module is built, don’t forget to announce it on the Lift mailing list.
When working on a module and testing it in a Lift application, it would be a chore to have to publish your module each time you changed it. Fortunately, SBT allows your Lift application to depend on the source of a module. To use this, change your Lift project to remove the dependency on the published module and instead add a local dependency by creating project/LocalModuleDev.scala:
importsbt._objectLocalModuleDevextendsBuild{lazyvalroot=Project("",file("."))dependsOn(snow)lazyvalsnow=ProjectRef(uri("../snowstorm"),"LiftModule")}
We are assuming that the snowstorm source can be found at ../snowstorm relative to the Lift application we are using. With this in place, when you build your Lift project, SBT will automatically compile and depend on changes in the local snowstorm module.
Originally, Lift included a set of modules, but these have been separated out to individual projects. The Lift contributor policy outlined in Contributing Small Code Changes and ScalaDoc doesn’t apply to Lift modules: you’re free to contribute to these modules as you would any other open source project.
The Lift wiki pages for modules can be reached via http://liftmodules.net.
The Snowstorm project has been "setting CPUs on fire worldwide every winter since 2003," and the module developed for this recipe is on GitHub.
To publish to Sonatype, take a look at their guide. CloudBees offers an open source repository.
There are other ways to structure common code between Lift applications. For an example that uses SBT modules and Git, see the mailing list discussion on "Modularize Lift Applications".
The animal on the cover of Lift Cookbook is an American lobster (Homarus americanus), a species of lobster found on the Atlantic coast of North America.
The cover image is from an unknown source. The cover font is Adobe ITC Garamond. The text font is Adobe Minion Pro; the heading font is Adobe Myriad Condensed; and the code font is Dalton Maag's Ubuntu Mono.